1. GSTR-1 क्या है और किसे File करना है?
GSTR-1 एक monthly (या quarterly) outward supply return है जिसमें आप अपनी सभी sales सरकार को declare करते हैं। आपका filed data आपके buyers के GSTR-2B में auto-populate होता है उनके Input Tax Credit claims के लिए।
| Taxpayer Type | Filing Frequency | Due Date |
|---|---|---|
| Regular Taxpayer (Monthly) | हर महीने | 11th of next month |
| QRMP Scheme (Quarterly) | हर quarter | 13th after quarter ends |
| Nil Return (zero sales) | Monthly — फिर भी जरूरी | 11th of next month |
| New Registration | Registration month से | 11th of next month |
2. Due Dates — Month-wise (FY 2025–26)
किसी महीने की GSTR-1 अगले महीने की 11 तारीख तक file करें। उदाहरण — January 2026 की sales, 11 February 2026 तक।
| Return Period | Due Date (Monthly) | Status |
|---|---|---|
| April 2025 | 11 May 2025 | Filed |
| May 2025 | 11 June 2025 | Filed |
| June 2025 | 11 July 2025 | Filed |
| July 2025 | 11 August 2025 | Filed |
| August 2025 | 11 September 2025 | Filed |
| September 2025 | 11 October 2025 | Filed |
| October 2025 | 11 November 2025 | Filed |
| November 2025 | 11 December 2025 | Filed |
| December 2025 | 11 January 2026 | Filed |
| January 2026 | 11 February 2026 | Filed |
| February 2026 | 11 March 2026 | Filed |
| March 2026 | 11 April 2026 | Filed |
| April 2026 | 11 May 2026 | Due Soon |
| May 2026 | 11 June 2026 | Upcoming |
QRMP Scheme — Quarterly Due Dates (FY 2025-26)
| Quarter | Period | Due Date |
|---|---|---|
| Q1 | April – June 2025 | 13 July 2025 |
| Q2 | July – September 2025 | 13 October 2025 |
| Q3 | October – December 2025 | 13 January 2026 |
| Q4 | January – March 2026 | 13 April 2026 |
3. सही Financial Year कैसे Select करें
GST portal पर गलत Financial Year (FY) select करना सबसे आम गलतियों में से एक है — इससे return गलत period में file हो जाती है और सुधारना बेहद मुश्किल होता है।
India का Financial Year: April से March
| Sales Month | Select Financial Year | Example |
|---|---|---|
| April 2024 – March 2025 | 2024-25 | Sales in May 2024 → FY 2024-25 |
| April 2025 – March 2026 | 2025-26 | Sales in January 2026 → FY 2025-26 |
| April 2026 – March 2027 | 2026-27 | Sales in April 2026 → FY 2026-27 |
4. Step-by-Step Filing Process
Login करें, navigate करें, data enter करें, preview करें और file करें — हर screen पर exactly क्या करना है।
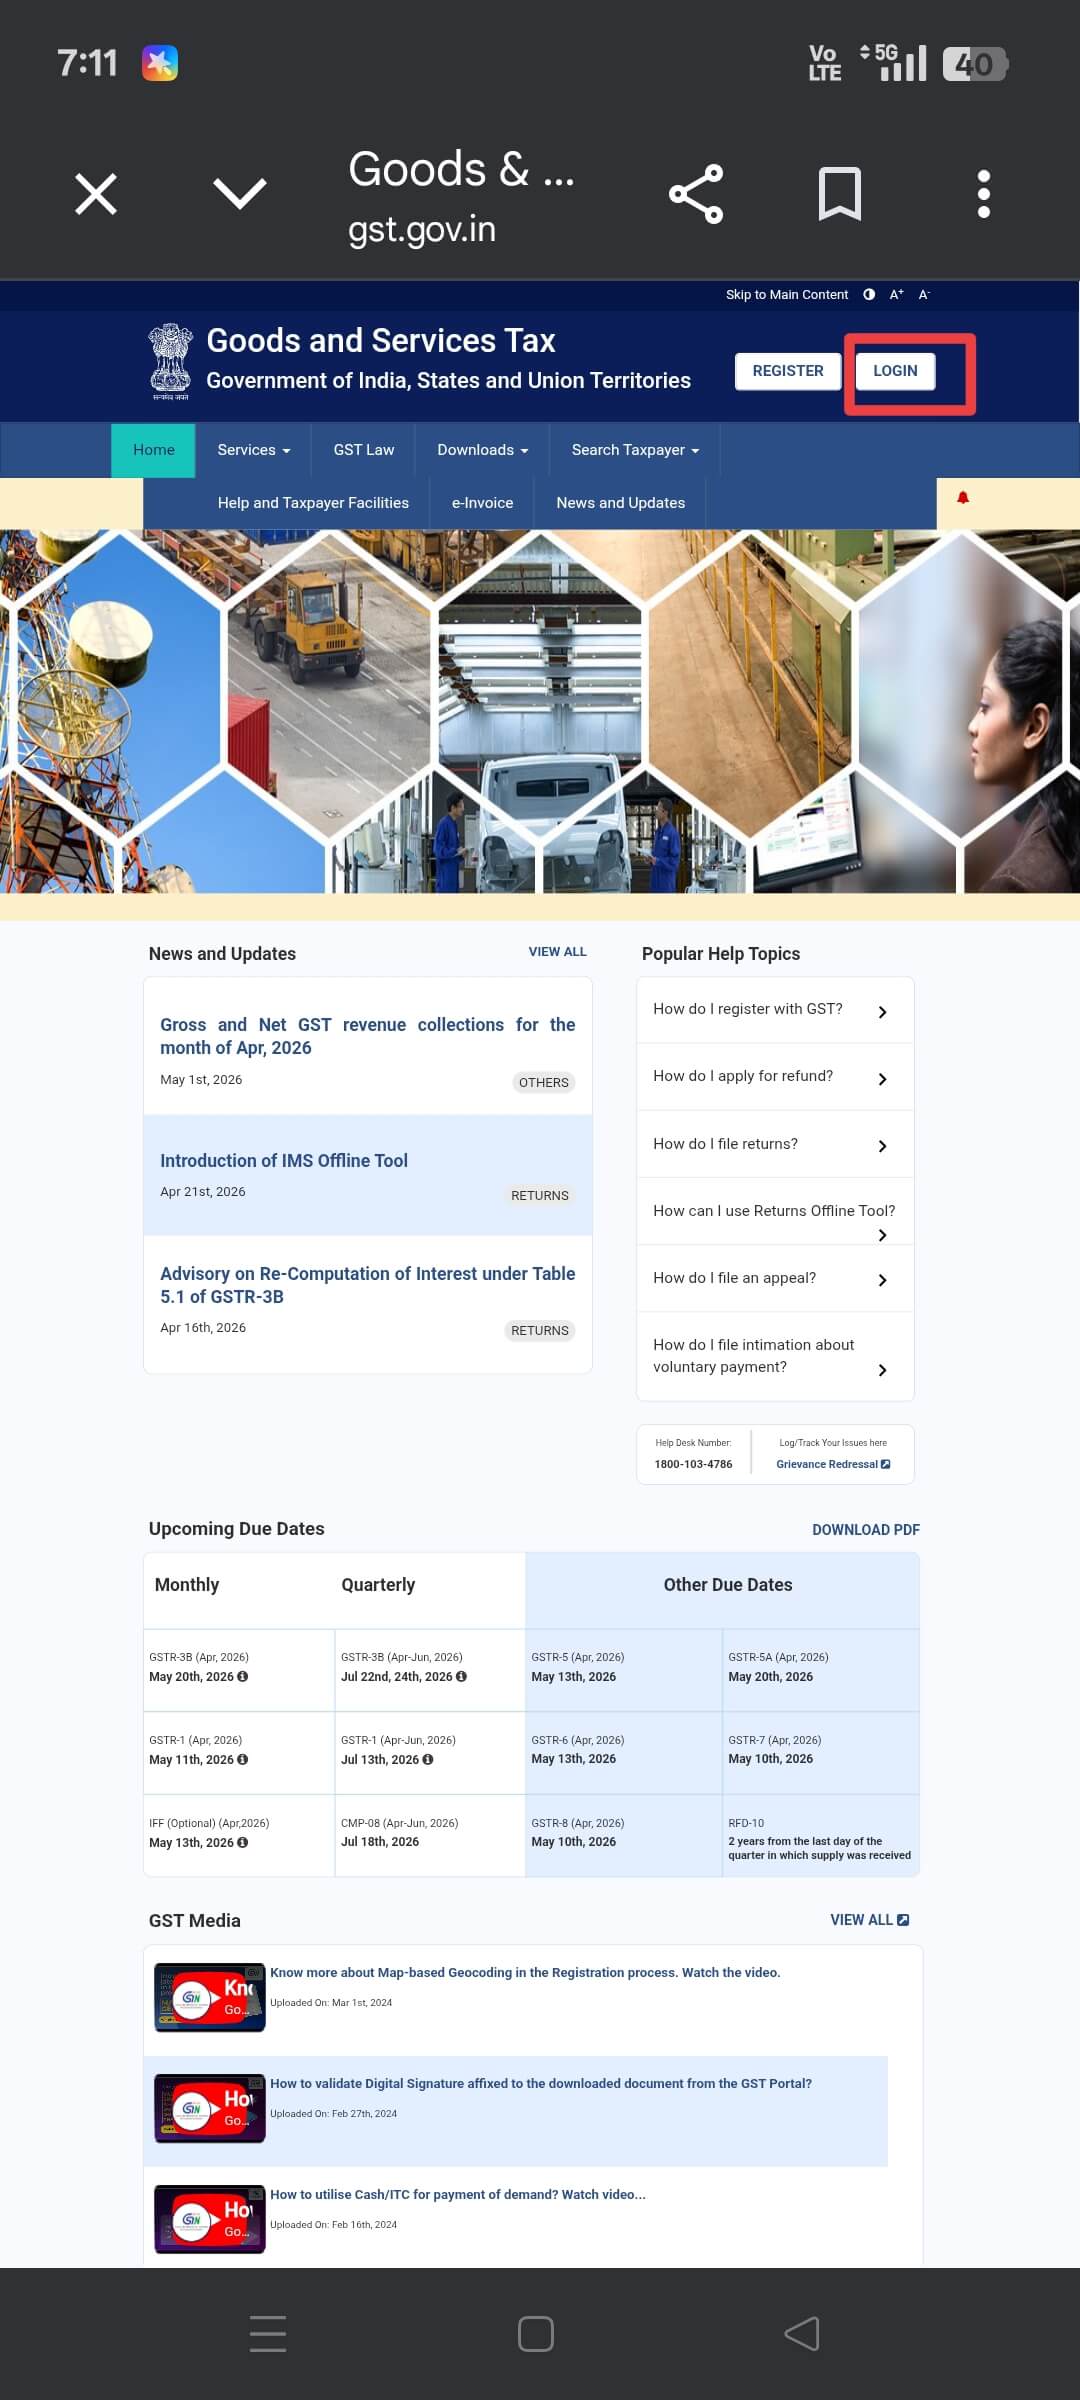
gst.gov.in browser में खोलें। ऊपर दाईं तरफ "Login" click करें, Username, Password और Captcha enter करें, फिर Login click करें।
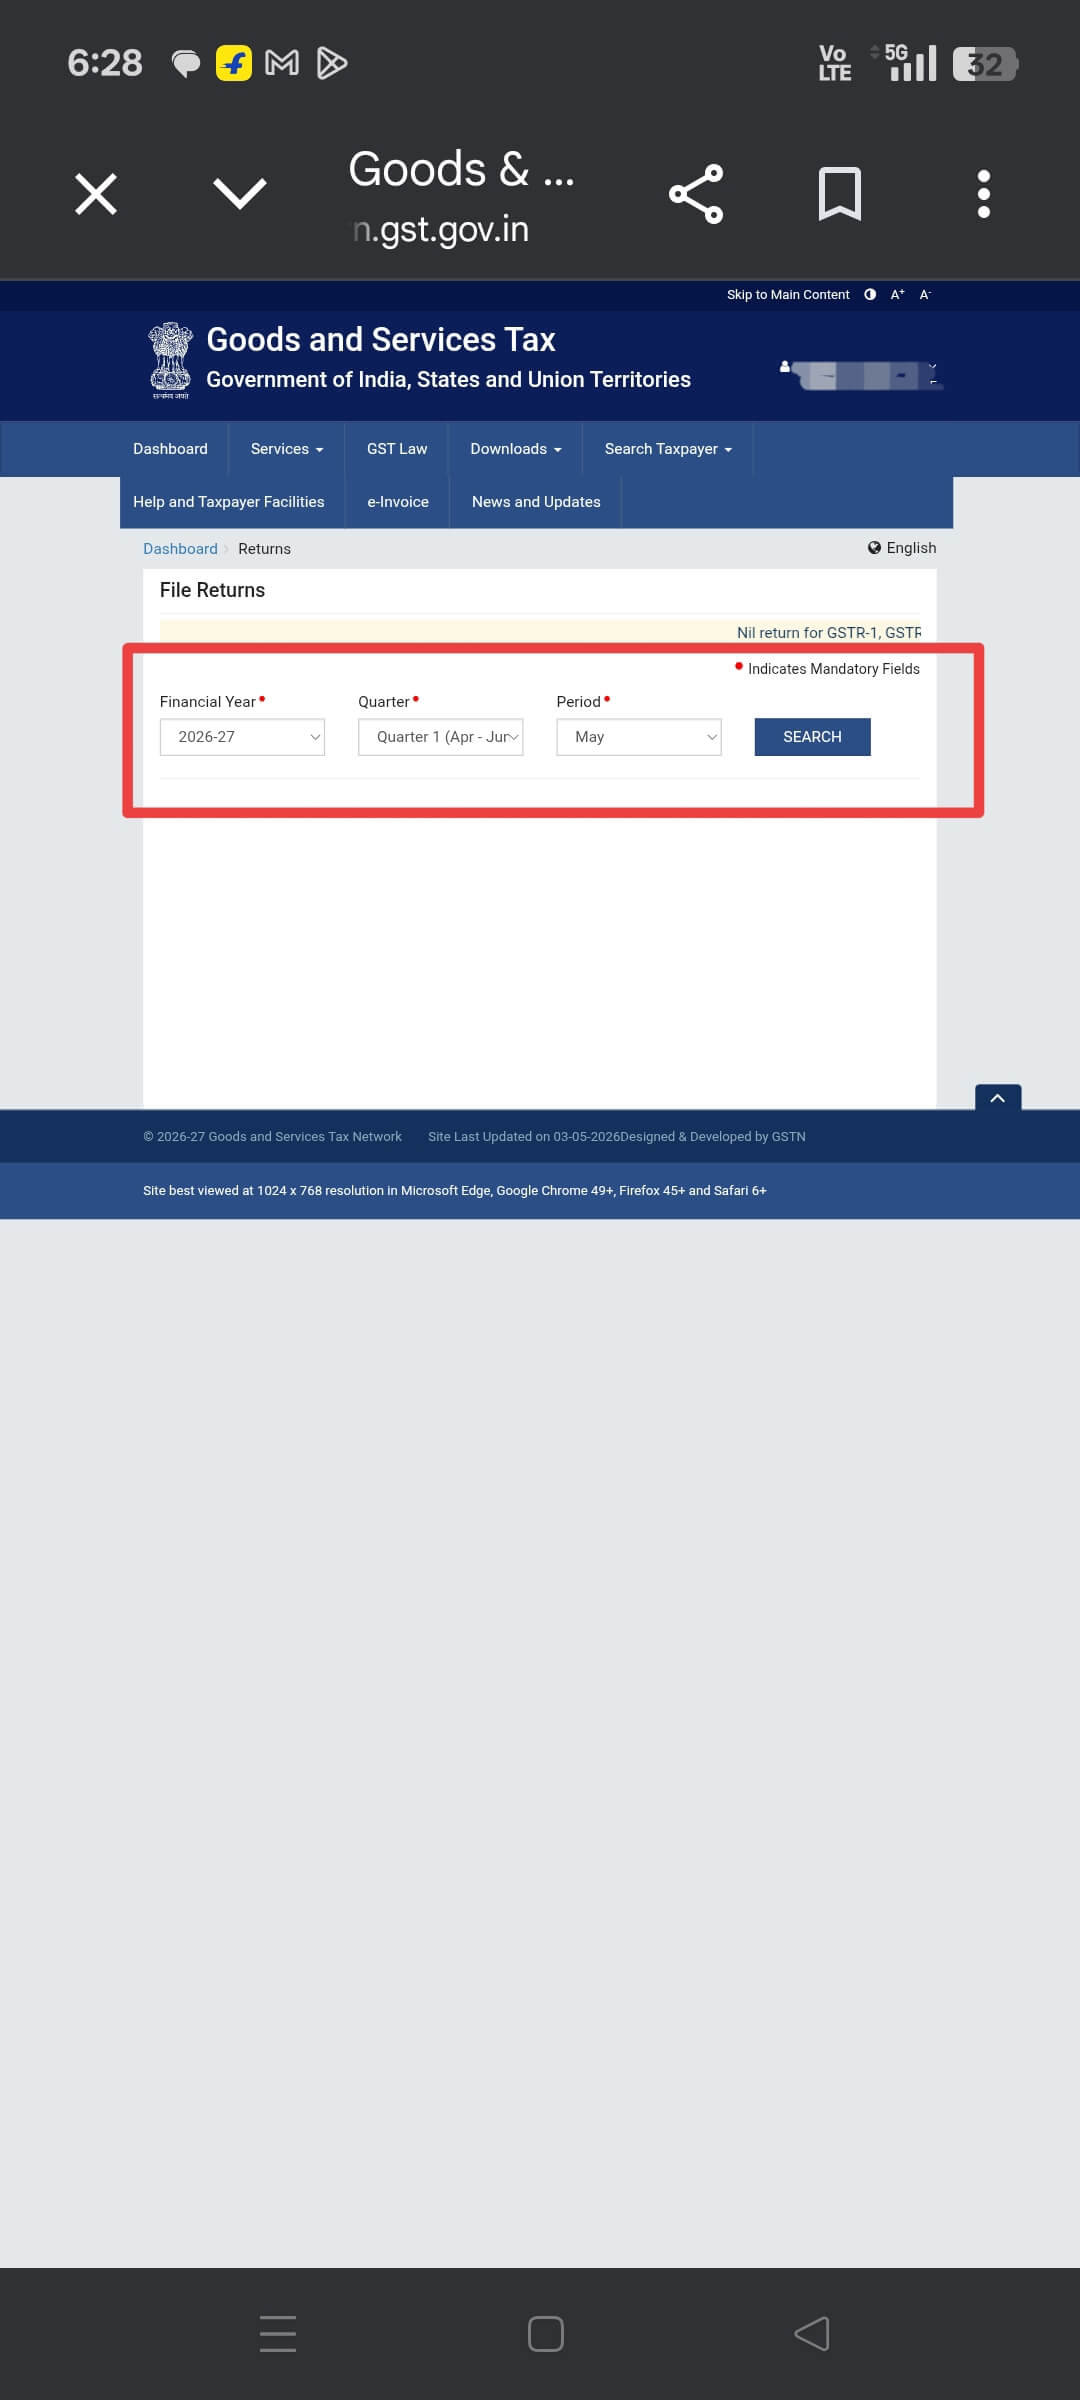
Login के बाद Services → Returns → Returns Dashboard पर जाएं। Dropdowns से Financial Year और Return Period (month) select करें।
| Filing For | Select FY | Select Period |
|---|---|---|
| Sales in January 2026 | 2025-26 | January |
| Sales in April 2025 | 2025-26 | April |
| Sales in March 2025 | 2024-25 | March |
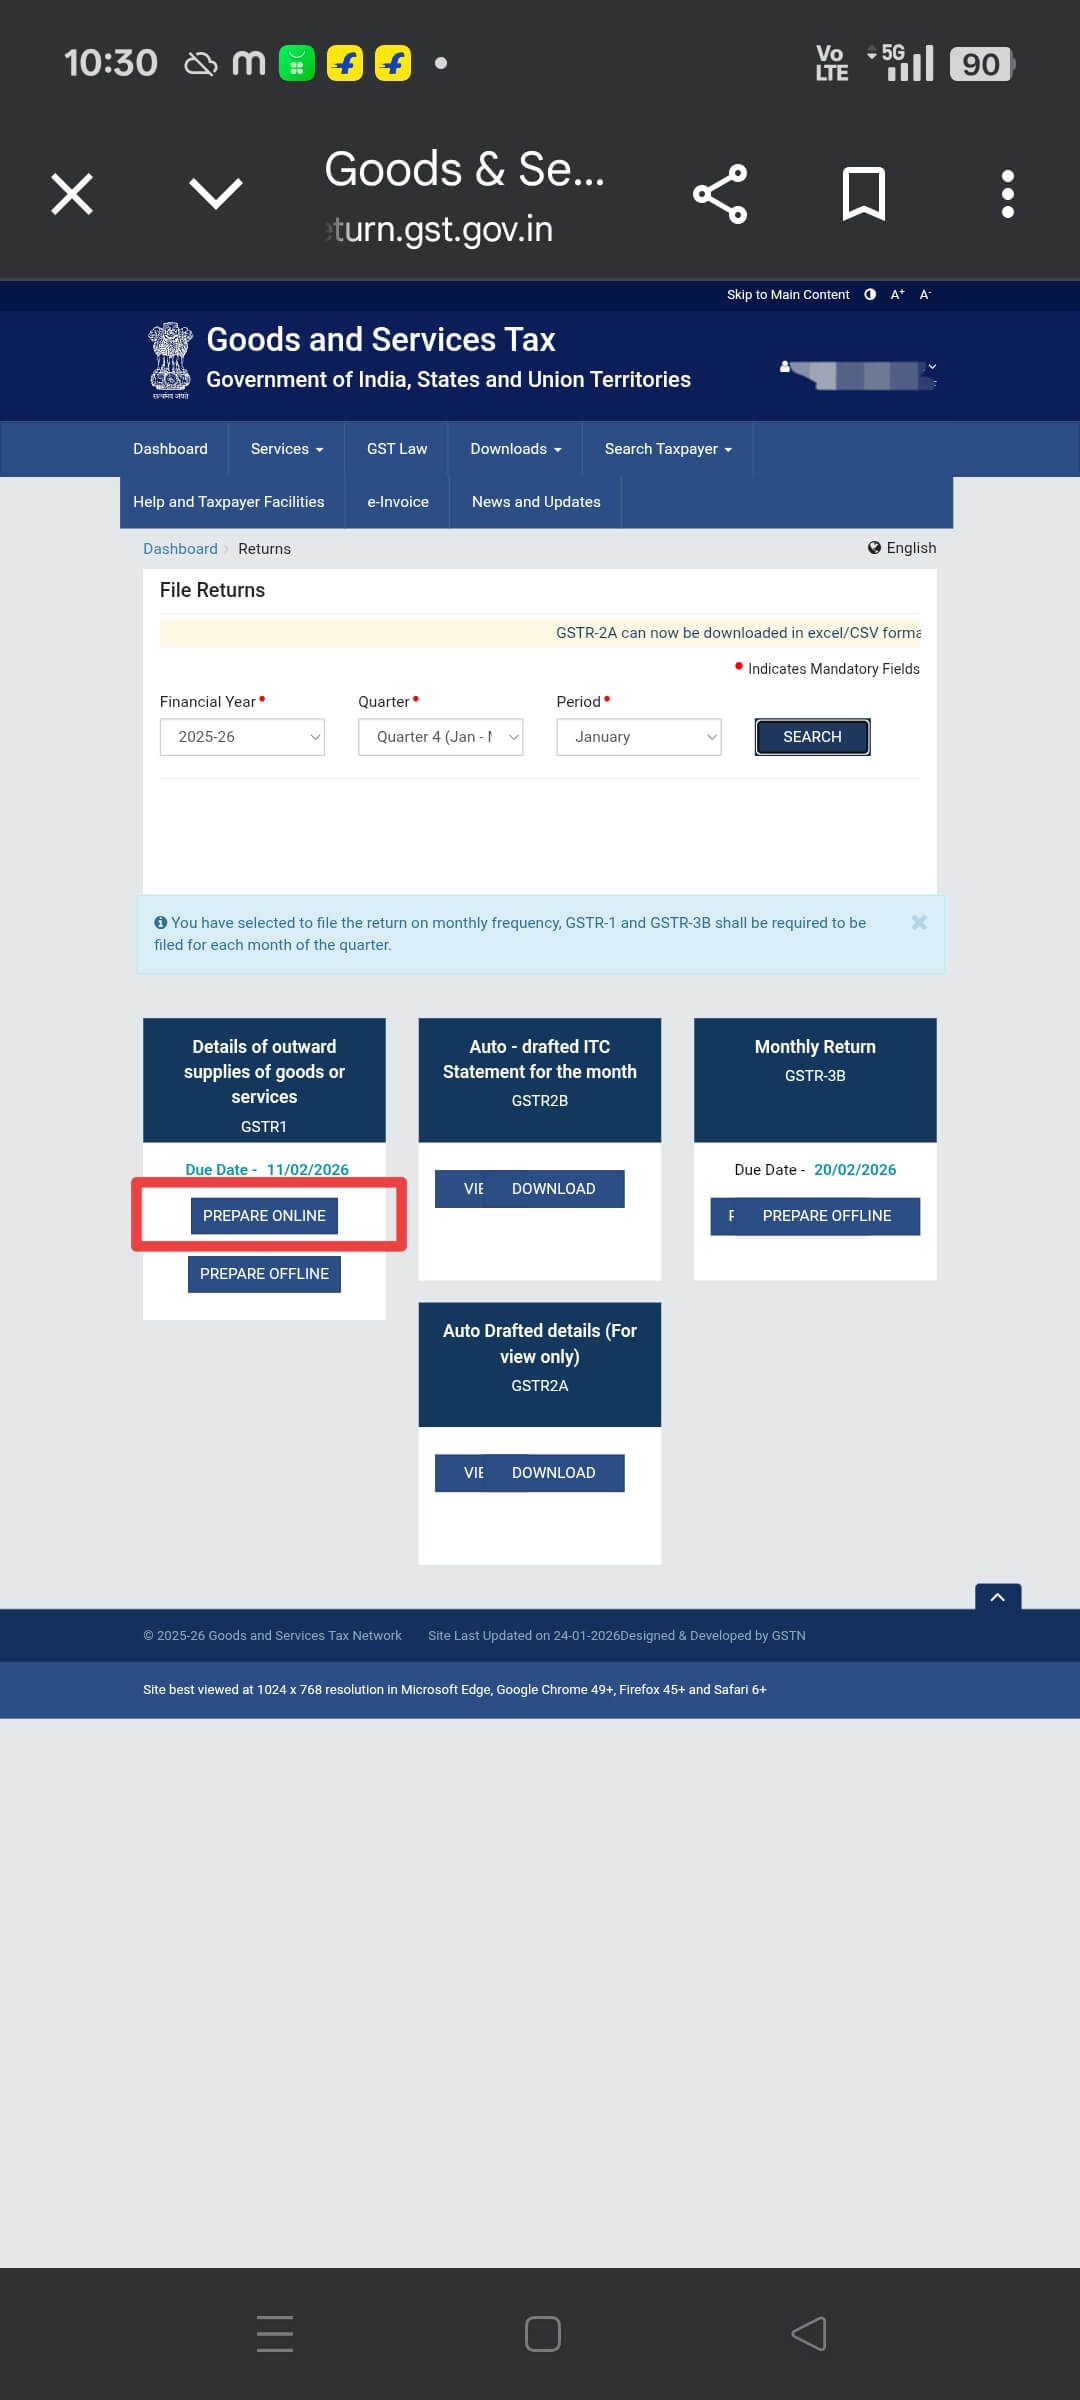
Dashboard पर GSTR-1 tile दिखेगी। उस पर click करें, फिर "Prepare Online" select करें — portal पर directly data enter करने के लिए।
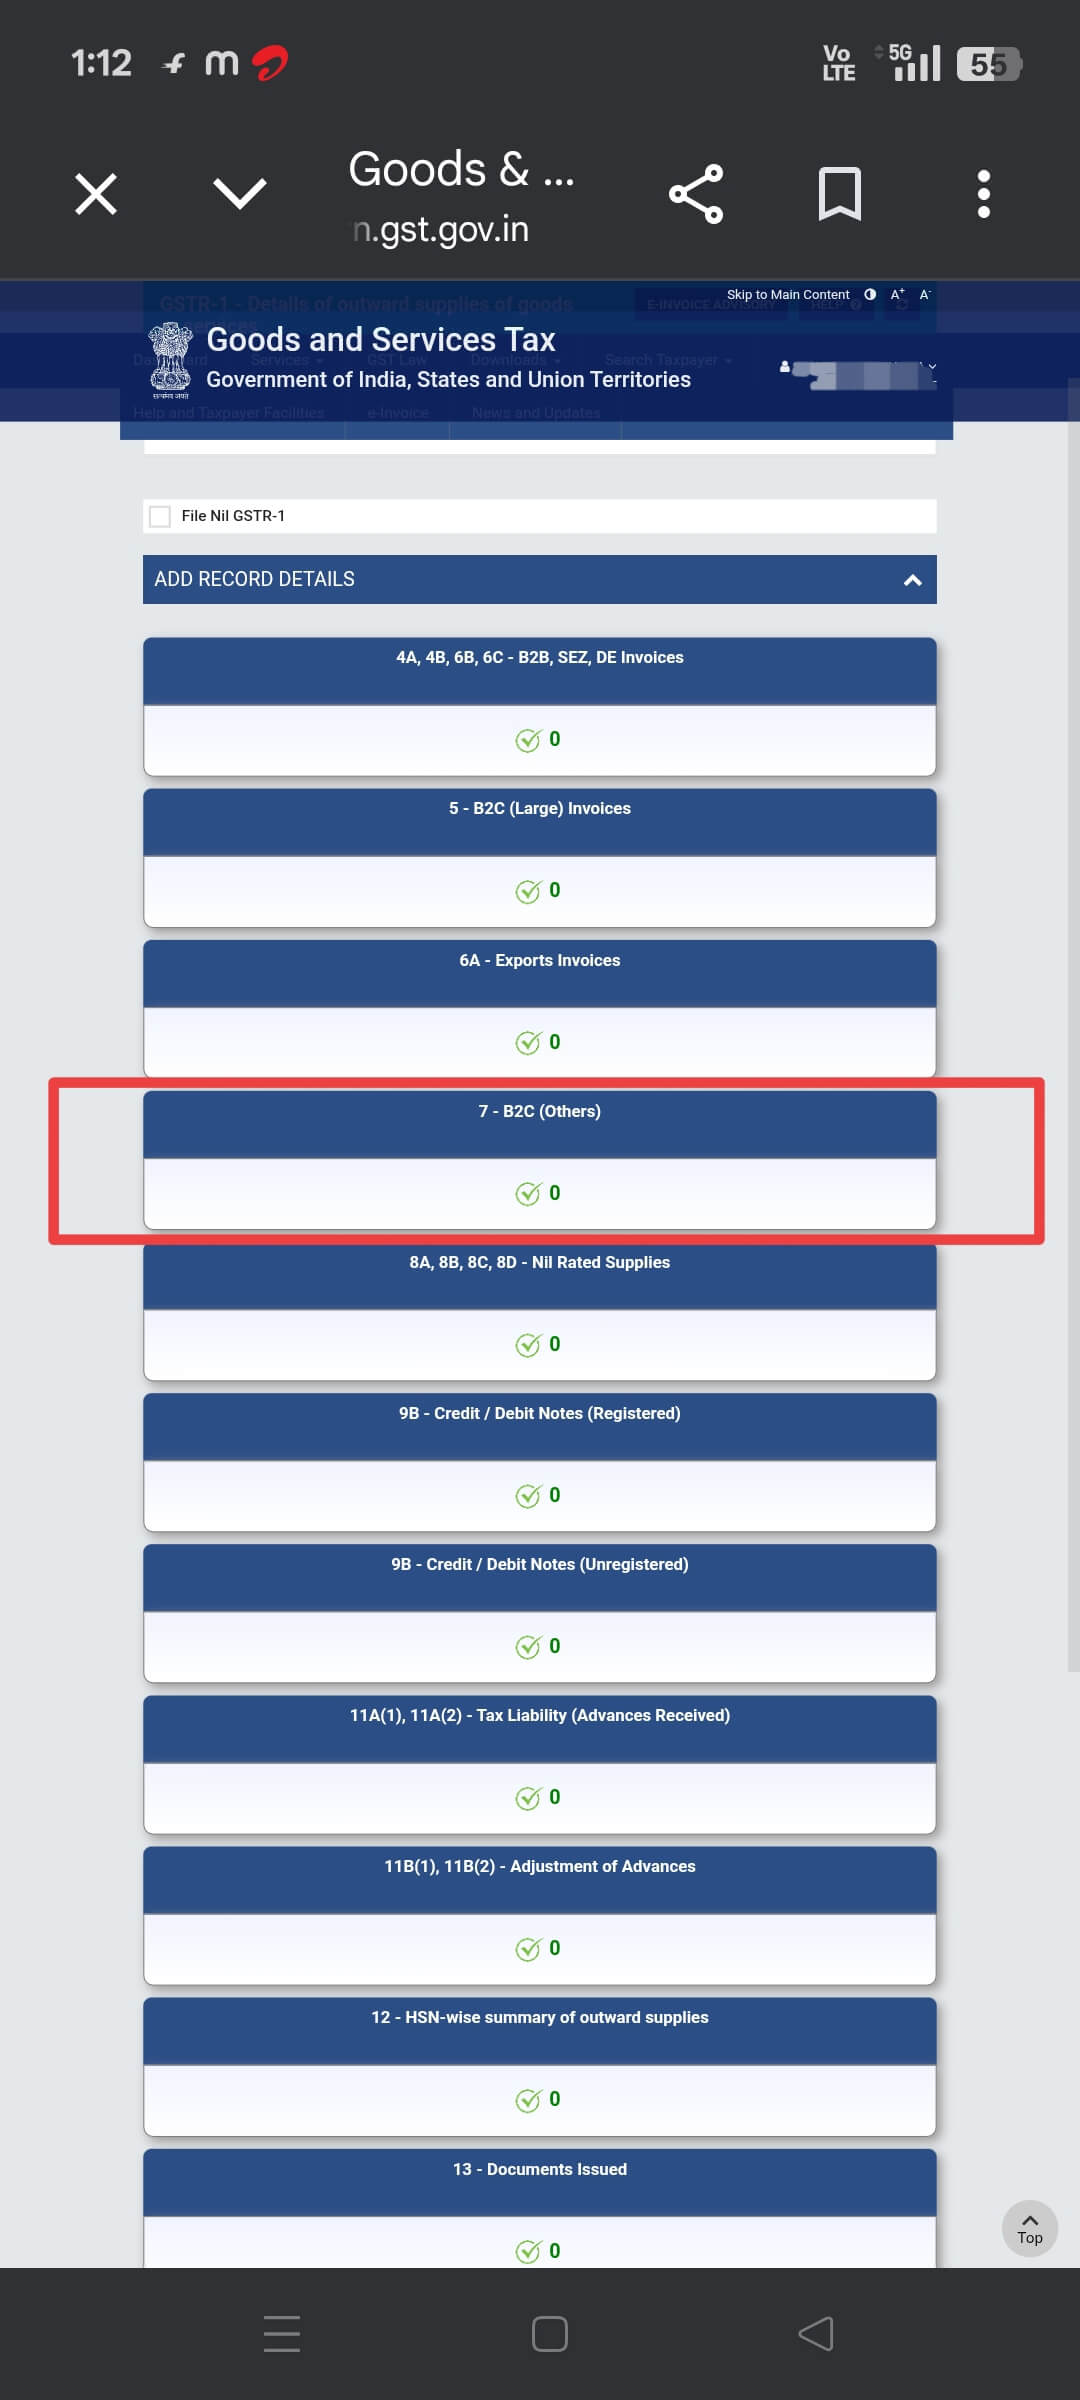
Online platforms पर individual consumers को की गई sales Table 7 — B2C Others में जाती है (invoice value ₹2.5 lakh से कम)।
| Field | What to Enter | Example |
|---|---|---|
| Type of Supply | Intra-state (CGST+SGST) or Inter-state (IGST) | Seller in Assam, buyer in Delhi → Inter-state (IGST) |
| Place of Supply | Buyer's state | Delhi, Maharashtra, West Bengal |
| Rate of Tax | Product's applicable GST rate | 5%, 12%, 18%, 28% |
| Taxable Value | Sale value excluding GST | ₹10,000 (MRP ₹10,500 at 5% GST) |
अगर आपने किसी GST-registered business को goods बेचे, तो वो Table 4A (B2B supplies) में जाएंगे। Buyer का GSTIN, invoice number, date, value, HSN code और tax rate enter करें।
अगर आप कोई nil-rated या exempt products बेचते हैं (जैसे unbranded food, fresh produce), तो उन्हें Table 8 में declare करें — भले ही कोई tax नहीं लगता।
| Supply Type | Example Products | Table |
|---|---|---|
| Nil Rated (0% GST) | Unbranded flour, rice, salt | Table 8 |
| Exempted | Fresh fruits, vegetables | Table 8 |
| Non-GST Supply | Alcohol, petroleum | Table 8 |
HSN (Harmonized System of Nomenclature) एक international product code है। Table 12 में अपनी सभी sales को HSN code के अनुसार group करें और हर group के totals enter करें।
| Annual Turnover | Required HSN Digits | Example |
|---|---|---|
| Below ₹5 Crore | 4-digit HSN | 6109 (T-shirts) |
| Above ₹5 Crore | 6-digit HSN | 610910 (T-shirts, cotton) |
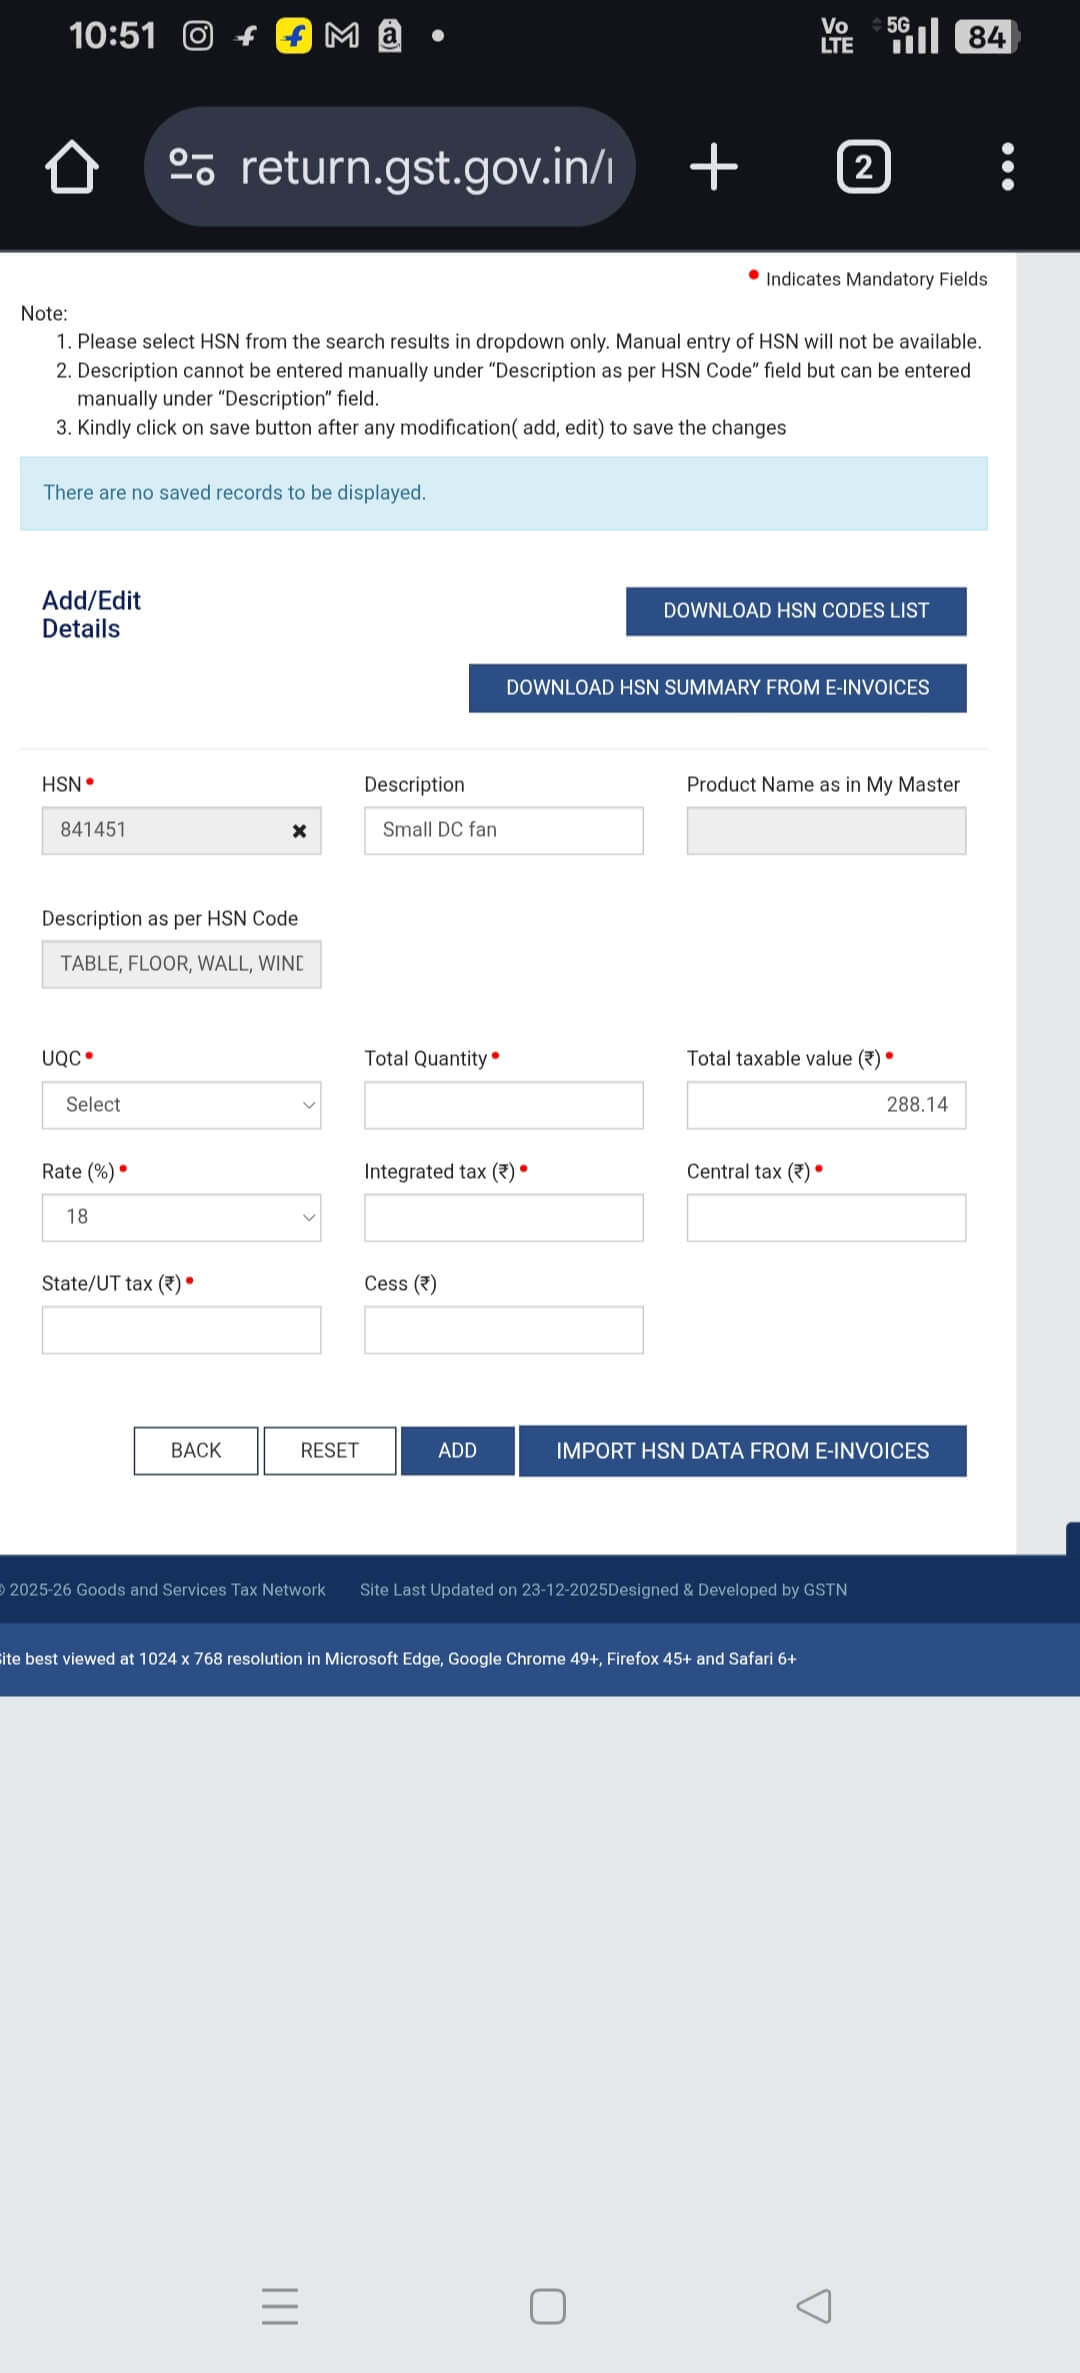
सारा data enter करने के बाद "Generate Summary" click करें। Portal को process करने में थोड़ा समय लगता है — page refresh करें और लगभग 1 मिनट इंतज़ार करें — फिर अगला button activate हो जाएगा। "Preview" click करके अपनी entries का PDF download करें।
Verify in the preview PDF:
- Total taxable value सही है?
- CGST + SGST / IGST amounts सही हैं?
- सभी states और HSN codes cover हुए?
- Gross sales से RTO returns deduct हुए?
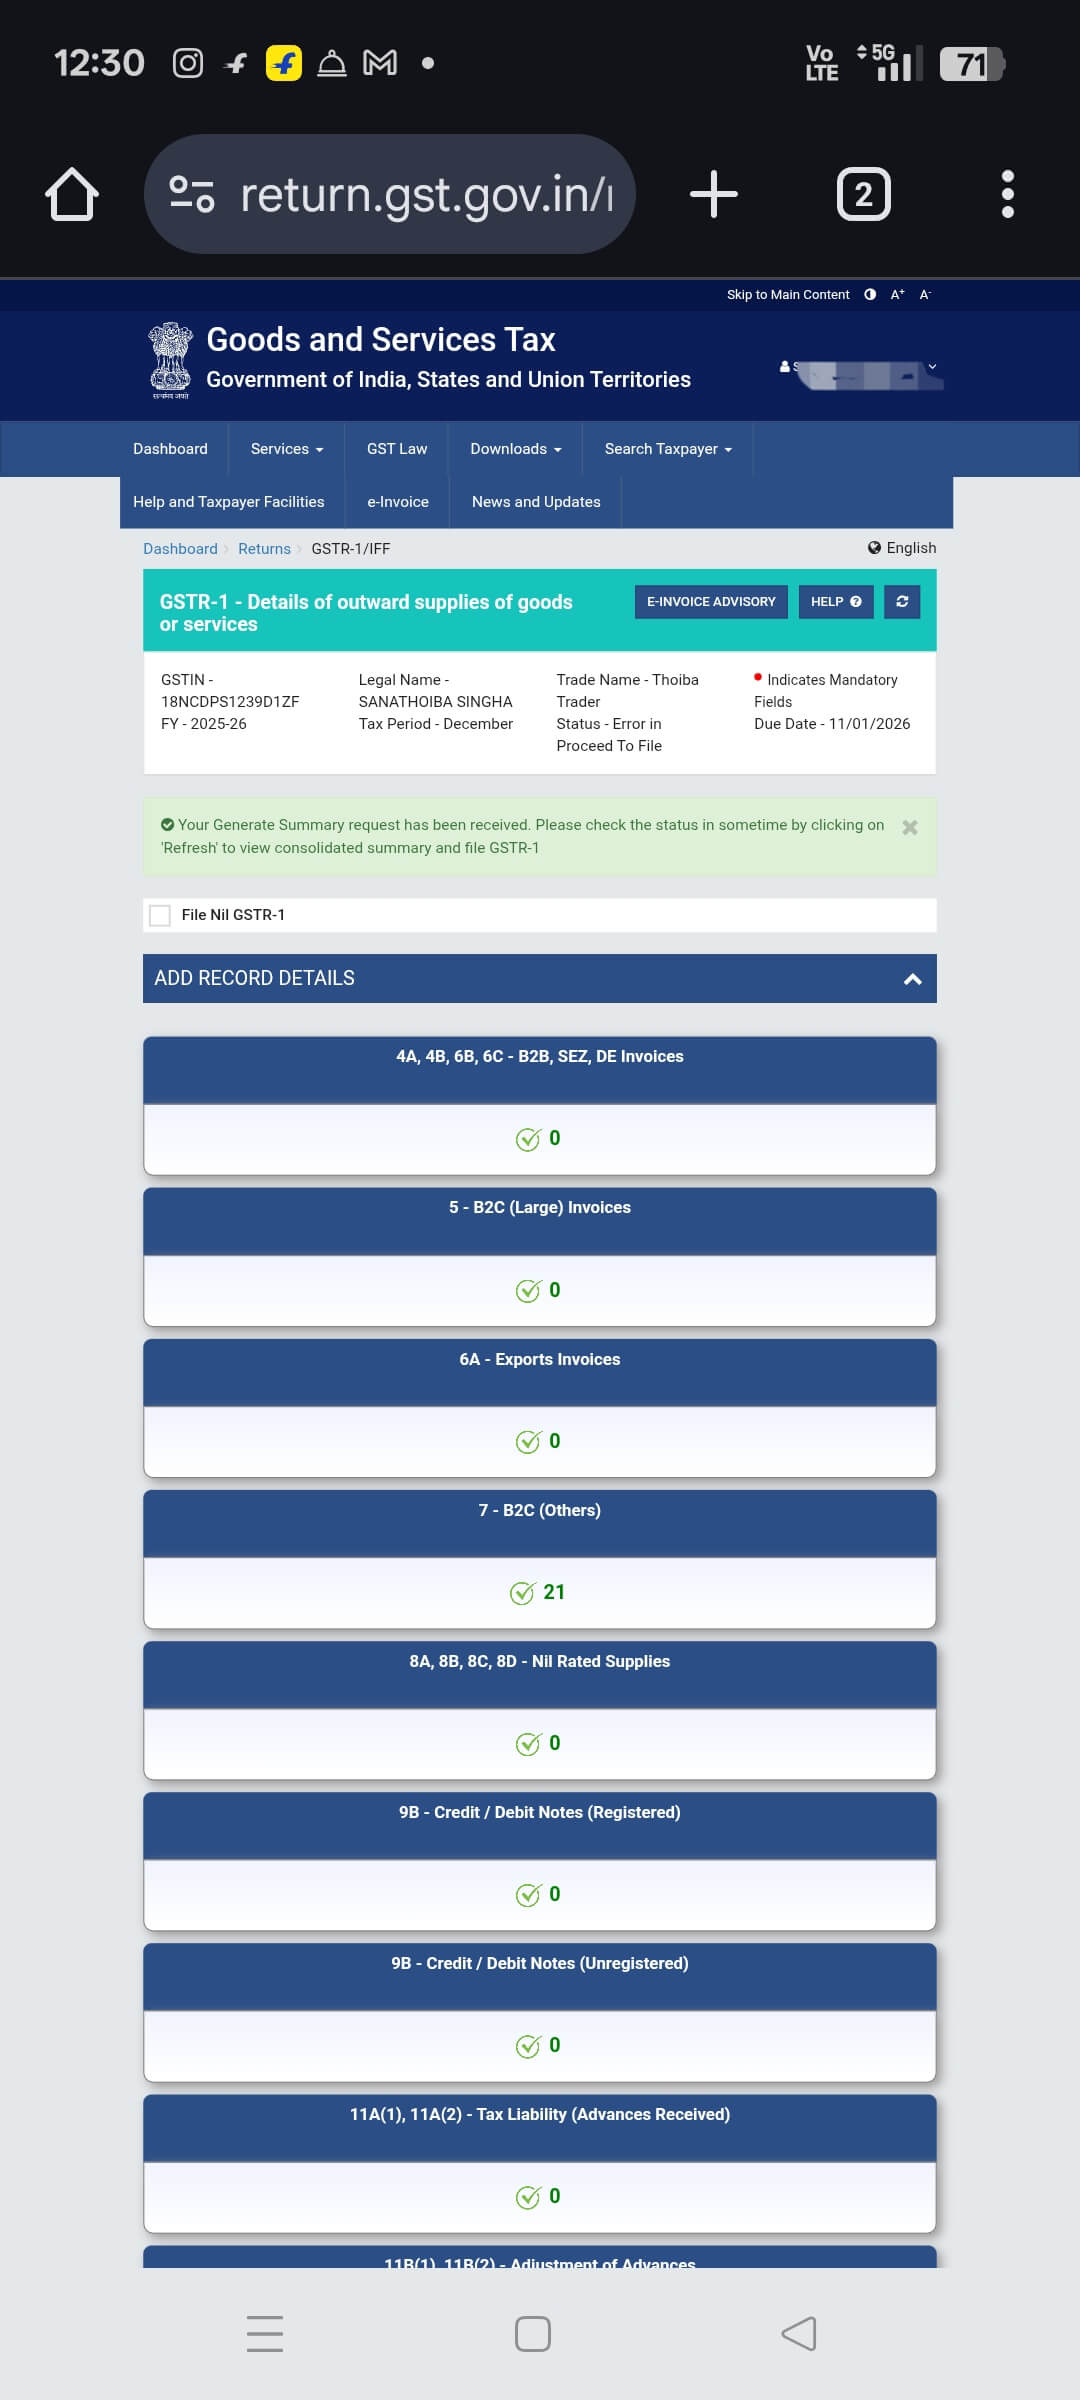
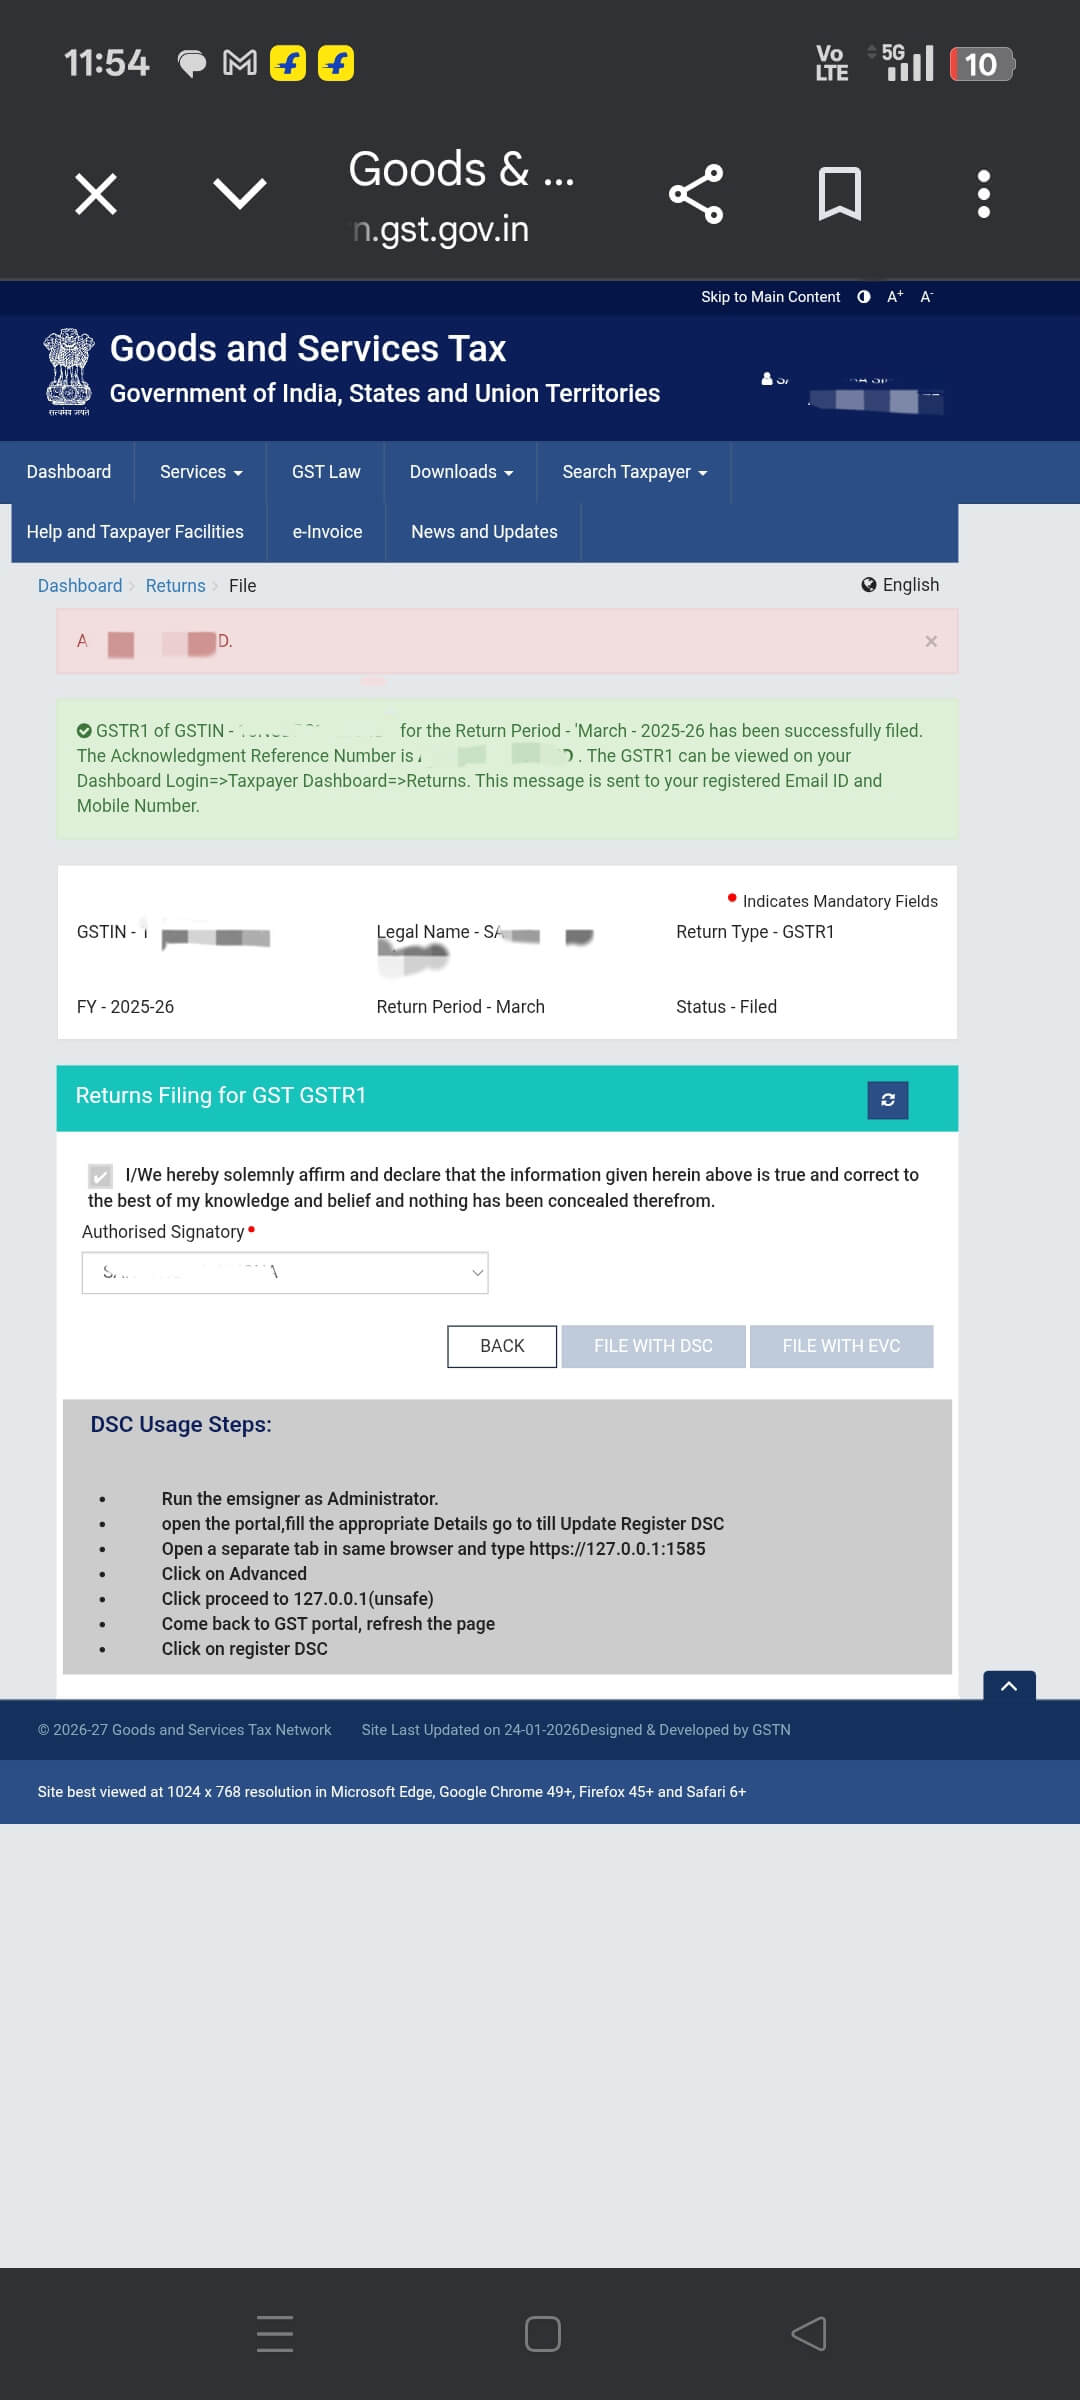
Preview सही लगे तो "Submit" click करें — इससे data lock हो जाता है। फिर "File Return" click करें और verification method चुनें:
- EVC (Electronic Verification Code): आपके Aadhaar-linked mobile पर OTP आएगा। Enter करके file करें। ज़्यादातर sellers के लिए यही सबसे आसान तरीका है।
- DSC (Digital Signature Certificate): अगर USB DSC token है तो use करें।
5. Table 13 — Documents Issued
Table 13 GSTR-1 के सबसे ज़्यादा skip होने वाले लेकिन ज़रूरी sections में से एक है। इसमें return period के दौरान issue किए गए सभी documents की summary चाहिए — tax invoices, bills of supply, credit notes, और debit notes।
| Document Type | When Issued | Example |
|---|---|---|
| Tax Invoice (B2B) | Selling to a GST-registered business | Wholesale to a registered shop |
| Tax Invoice (B2C) | Selling taxable goods to a consumer | Meesho / Amazon / Flipkart order |
| Bill of Supply | Nil-rated or exempt goods | Unbranded atta, fresh vegetables |
| Credit Note | Returns or cancellations | RTO return → credit note issued |
| Debit Note | Additional charge applies | Short-billed invoice revised upward |
Table 13 कैसे भरें
| Field | What to Enter |
|---|---|
| Sr. No. (From) | Period का पहला invoice number |
| Sr. No. (To) | Period का आखिरी invoice number |
| Total Number | Portal द्वारा auto-calculated |
| Cancelled | Cancel हुए की संख्या — कोई नहीं तो 0 enter करें |
| Net Issued | Total − Cancelled (auto-calculated) |
6. Phone से File कर रहे हैं? यह असल में काम करता है
GST portal desktop के लिए बना है — लेकिन सही settings से phone पर भी अच्छे से काम करता है।
सबके पास laptop नहीं होता। अगर सिर्फ phone है, तो घबराइए मत — मैं खुद phone से file कर चुका हूं। लेकिन एक setting है जो बिल्कुल skip नहीं कर सकते।
पहली बार जब मैंने phone के normal browser mode में file करने की कोशिश की, Table 7 में state-wise data edit ही नहीं हो रहा था। Edit option खुल ही नहीं रहा था। 20 मिनट लगाए यह समझने में कि गलती कहाँ है। निकला कि गलती मेरी नहीं थी — portal का mobile view ही problem था।
Fix बिल्कुल आसान था: browser settings में गया, "Desktop Site" on किया — और portal एकदम laptop जैसा काम करने लगा। Mobile पर हैं तो यह सबसे पहला काम करें — login से भी पहले।
📱 Desktop Mode कैसे Enable करें
- Chrome (Android): Three-dot menu (⋮) tap करें → "Desktop site" check करें
- Safari (iPhone): Address bar में "AA" icon tap करें → "Request Desktop Website"
- Samsung Browser: Three-line menu → Settings → "Desktop mode" tap करें
मेरा Pen-Paper Method — छोटी Screen पर बिना गलती के Filing
Phone पर tabs switch करते वक्त गलतियाँ होती हैं। गलत number copy, कोई state miss, same entry दो बार। यह है वो system जो मैं use करता हूं और जो कभी fail नहीं हुआ:
GST portal खोलने से पहले, मैं notebook लेकर बैठता हूं और हर वो number लिखता हूं जो enter करना है — state-wise sales, taxable values, tax amounts, invoice ranges। सब कुछ। कागज़ पर।
फिर, portal पर जैसे-जैसे हर entry भरता जाता हूं, notebook में उसके बगल में tick लगाता जाता हूं। इस तरह, चाहे गलती से tab बंद हो जाए या बीच में फोन आ जाए — मुझे पता रहता है कि कहाँ छोड़ा था। कोई entry दो बार नहीं जाती, कोई state miss नहीं होती।
यह पुराना तरीका लग सकता है, लेकिन single-screen phone पर यह apps के बीच switch करने से तेज़ और safe है। एक ₹10 की notebook ने मुझे ₹10,000 की penalty से बचाया है।
7. Pre-Filing Checklist — "File" दबाने से पहले यह करें
GSTR-1 में Submit click करने के बाद data lock हो जाता है। सुधार सिर्फ अगले महीने की return में हो सकता है। इसलिए यह step matter करता है।
✅ File करने से पहले Final Checklist
8. Late Fee और Interest
Due date miss हो गई? सरकार यह charge करती है:
| Taxpayer Type | Late Fee Per Day | Maximum Cap | Interest |
|---|---|---|---|
| Normal Taxpayer (Sales occurred) | ₹50/day (₹25 CGST + ₹25 SGST) | ₹10,000 | 18% p.a. |
| Nil Return (Zero sales) | ₹20/day (₹10 CGST + ₹10 SGST) | ₹500 | — |
| Small Taxpayer (Turnover <₹1.5 Cr) | ₹50/day | ₹2,000 (relaxed) | 18% p.a. |
9. अक्सर पूछे जाने वाले सवाल
Monthly filers के लिए due date अगले महीने की 11 तारीख है। January 2026 की GSTR-1 → 11 February 2026 तक। QRMP (quarterly) filers के लिए quarter खत्म होने के बाद 13 तारीख।
नहीं। GST portal marketplace reports directly accept नहीं करता। आपको taxable values निकालनी होंगी, state-wise और rate-wise split करनी होगी, और manually enter करना होगा — या हमारा GSTR-1 Calculator use करें जो यह automatically करता है।
हाँ। Zero-sales महीनों में भी Nil GSTR-1 file करनी होगी। Portal पर "File Nil Return" select करें — 2 मिनट से कम लगता है। Skip करने पर ₹20 प्रतिदिन late fee।
Gross sales से returned orders (RTOs) deduct करें और Table 7 (B2C) में सिर्फ net sales report करें। RTOs deduct किए बिना gross sales file करने पर tax overpayment हो जाता है।
हाँ — लेकिन browser में Desktop Mode use करना होगा। Normal mobile view portal की editing functionality तोड़ देता है। Chrome खोलें, three-dot menu tap करें, login से पहले "Desktop site" check करें।
₹5 crore से कम annual turnover वाले taxpayers QRMP (Quarterly Return Monthly Payment) scheme ले सकते हैं — monthly की जगह quarterly GSTR-1 file करें। लेकिन tax Form PMT-06 के ज़रिए monthly भरना होगा।
GSTR-1 filing के बाद revise नहीं होती। गलती को अगले महीने की GSTR-1 में Amendment Tables से सुधारें — Table 9A (B2B), 9B (credit/debit notes), 9C (B2C)।
Late fee अगले GSTR-3B में "Late Fee" section में auto-reflect होती है। Portal पर Electronic Cash Ledger से pay करें। Pending GSTR-1 file करने से पहले यह clear करनी होगी।