1. Before You Start — Wait for the Email
Don't waste time looking for the report before it's ready.
Amazon generates your monthly GST reports on the 5th of every calendar month. However, from my personal experience, you usually receive a confirmation email around the 2nd of the month telling you the report is available.
2. Where to Find the GST Report
The menu path can feel confusing the first time — here's exactly where to go.
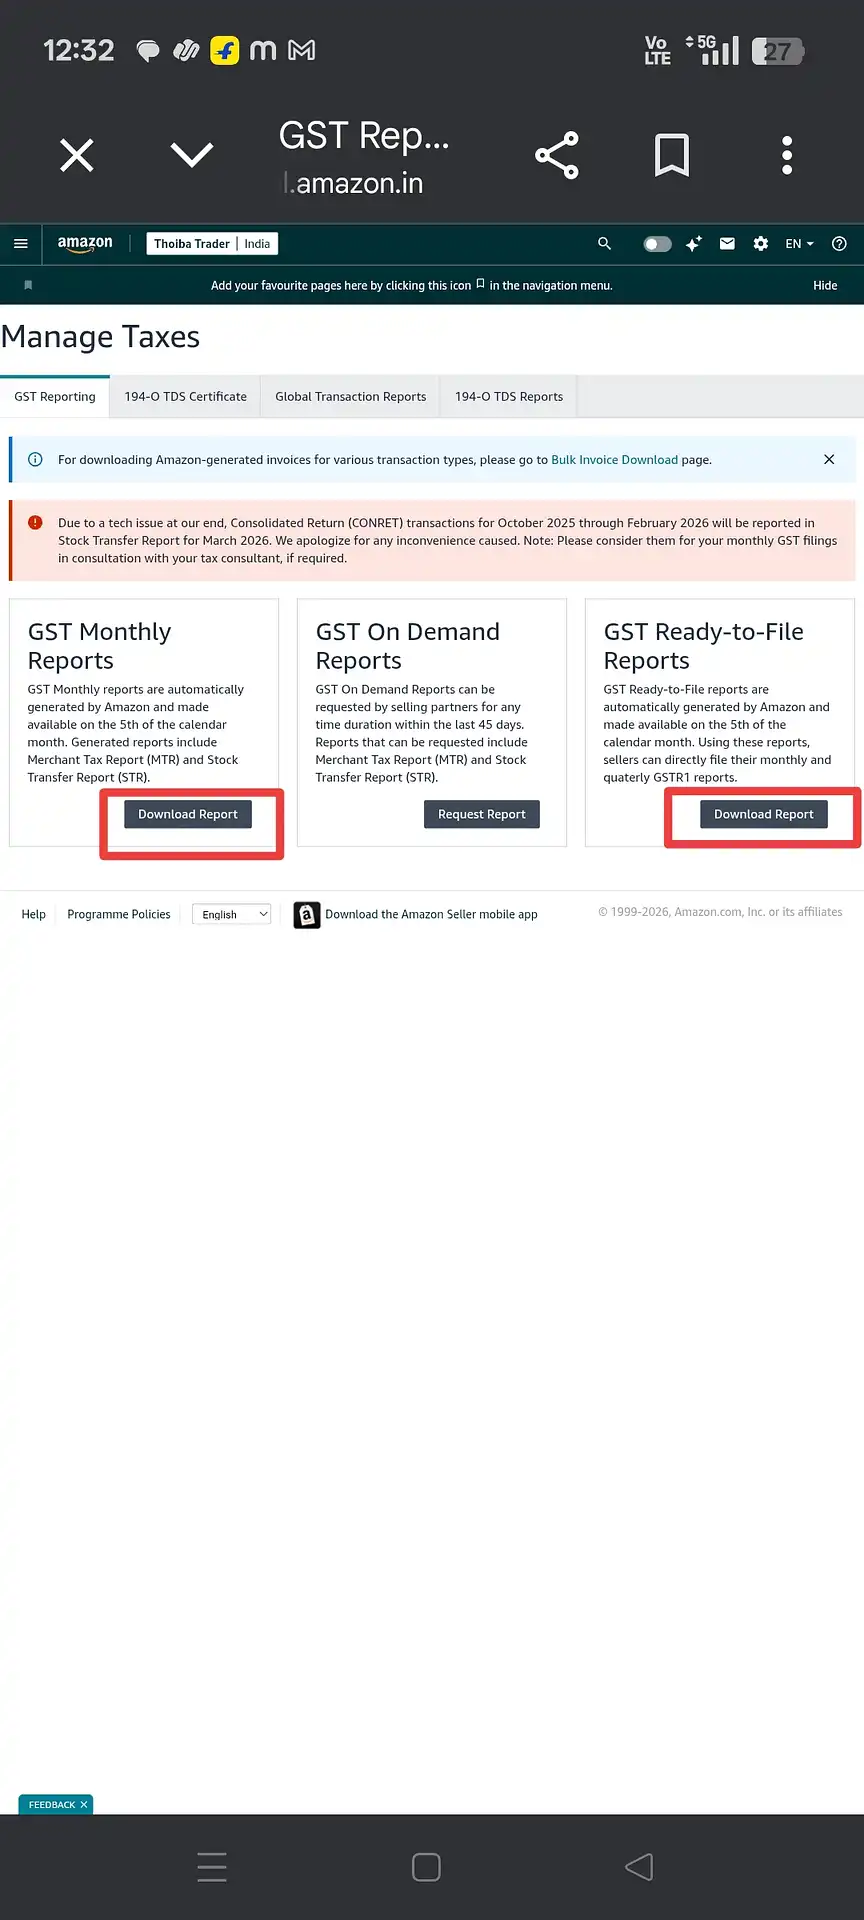
Log in to Amazon Seller Central (sellercentral.amazon.in) on a laptop or desktop browser. Once you're on the homepage, follow this navigation path:
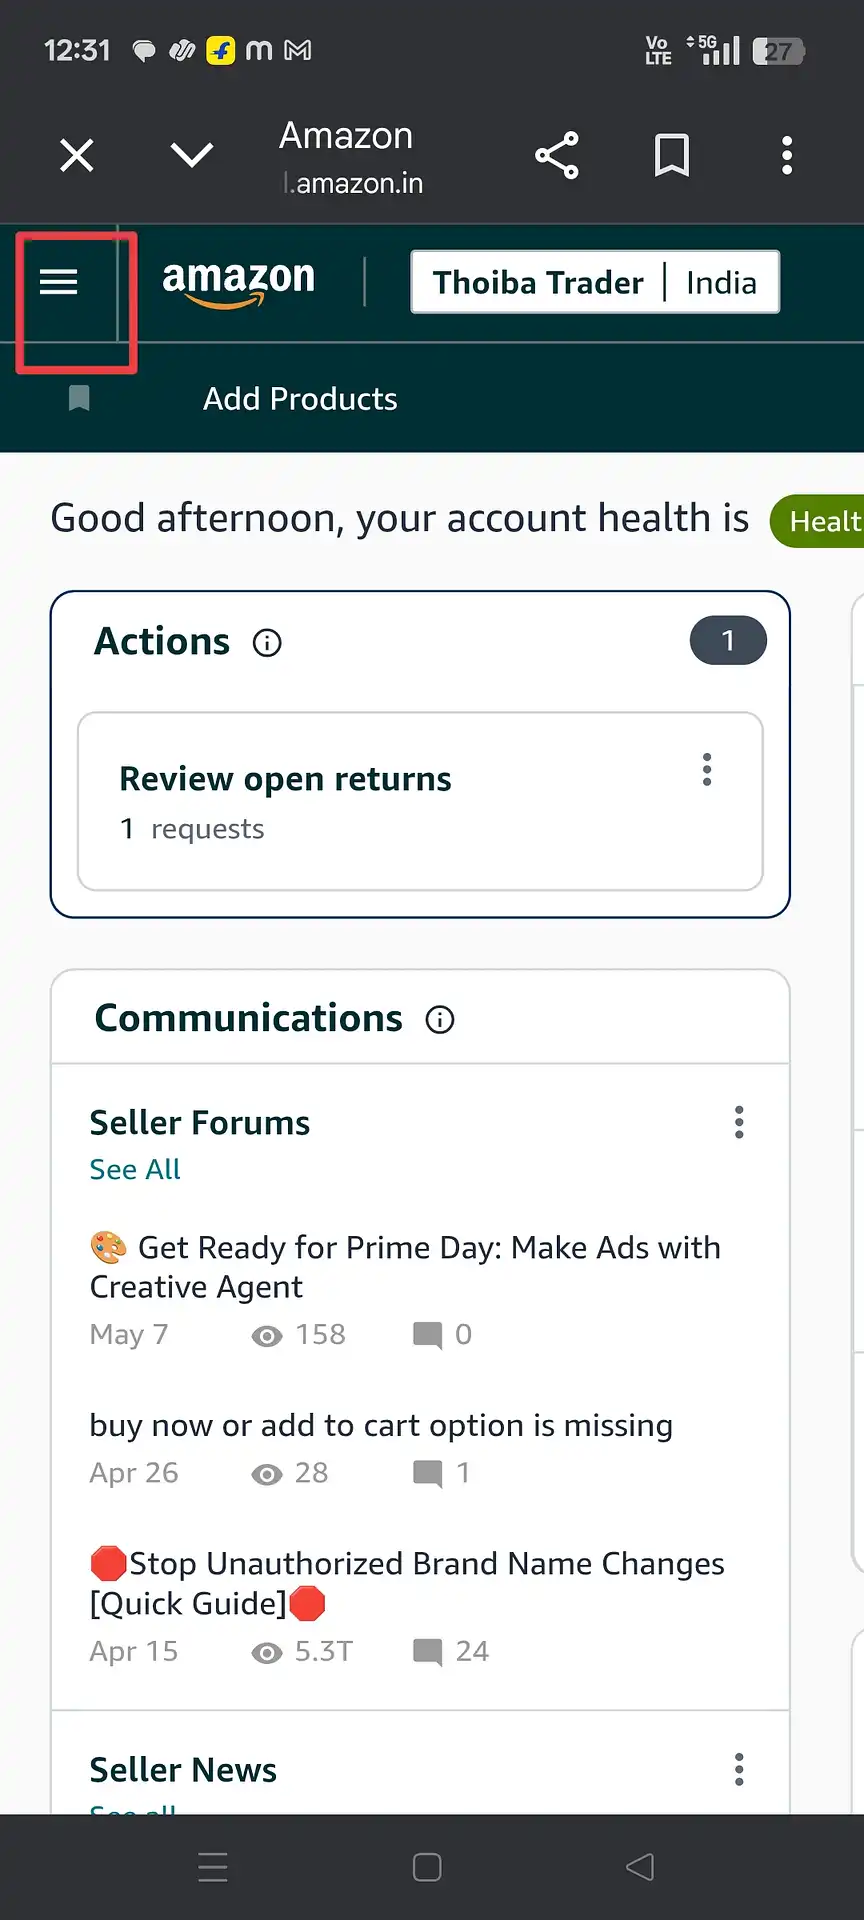
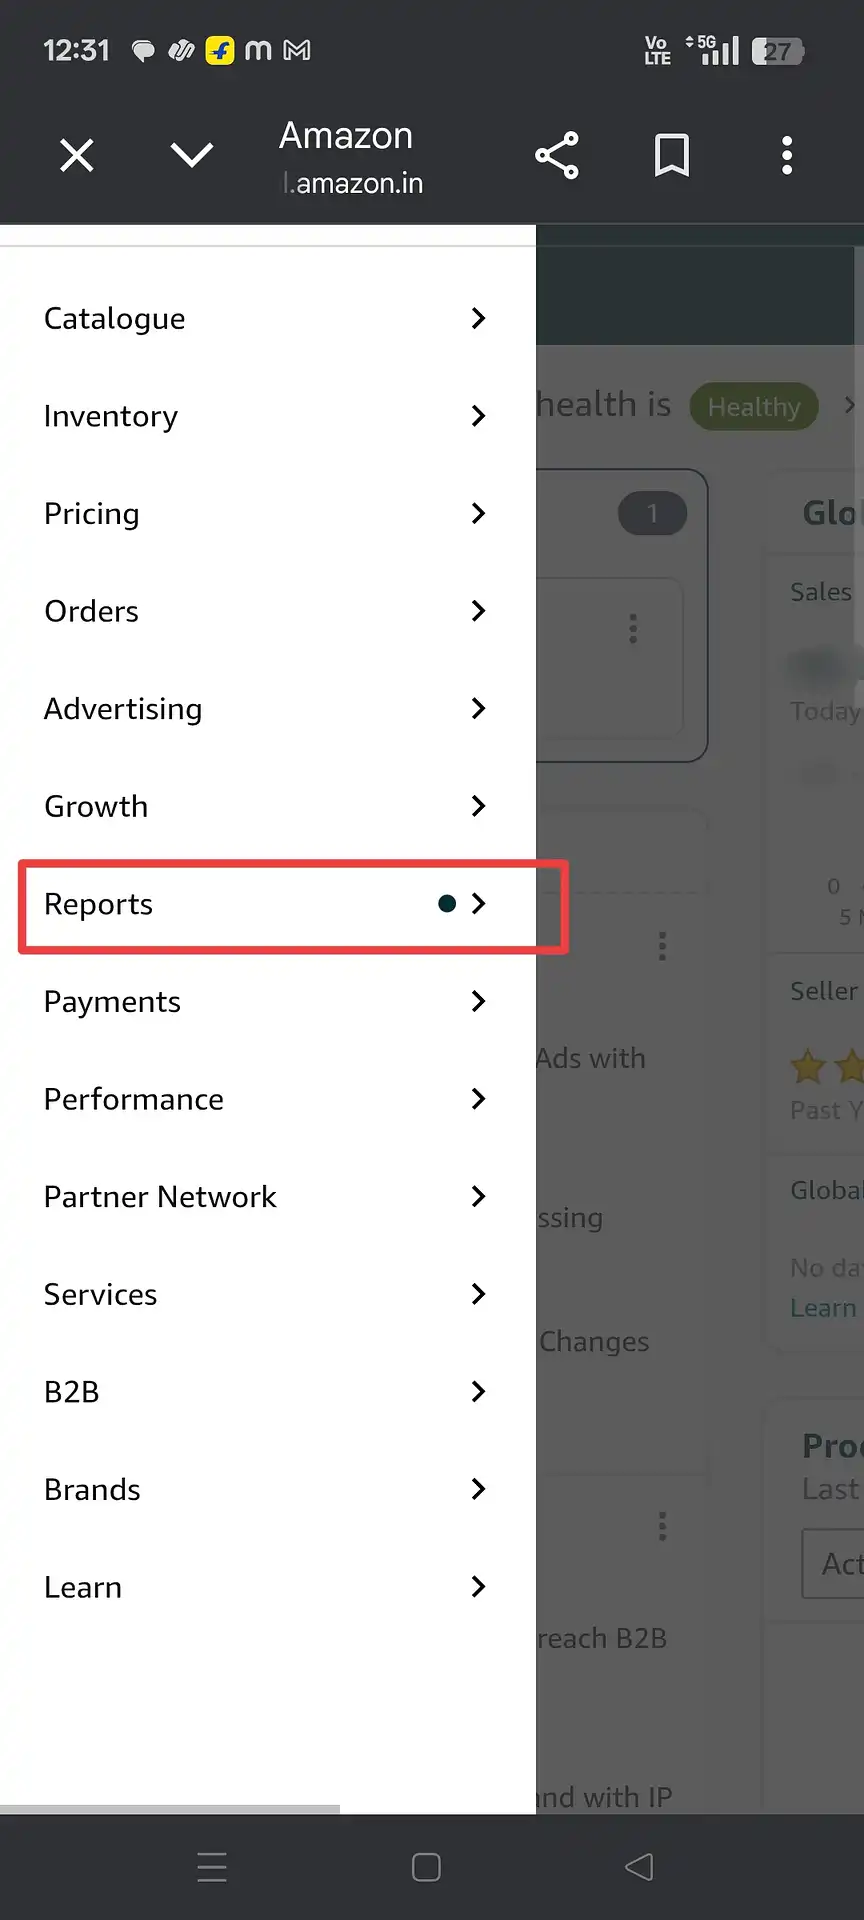
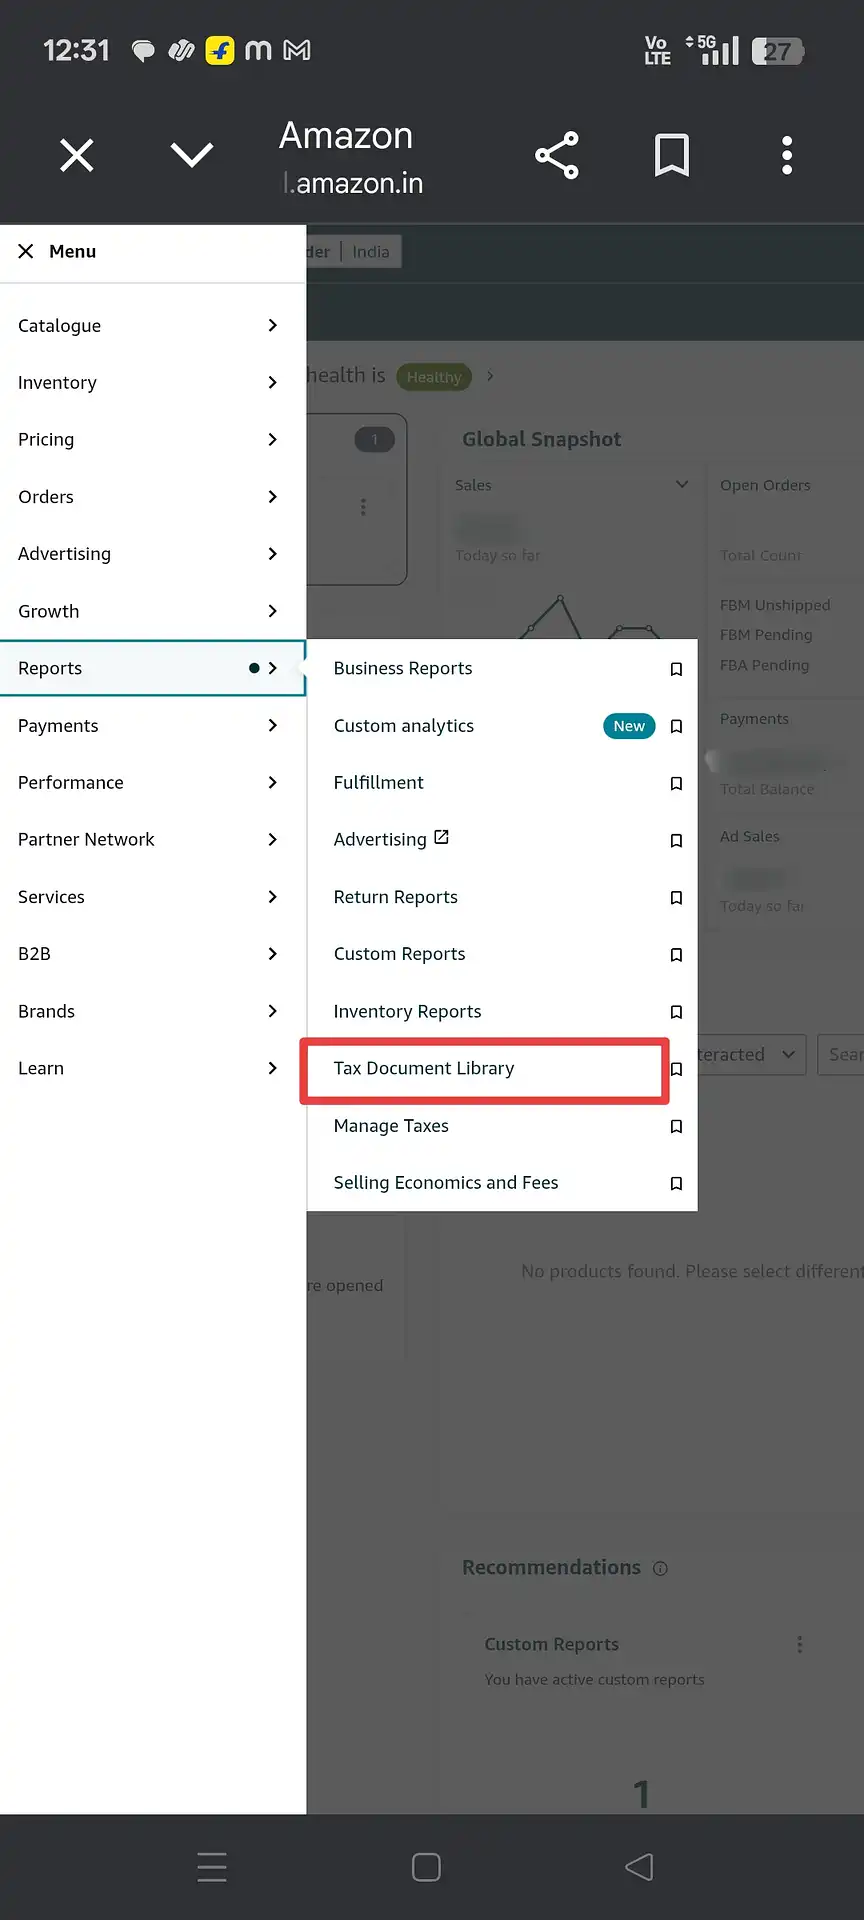
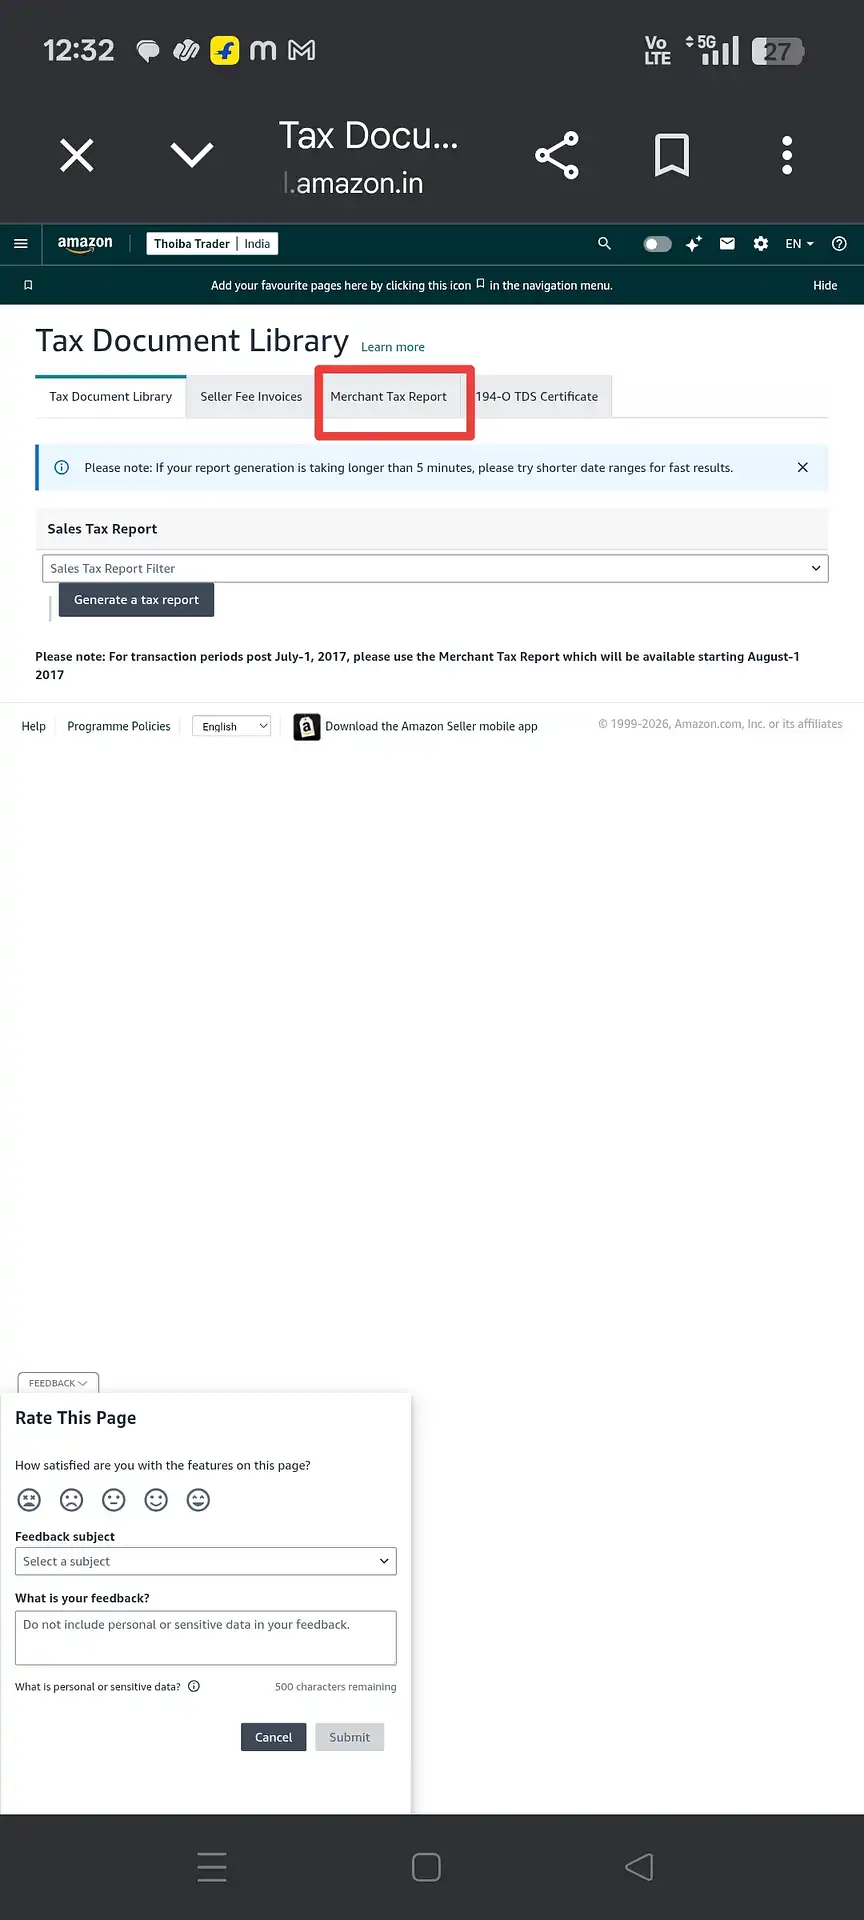
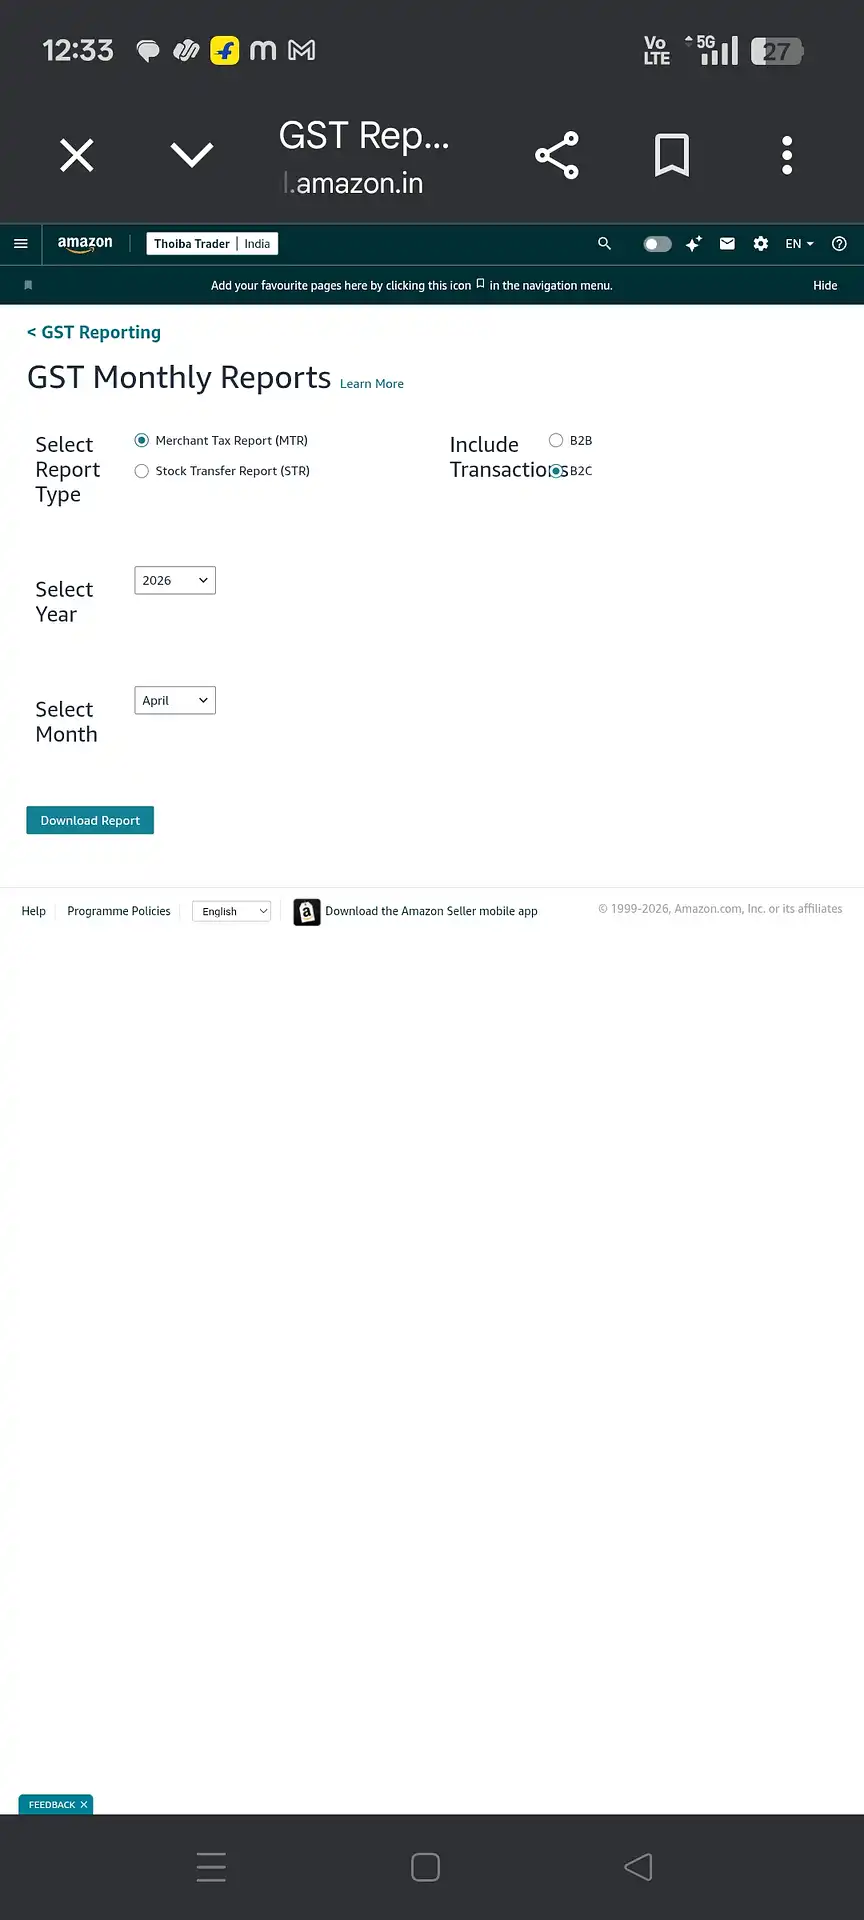
a) GST Monthly Reports — This gives you the full transaction-level Merchant Tax Report (MTR). Click "Download Report" under the first card.
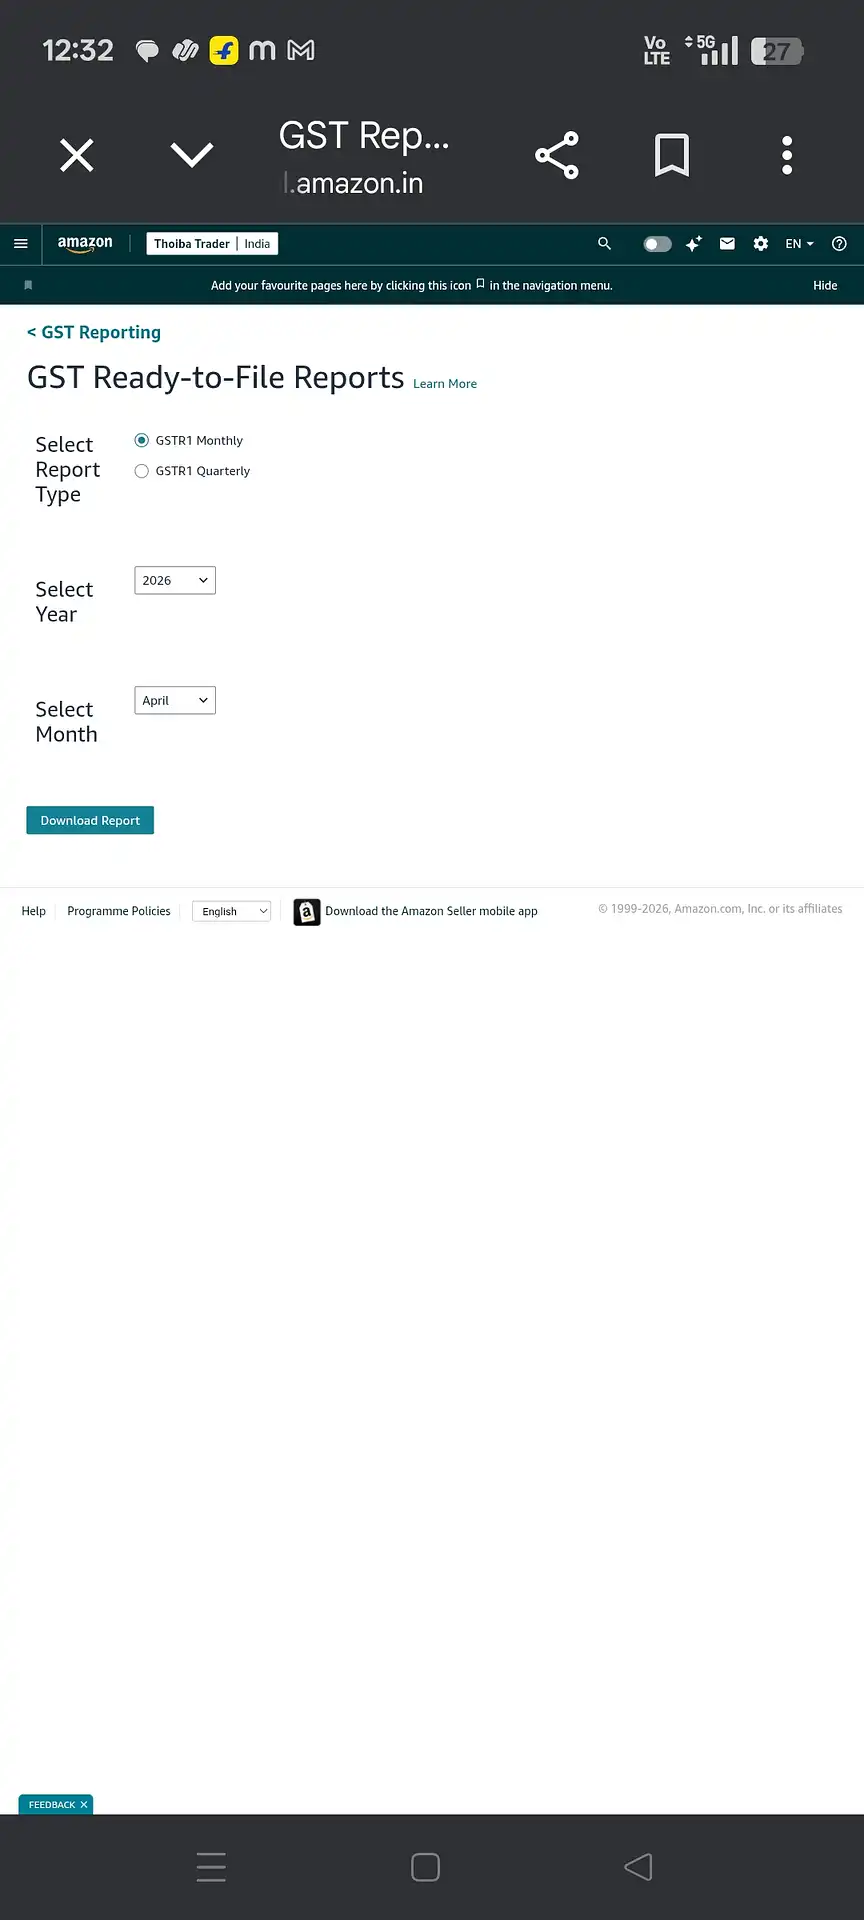
b) GST Ready-to-File Reports — This gives you the pre-formatted GSTR-1 summary (Monthly or Quarterly). Click "Download Report" under the third card.
3. Which Report to Download — MTR vs Ready-to-File
Amazon gives you multiple options. Here's what each one means.
On the GST Reporting page, you'll see three report types. Understanding the difference is key to filing your GSTR-1 correctly.
| Feature | GST Monthly Reports (MTR) | GST Ready-to-File Reports |
|---|---|---|
| Full name | Merchant Tax Report (MTR) | GSTR-1 Monthly / Quarterly |
| Data type | Transaction-level (each order) | Pre-summarised GSTR-1 format |
| B2B sales (GSTIN buyers) | ✓ Included | ✓ Included |
| Document Series (invoice range) | ✓ Available | ✗ Not available |
| HSN-wise summary | Manual work needed | ✓ Pre-calculated |
| State-wise breakup | Manual work needed | ✓ Pre-calculated |
| File format | ZIP (CSV inside) | ZIP (Excel inside) |
| Best for | Cross-verification, document series | Quick filing reference |
4. Step-by-Step Download Guide
Exact steps for downloading the MTR (Monthly Tax Report) and the Ready-to-File report.
Part A — Download GST Monthly Report (MTR)
Part B — Download GST Ready-to-File Report (GSTR-1 Summary)
5. Personal Tips from My Own Experience
Things I wish I knew when I started selling on Amazon.
1. Don't use the Amazon Seller App for tax reports. I've tried it — the app is great for order management, but downloading and opening tax files on mobile is a mess. Files either don't download properly or open in an incompatible viewer. Always use a laptop or PC for this.
2. If you must use your phone, use Desktop Mode. Open your browser (Chrome works best), go to sellercentral.amazon.in, tap the three dots menu → check "Desktop site." This gives you the full interface. It's not perfect but it works for downloading.
3. The Ready-to-File report is missing Document Series. This is a big gap. The GST portal asks you to declare the invoice number range (Document Series) — e.g., from invoice #1 to invoice #312. This information is only in the MTR, not in the Ready-to-File report. So don't skip the MTR download even if the Ready-to-File report looks complete.
4. Always cross-check B2B totals. I download both reports and verify that the B2B sale totals match between the MTR and the Ready-to-File summary. If they don't match, there's usually a data issue worth investigating before you file.
5. Wait for the email — don't panic on the 1st. I used to check Seller Central on the 1st of every month and wonder why the report wasn't there. Now I just wait for Amazon's notification email. Much less stressful.
6. Common Mistakes to Avoid ❌
These small errors can cause big headaches at the time of filing.
-
Don't rename the downloaded file. The file name that Amazon gives (e.g.,
MTR-B2B-2026-04.csv) carries important metadata. Renaming it can cause processing errors in tools or confuse you later when you have multiple months' files. -
Don't open the CSV file in Excel and "Save As." Opening an Amazon MTR CSV in Excel and saving it as .xlsx changes the data format. Excel automatically reformats dates, GST numbers, and numeric values — this corrupts the data. Always upload the original downloaded file directly to your calculator or CA.
-
Don't manually edit the data inside the CSV. Even a single extra space, comma, or deleted row can break calculations. If you think there's an error in the data, raise it with Amazon support — don't edit the raw file yourself.
-
Don't download from the Amazon Seller App. The mobile app may not download the file correctly, and you cannot verify if the ZIP extracted properly on a phone. Always use a laptop or desktop for tax report downloads.
-
Don't use the "On Demand Report" as a substitute for the Monthly Report. On Demand Reports cover only the last 45 days and may not align exactly with the calendar month boundaries required for GSTR-1 filing. Always use the GST Monthly Report for monthly filings.
7. What to Do After Downloading
The download is just step one — here's how to turn it into a filed return.
Once you have both the MTR (ZIP/CSV) and the Ready-to-File (ZIP/Excel) reports downloaded, the next step is to process them into the GSTR-1 format your CA or the GST portal expects.
If you're selling on multiple platforms (Amazon + Flipkart + Meesho), you'll need to combine the reports from all three and generate a single state-wise and HSN-wise summary. Doing this manually in Excel is error-prone and time-consuming.