1. শুরু করার আগে — Email-এর অপেক্ষা করুন
Report তৈরি হওয়ার আগে খুঁজে সময় নষ্ট করবেন না।
Amazon প্রতি মাসের GST report calendar month-এর ৫ তারিখে generate করে। কিন্তু আমার personal experience অনুযায়ী, সাধারণত মাসের ২ তারিখের আশেপাশে একটি confirmation email আসে যা জানায় report তৈরি।
2. GST Report কোথায় পাবেন
প্রথমবার menu path একটু confusing লাগতে পারে — এখানে exactly বলা আছে কোথায় যেতে হবে।
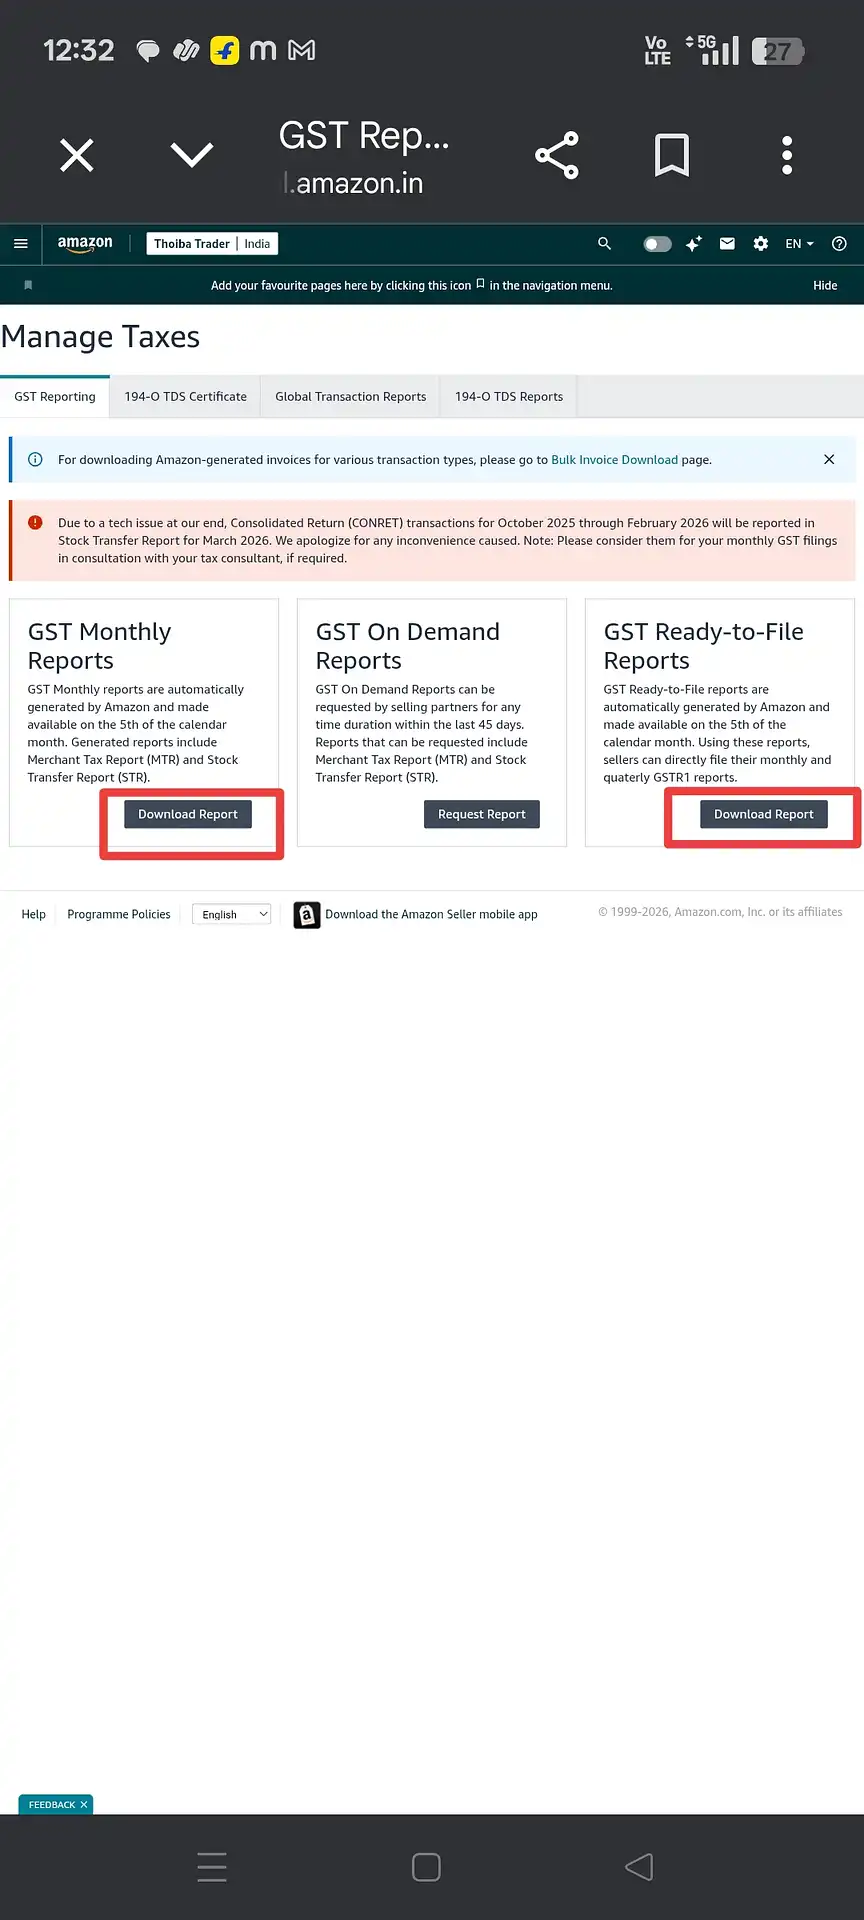
Laptop বা desktop browser-এ Amazon Seller Central (sellercentral.amazon.in)-এ login করুন। Homepage-এ আসার পরে এই navigation path follow করুন:
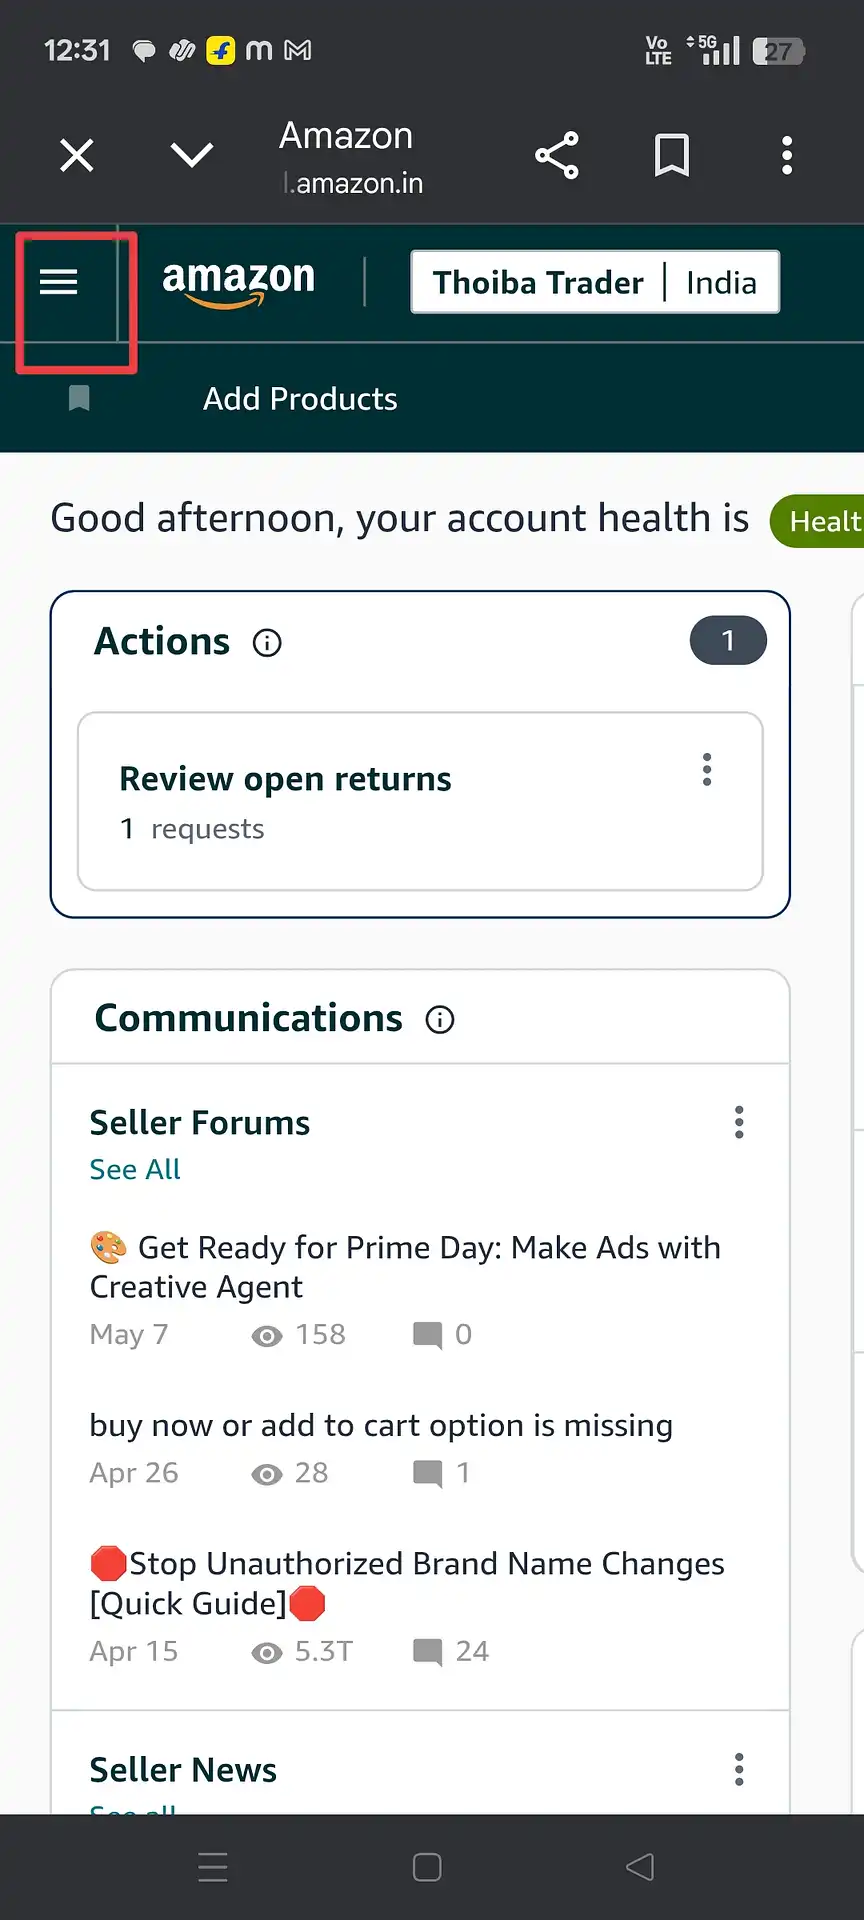
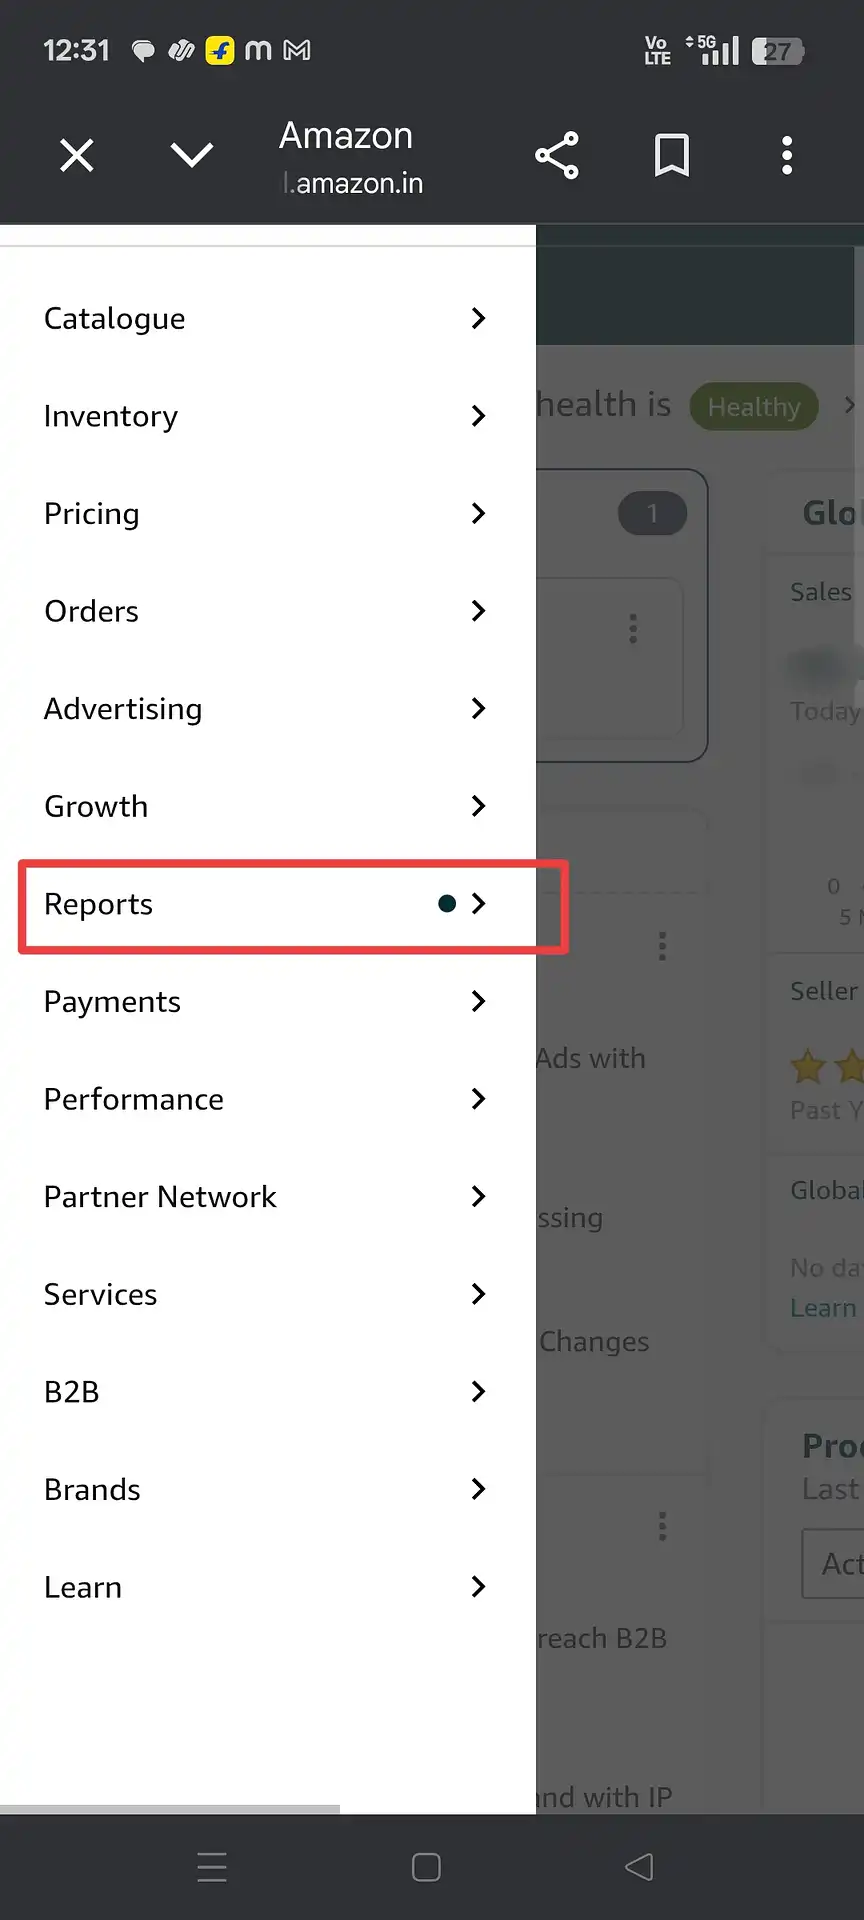
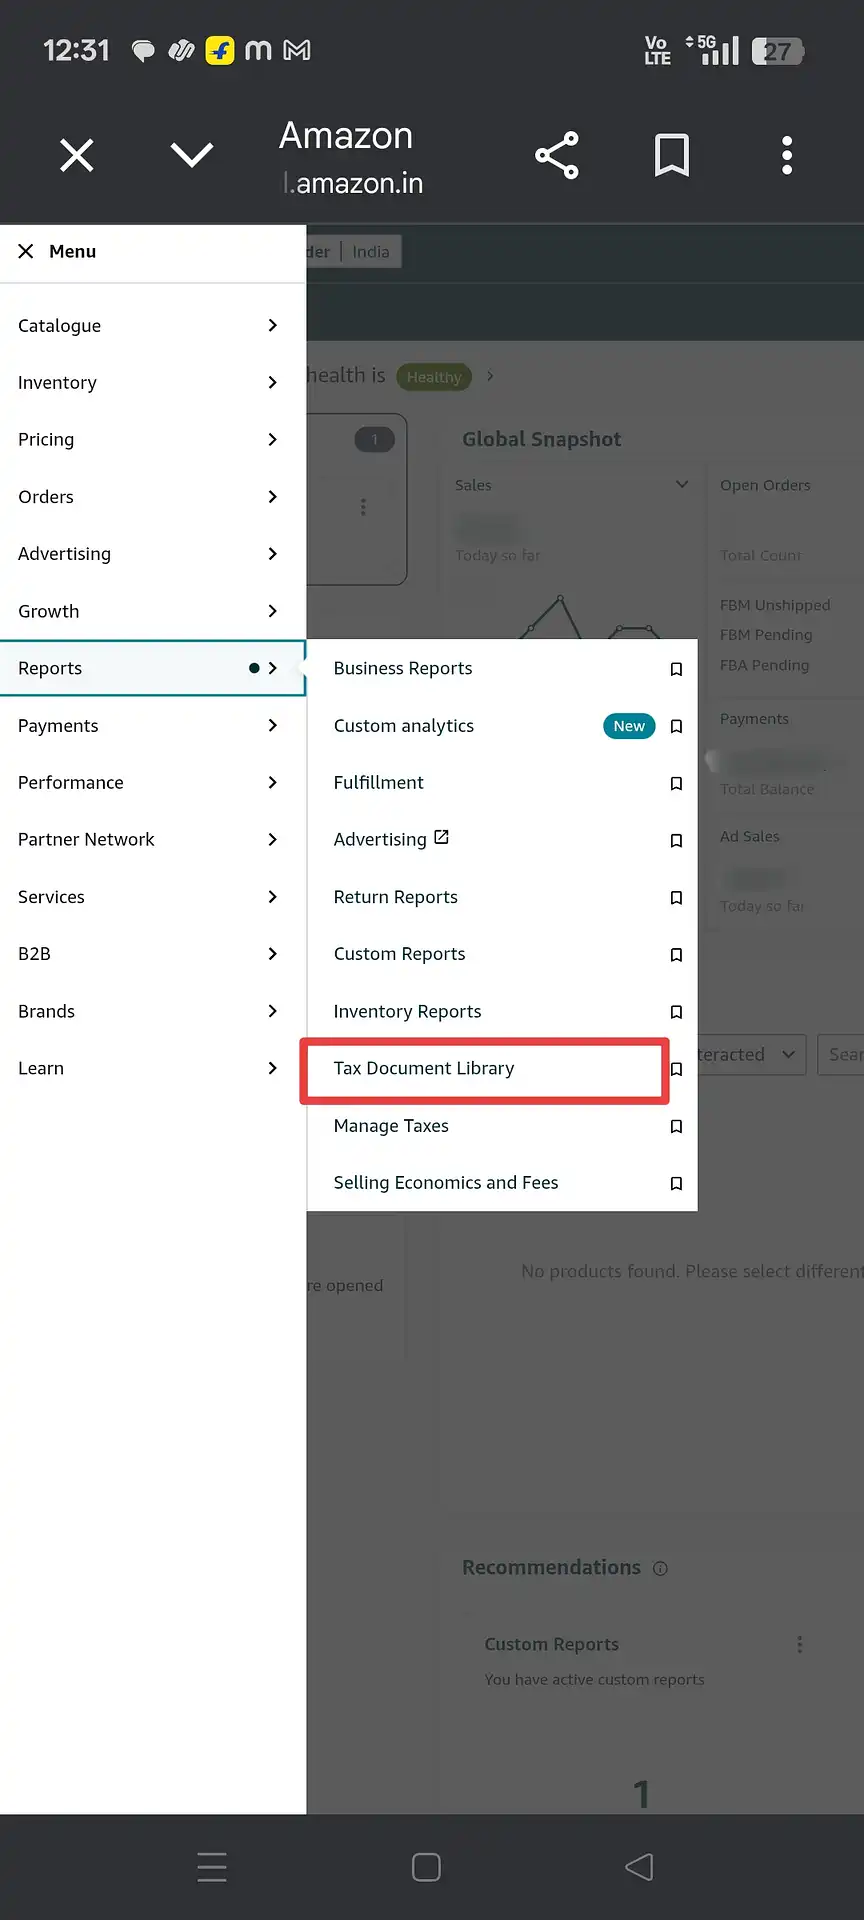
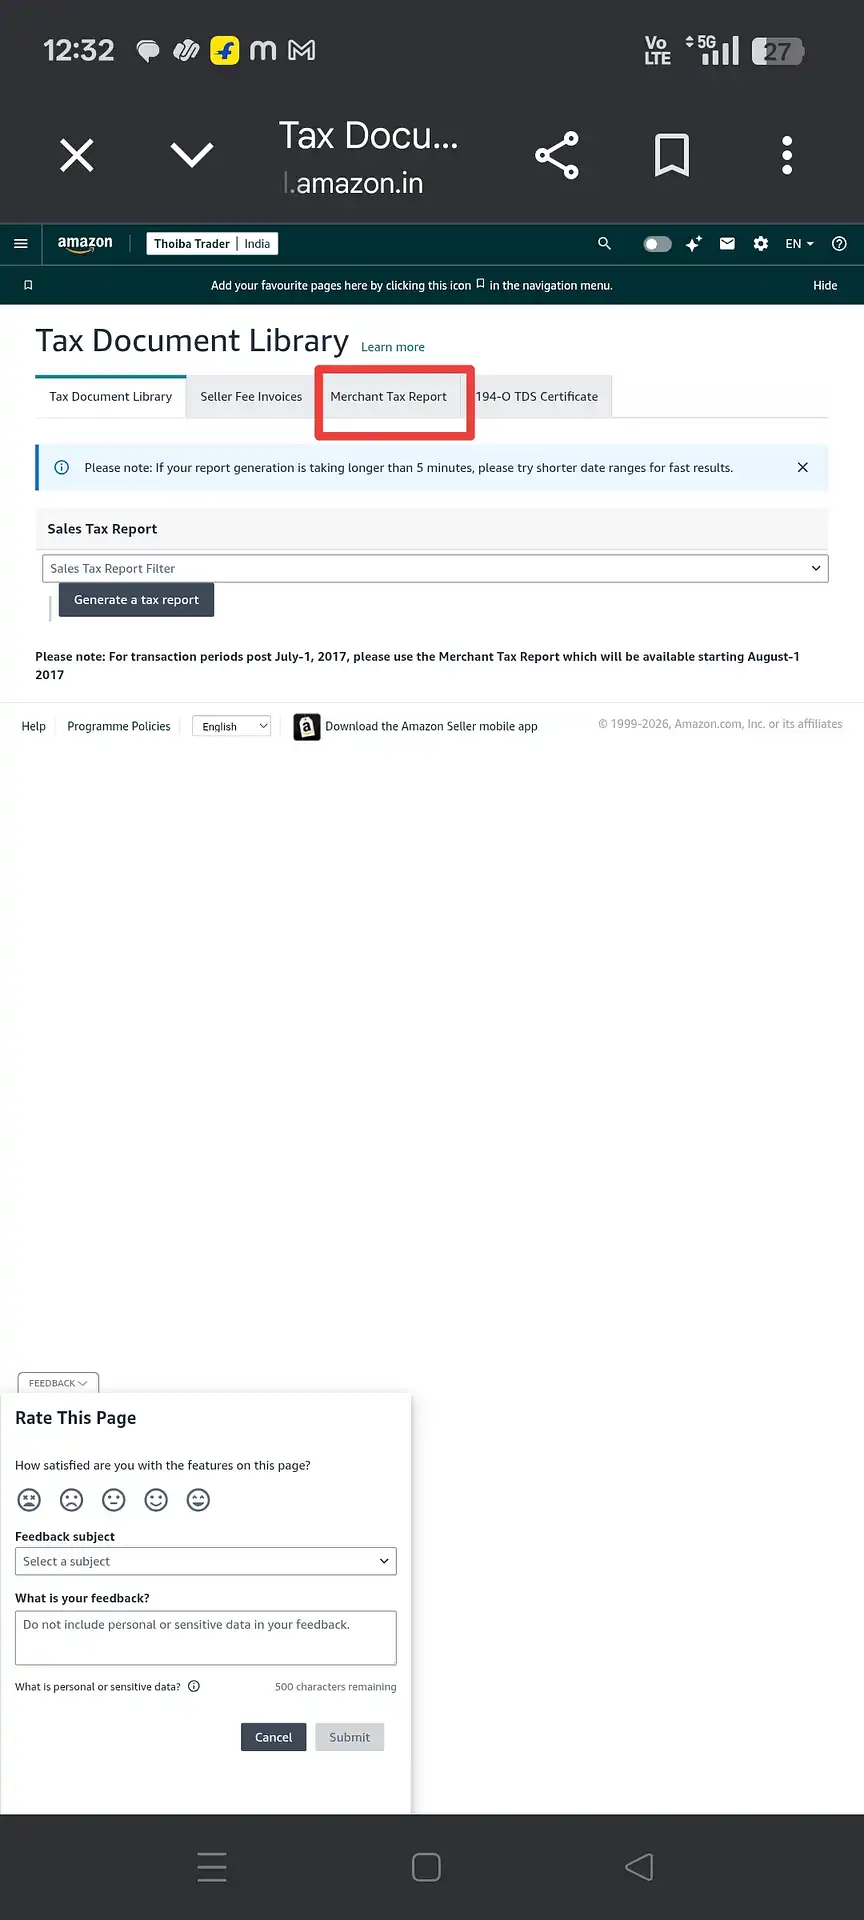
a) GST Monthly Reports — এটি পূর্ণ transaction-level Merchant Tax Report (MTR) দেয়। প্রথম card-এর নিচে "Download Report"-এ click করুন।
b) GST Ready-to-File Reports — এটি pre-formatted GSTR-1 summary (Monthly বা Quarterly) দেয়। তৃতীয় card-এর নিচে "Download Report"-এ click করুন।
3. কোন Report Download করবেন — MTR vs Ready-to-File
Amazon আপনাকে অনেক options দেয়। এখানে জানুন প্রতিটির মানে।
GST Reporting page-এ আপনি তিন ধরনের report দেখবেন। GSTR-1 সঠিকভাবে file করতে এগুলোর পার্থক্য বোঝা জরুরি।
| Feature | GST Monthly Reports (MTR) | GST Ready-to-File Reports |
|---|---|---|
| পুরো নাম | Merchant Tax Report (MTR) | GSTR-1 Monthly / Quarterly |
| Data-র ধরন | Transaction-level (প্রতিটি order) | Pre-summarised GSTR-1 format |
| B2B sales (GSTIN buyers) | ✓ অন্তর্ভুক্ত | ✓ অন্তর্ভুক্ত |
| Document Series (invoice range) | ✓ Available | ✗ Available নেই |
| HSN-wise summary | Manual কাজ দরকার | ✓ Pre-calculated |
| State-wise breakup | Manual কাজ দরকার | ✓ Pre-calculated |
| File format | ZIP (CSV inside) | ZIP (Excel inside) |
| Best for | Cross-verification, document series | Quick filing reference |
4. Step-by-Step Download Guide
MTR (Monthly Tax Report) এবং Ready-to-File report download করার exact steps।
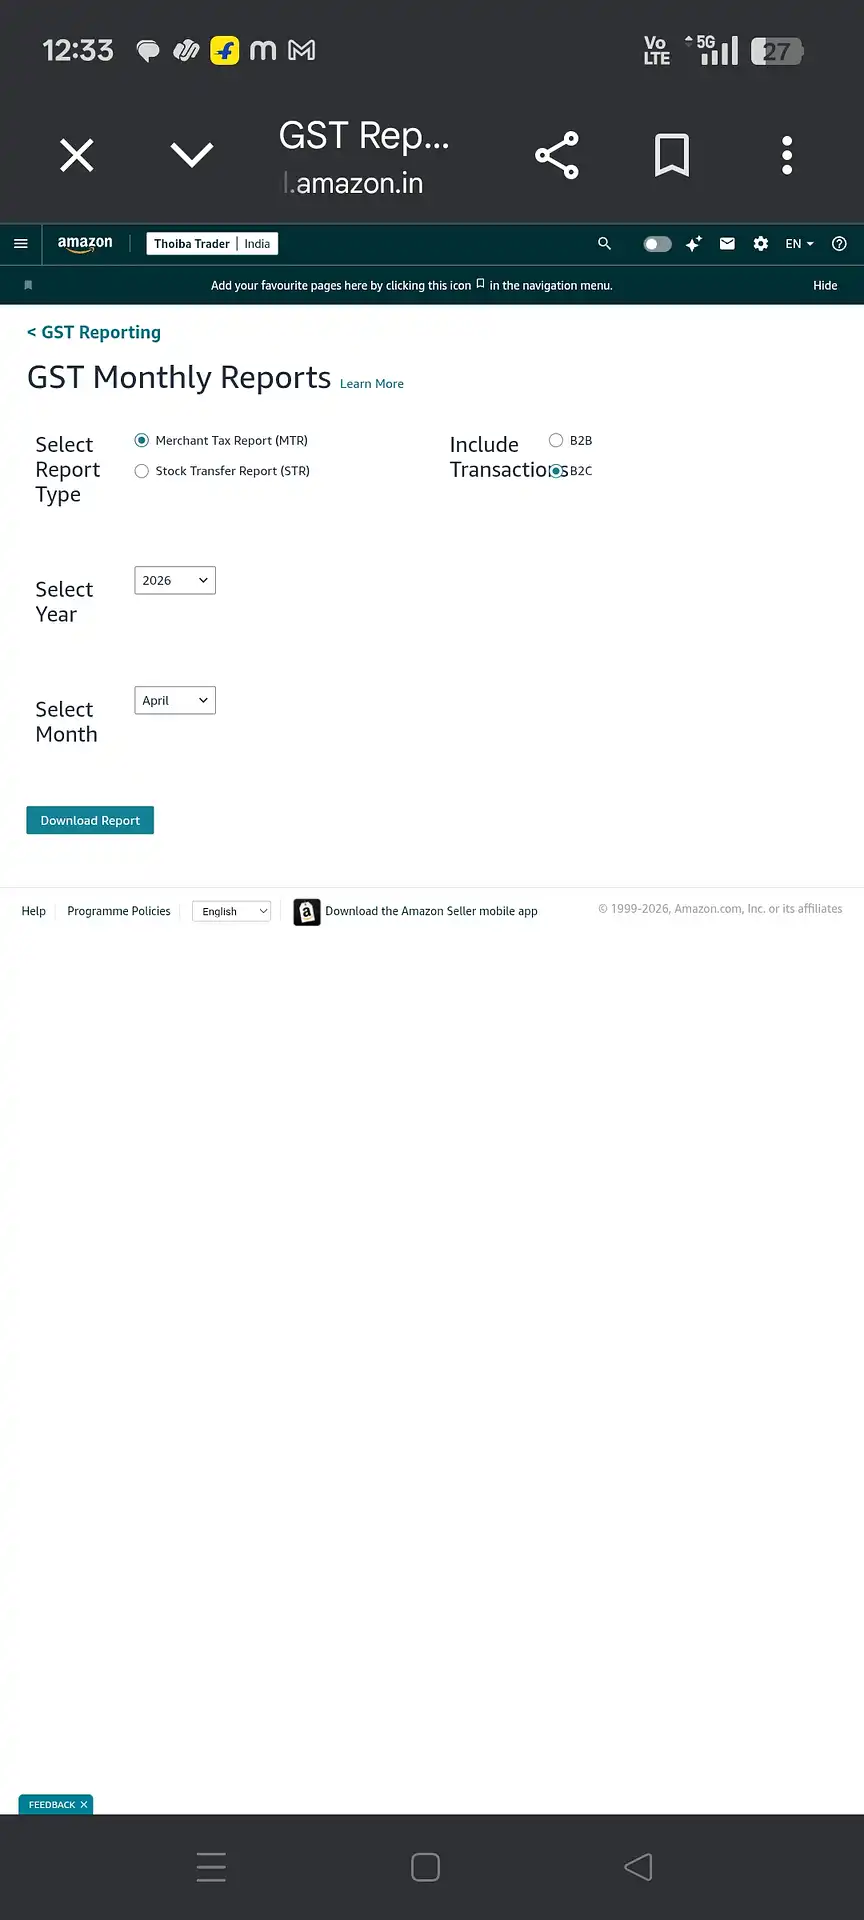
Part A — GST Monthly Report (MTR) Download করুন
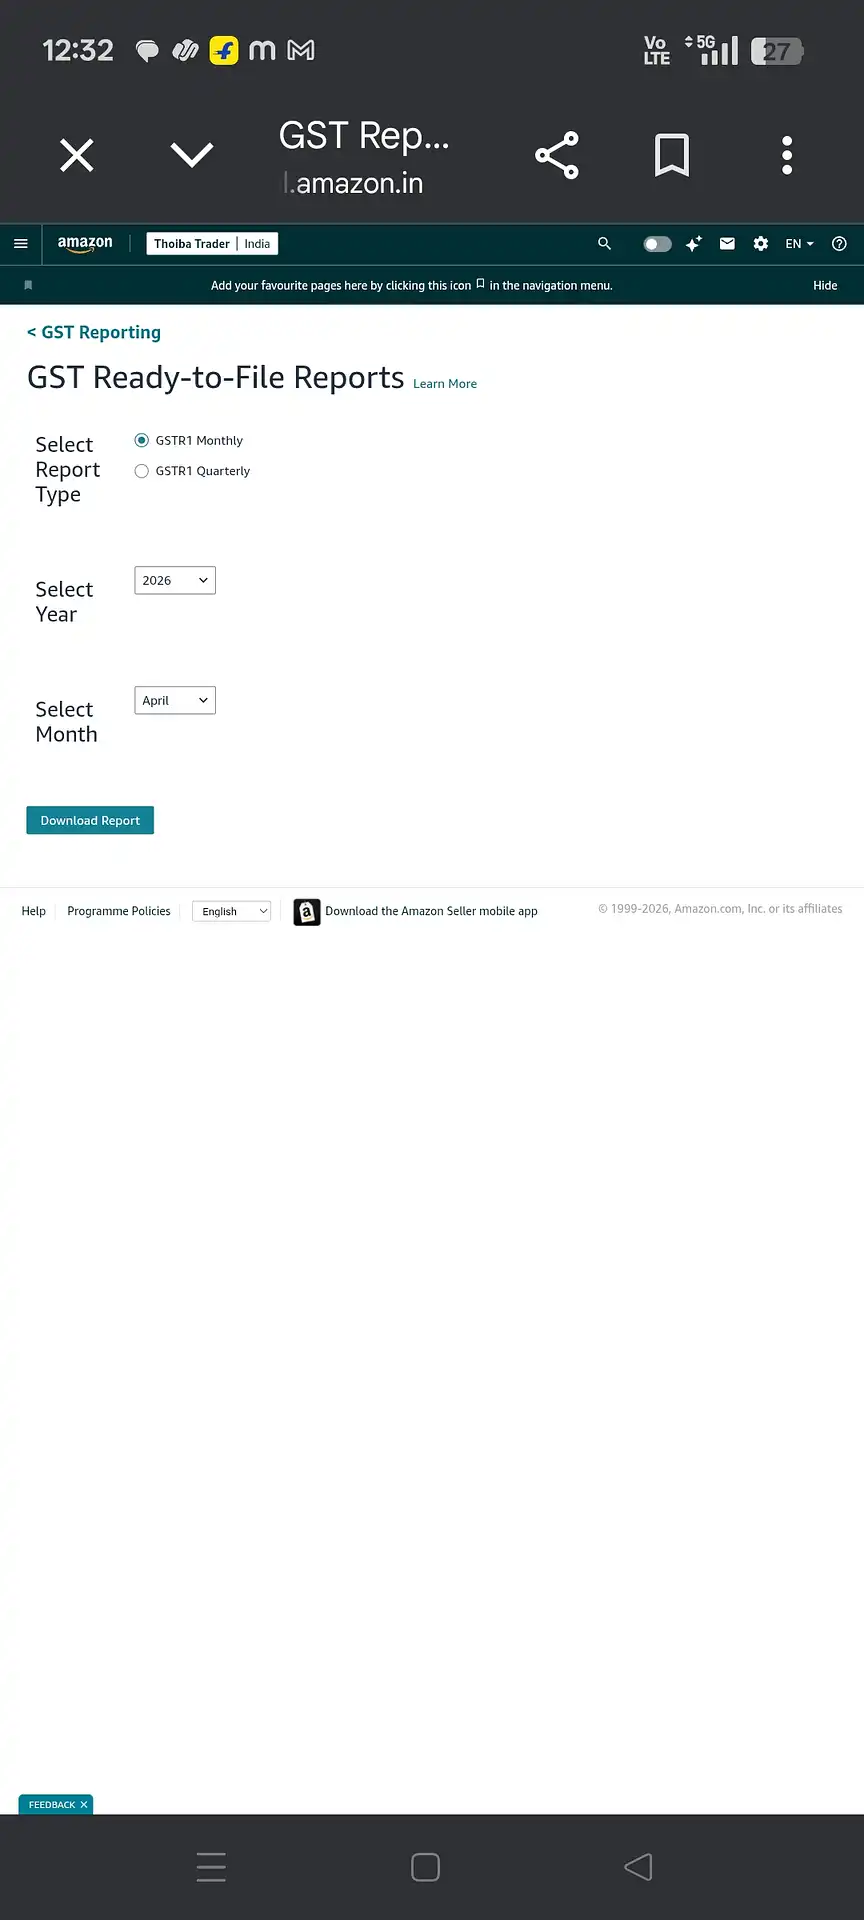
Part B — GST Ready-to-File Report (GSTR-1 Summary) Download করুন
5. আমার নিজের Experience থেকে Personal Tips
সেই কথাগুলো যা আমি Amazon-এ selling শুরু করার সময় জানতে চেয়েছিলাম।
1. Tax reports-এর জন্য Amazon Seller App use করবেন না। আমি try করেছি — app order management-এর জন্য ভালো, কিন্তু mobile-এ tax files download এবং open করা অনেক ঝামেলার। Files হয় ঠিকমতো download হয় না, না হয় incompatible viewer-এ খোলে। এর জন্য সবসময় laptop বা PC use করুন।
2. Phone ব্যবহার করতেই হলে Desktop Mode use করুন। Browser (Chrome সবচেয়ে ভালো) খুলুন, sellercentral.amazon.in-এ যান, three dots menu tap করুন → "Desktop site" check করুন। এটি পূর্ণ interface দেয়। Perfect নয় কিন্তু download-এর জন্য কাজ করে।
3. Ready-to-File report-এ Document Series নেই। এটি একটি বড় ঘাটতি। GST portal invoice number range (Document Series) declare করতে বলে — যেমন invoice #1 থেকে invoice #312 পর্যন্ত। এই information শুধু MTR-এ থাকে, Ready-to-File report-এ নয়। তাই MTR download skip করবেন না।
4. সবসময় B2B totals cross-check করুন। আমি দুটো report download করে verify করি যে MTR এবং Ready-to-File summary-তে B2B sale totals match করে কিনা। না করলে, filing-এর আগে investigate করুন।
5. Email-এর অপেক্ষা করুন — ১ তারিখে panic করবেন না। আমি আগে প্রতি মাসের ১ তারিখে Seller Central check করতাম এবং ভাবতাম report কেন নেই। এখন শুধু Amazon-এর notification email-এর অপেক্ষা করি। অনেক কম stress হয়।
6. Common Mistakes যা Avoid করবেন ❌
এই ছোট ভুলগুলো filing-এর সময় বড় সমস্যা হয়ে উঠতে পারে।
-
Downloaded file-এর নাম বদলাবেন না। Amazon যে file name দেয় (যেমন
MTR-B2B-2026-04.csv) তাতে important metadata থাকে। নাম বদলালে tools-এ processing errors আসতে পারে বা পরে multiple months-এর files-এ confusion হতে পারে। -
CSV file Excel-এ open করে "Save As" করবেন না। Amazon MTR CSV-কে Excel-এ open করে .xlsx-এ save করলে data format বদলে যায়। Excel dates, GST numbers, এবং numeric values automatically reformat করে দেয় — এতে data corrupt হয়ে যায়। সবসময় original downloaded file সরাসরি আপনার calculator বা CA-কে দিন।
-
CSV-এর ভেতরের data manually edit করবেন না। একটি extra space, comma, বা deleted row-ও calculations নষ্ট করতে পারে। Data-তে কোনো error মনে হলে Amazon support-এর সাথে কথা বলুন — raw file নিজে edit করবেন না।
-
Amazon Seller App থেকে download করবেন না। Mobile app file ঠিকমতো download করে না, এবং phone-এ ZIP properly extract হয়েছে কিনা verify করা যায় না। Tax report downloads-এর জন্য সবসময় laptop বা desktop use করুন।
-
"On Demand Report"-কে Monthly Report-এর substitute মনে করবেন না। On Demand Reports শুধু গত 45 দিন cover করে এবং GSTR-1 filing-এর জন্য প্রয়োজনীয় calendar month boundaries-এর সাথে exactly align নাও হতে পারে। Monthly filings-এর জন্য সবসময় GST Monthly Report use করুন।
7. Download-এর পরে কী করবেন
Download শুধু প্রথম পদক্ষেপ — এখানে জানুন এটিকে filed return-এ কীভাবে পরিণত করবেন।
একবার MTR (ZIP/CSV) এবং Ready-to-File (ZIP/Excel) উভয় report download হয়ে গেলে, পরের পদক্ষেপ হলো এগুলোকে GSTR-1 format-এ process করা যা আপনার CA বা GST portal expect করে।
আপনি যদি multiple platforms (Amazon + Flipkart + Meesho)-এ sell করেন, তাহলে তিনটির reports combine করে একটি single state-wise এবং HSN-wise summary তৈরি করতে হবে। Excel-এ manually এটা করা error-prone এবং time-consuming।