🛒 Flipkart Guide
How to Download Your GSTR-1 Report from Flipkart Seller Hub (2026)
🗓️ May 12, 2026
✍️ Sanathoiba Singha
⏱️ 5 min read
Flipkart's GST report — called the "GSTR return report" — is the most detailed of the three major platforms, giving you nearly everything you need for GSTR-1 in a single file. But there are two important quirks: the report requires a manual request (and a waiting period), and if you're using a phone with the Flipkart Seller App installed, your browser will keep redirecting away from the download. Here's how to handle all of it.
1. Why Flipkart's Report Is the Most Detailed
Among Amazon, Meesho, and Flipkart — Flipkart gives you the most complete data.
🏆 Most Detailed GST Report Among Major Platforms
If you sell on multiple ecommerce platforms, you'll quickly notice that each one provides a different level of detail in their GST reports. From my experience as a seller on all three, Flipkart's GSTR return report is the most comprehensive.
| Data Point |
Amazon |
Meesho |
Flipkart |
| Document Series (invoice range) |
✓ MTR only |
✗ Manual lookup |
✓ Included |
| HSN-wise summary |
✓ Included |
✓ Included |
✓ Included |
| State-wise breakup |
✓ Ready-to-File |
✓ Available |
✓ Included |
| GSTR-1 & GSTR-8 data in one file |
✗ |
✗ |
✓ Both covered |
| Report availability |
Auto-generated (5th) |
Auto (6th–8th) |
On-request (1–24 hrs) |
| Download method |
Direct download |
Direct download |
Request → wait → download |
The trade-off: unlike Amazon and Meesho where the report is automatically generated and ready to download, Flipkart requires you to manually request the report and wait for it to be generated. More on that below.
2. The App Redirect Problem — and How to Fix It
If the Flipkart Seller App is installed on your phone, your browser will fight you.
This is a frustrating but easily solved problem. When you try to open seller.flipkart.com in Chrome or any mobile browser with the Flipkart Seller App installed, the browser automatically redirects the page to the app. Inside the app, there is no option to download tax reports — so you end up going in circles.
⚠️ The App Redirect Trap
- Don't try to "force" the browser to stay on the web page while the Seller App is installed — it will keep redirecting.
- Don't use the Flipkart Seller App itself to download tax reports — the option simply is not available inside the app.
✅ The Fix — Temporary Uninstall
The cleanest solution is to temporarily uninstall the Flipkart Seller App from your phone. Once the app is removed, open seller.flipkart.com in Chrome, tap the three-dot menu (⋮), and select Desktop Site. You can now navigate the full seller dashboard and access the Reports section without any redirects. Reinstall the app after you've downloaded your report.
ℹ️ Best Option: Use a Computer
If you have access to a laptop or desktop, that is always the easiest and most reliable path. Log in at seller.flipkart.com on a computer browser — no app conflict, no Desktop Site toggle needed.
3. Step-by-Step: How to Request and Download the Report
Follow these steps on seller.flipkart.com in a desktop browser (or mobile with app uninstalled).
1
Log In to Flipkart Seller Hub
Open seller.flipkart.com in your browser and log in. You'll land on the main dashboard showing impressions, today's units, and today's sales. In the left sidebar, you can see: Home, Listings, Inventory, Orders, Payments, Growth, Ads, Reports, and Partner Services.
seller.flipkart.com
2
Click "Reports" in the Left Sidebar
Look for Reports in the left navigation sidebar (it has a document/list icon). Click it. You'll be taken to the Reports page which shows any previously requested reports and a Request New Report button in the top right.
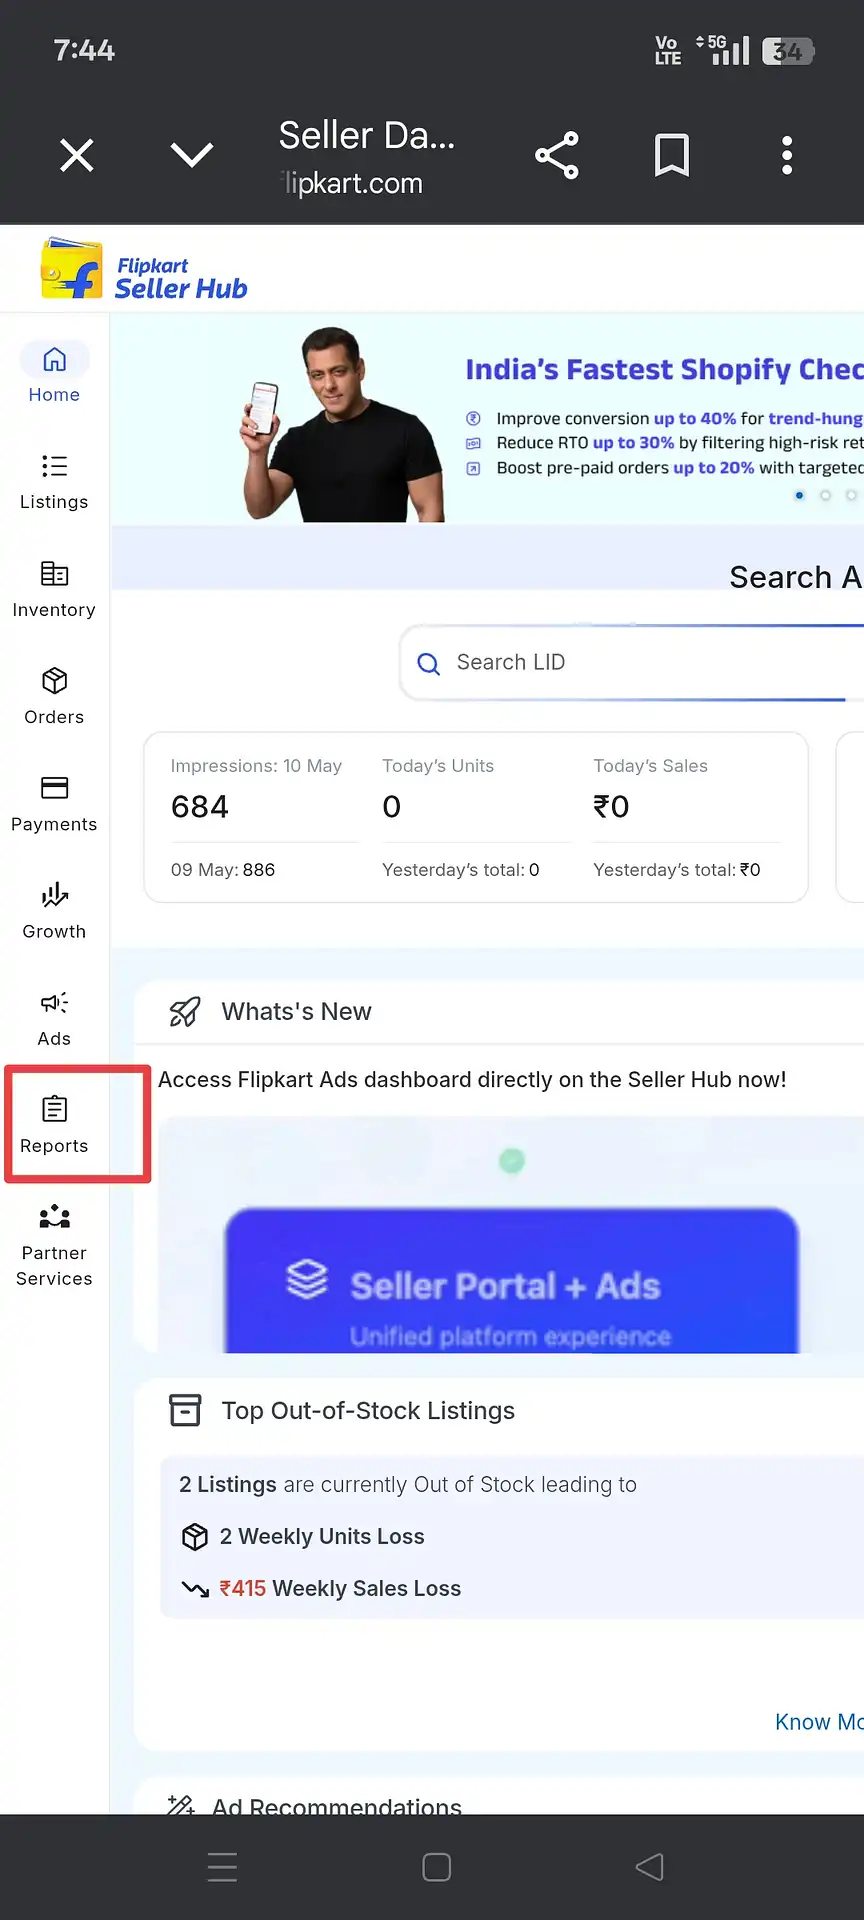
Step 2: Click "Reports" in the left sidebar of Flipkart Seller Hub
3
Click "Request New Report"
On the Reports page, you'll see tabs for Requested and Scheduled reports, and a list of any reports you've previously downloaded. Click the Request New Report button at the top right to open the report selection panel.
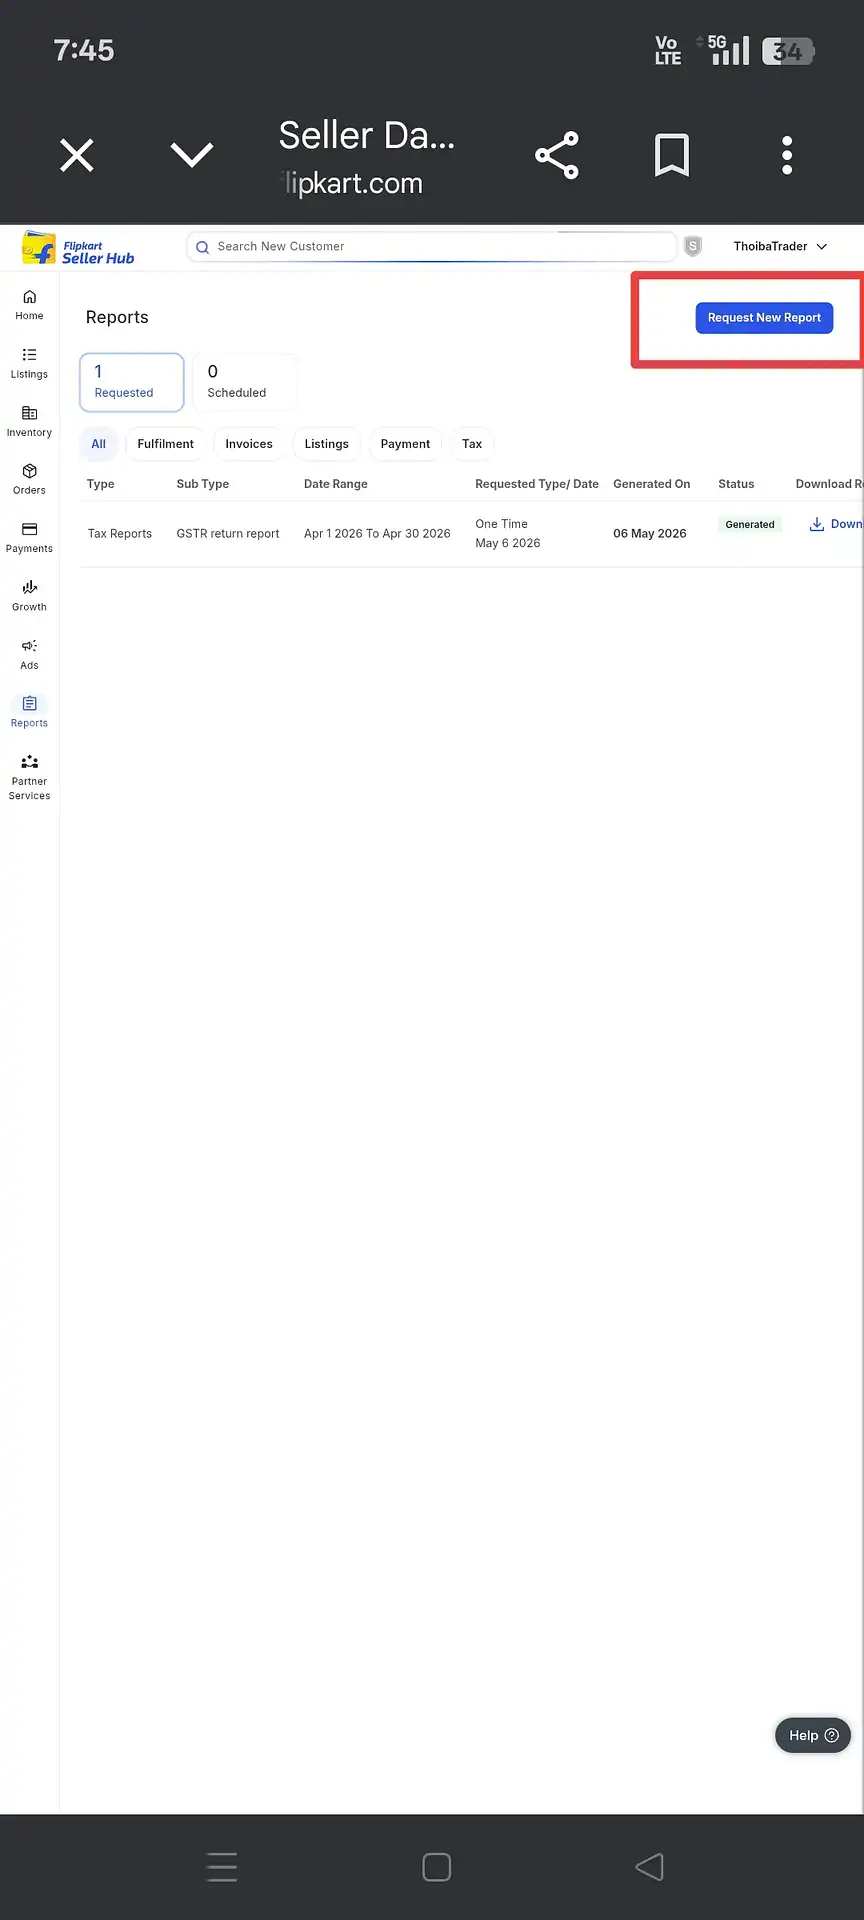
Step 3: The Reports page — click "Request New Report" (top right)
4
Select the "Tax Reports" Tab
A panel will open with report categories across the top: Fulfilment Reports, Invoices, Listings Reports, Payment Reports, and Tax Reports. Click on Tax Reports.
Request New Report → Tax Reports
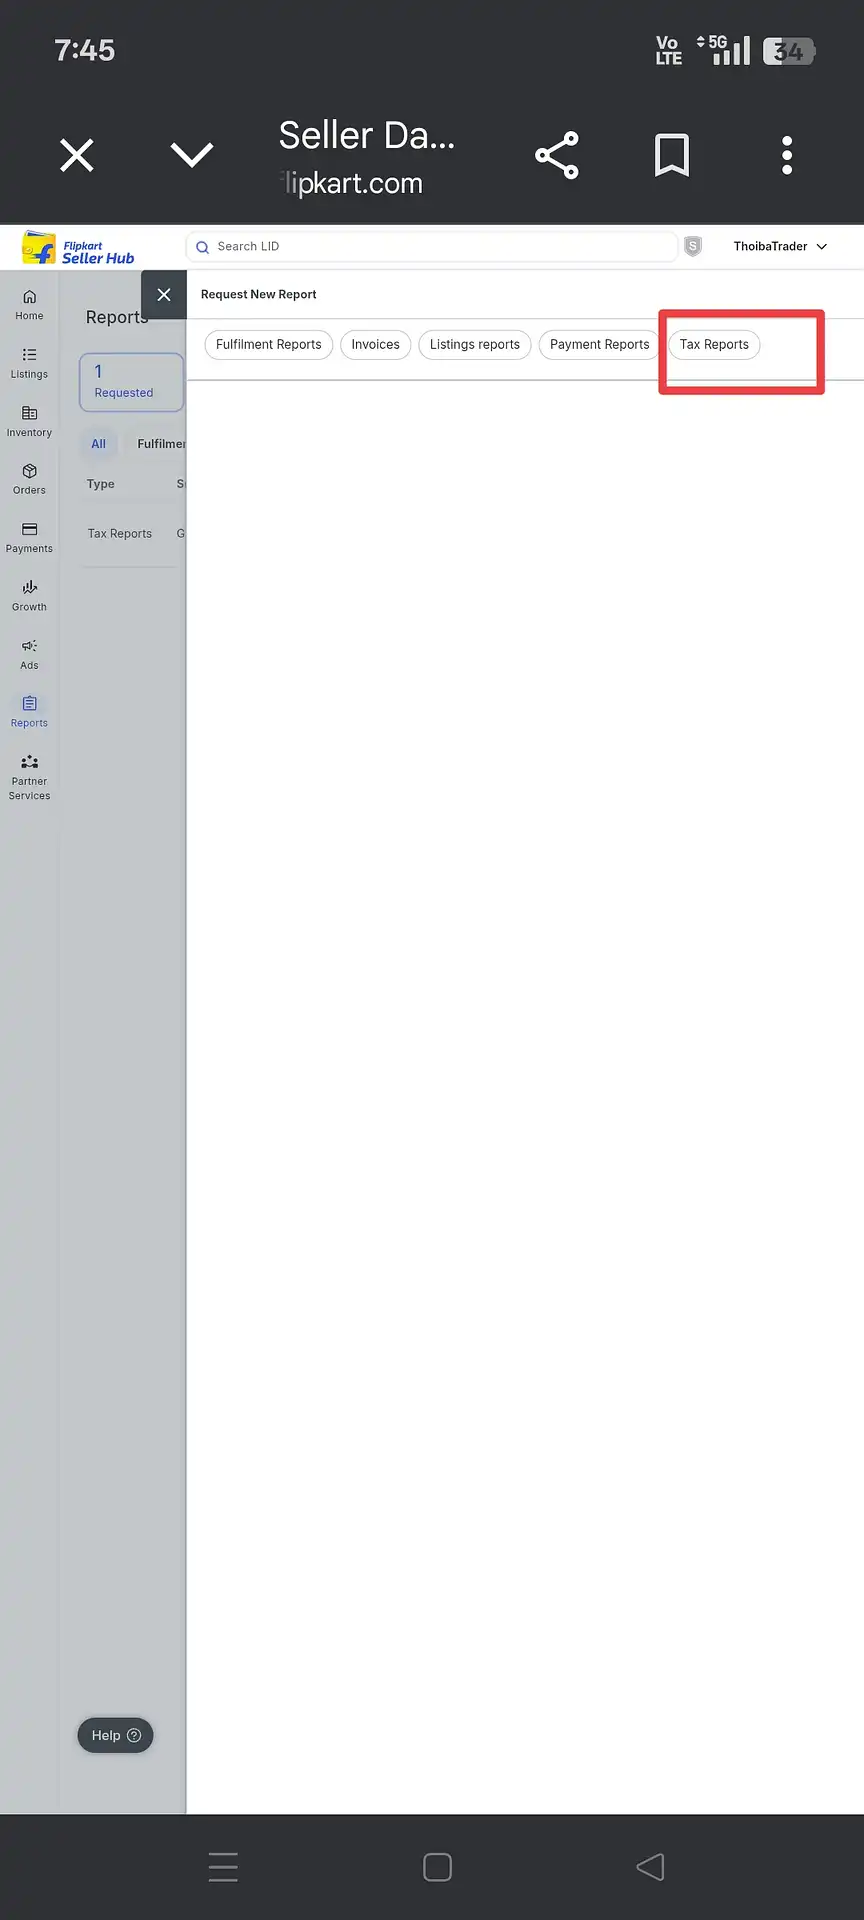
Step 4: Select the "Tax Reports" tab in the Request New Report panel
5
Click "Request Report" Under "GSTR Return Report"
Under Tax Reports, you'll see three options: GSTR return report (for filing GSTR-1 and GSTR-8), Sales Report (for sales tax), and TDS (for TDS computation). Click Request Report under the first option — GSTR return report.
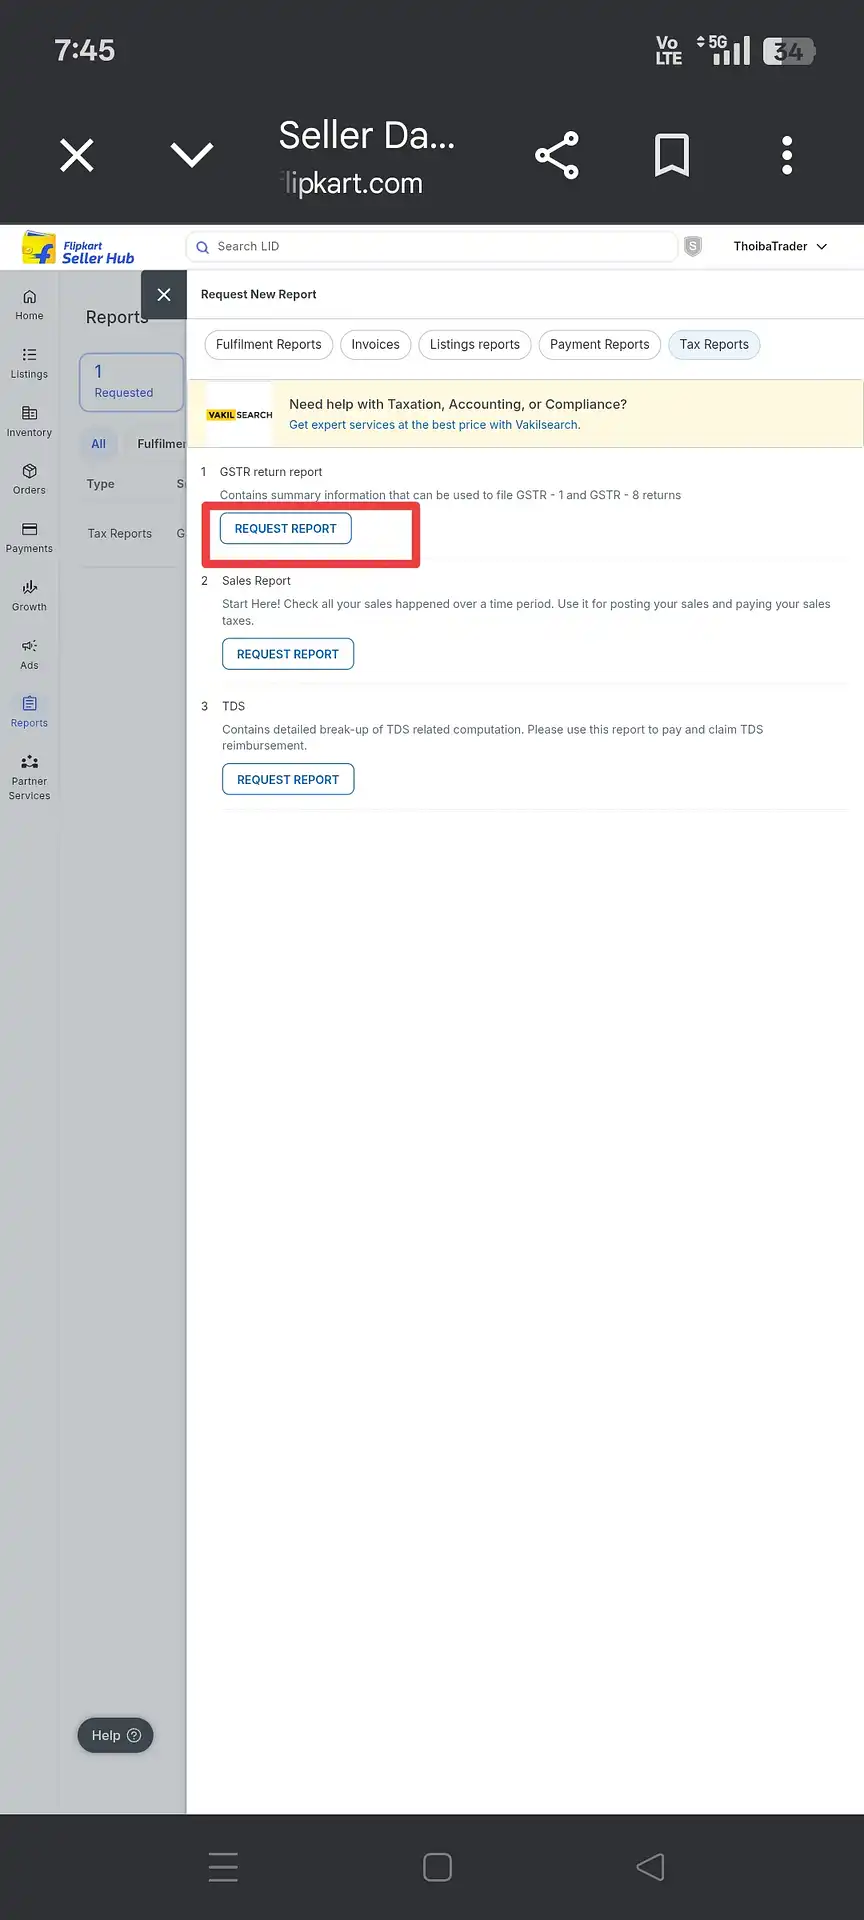
Step 5: Under Tax Reports, click "Request Report" next to "GSTR return report"
6
Set the Date Range and Submit
You'll see a form for the GSTR return report with two options: One Time Request and Schedule Report. Choose One Time Request. Then set the Select Date Range — for example, "Apr 01, 2026 – Apr 30, 2026" for the April filing. Click Submit. Note: the report can only be generated up to 3 days before the current date.
One Time Request → Select Date Range → Submit
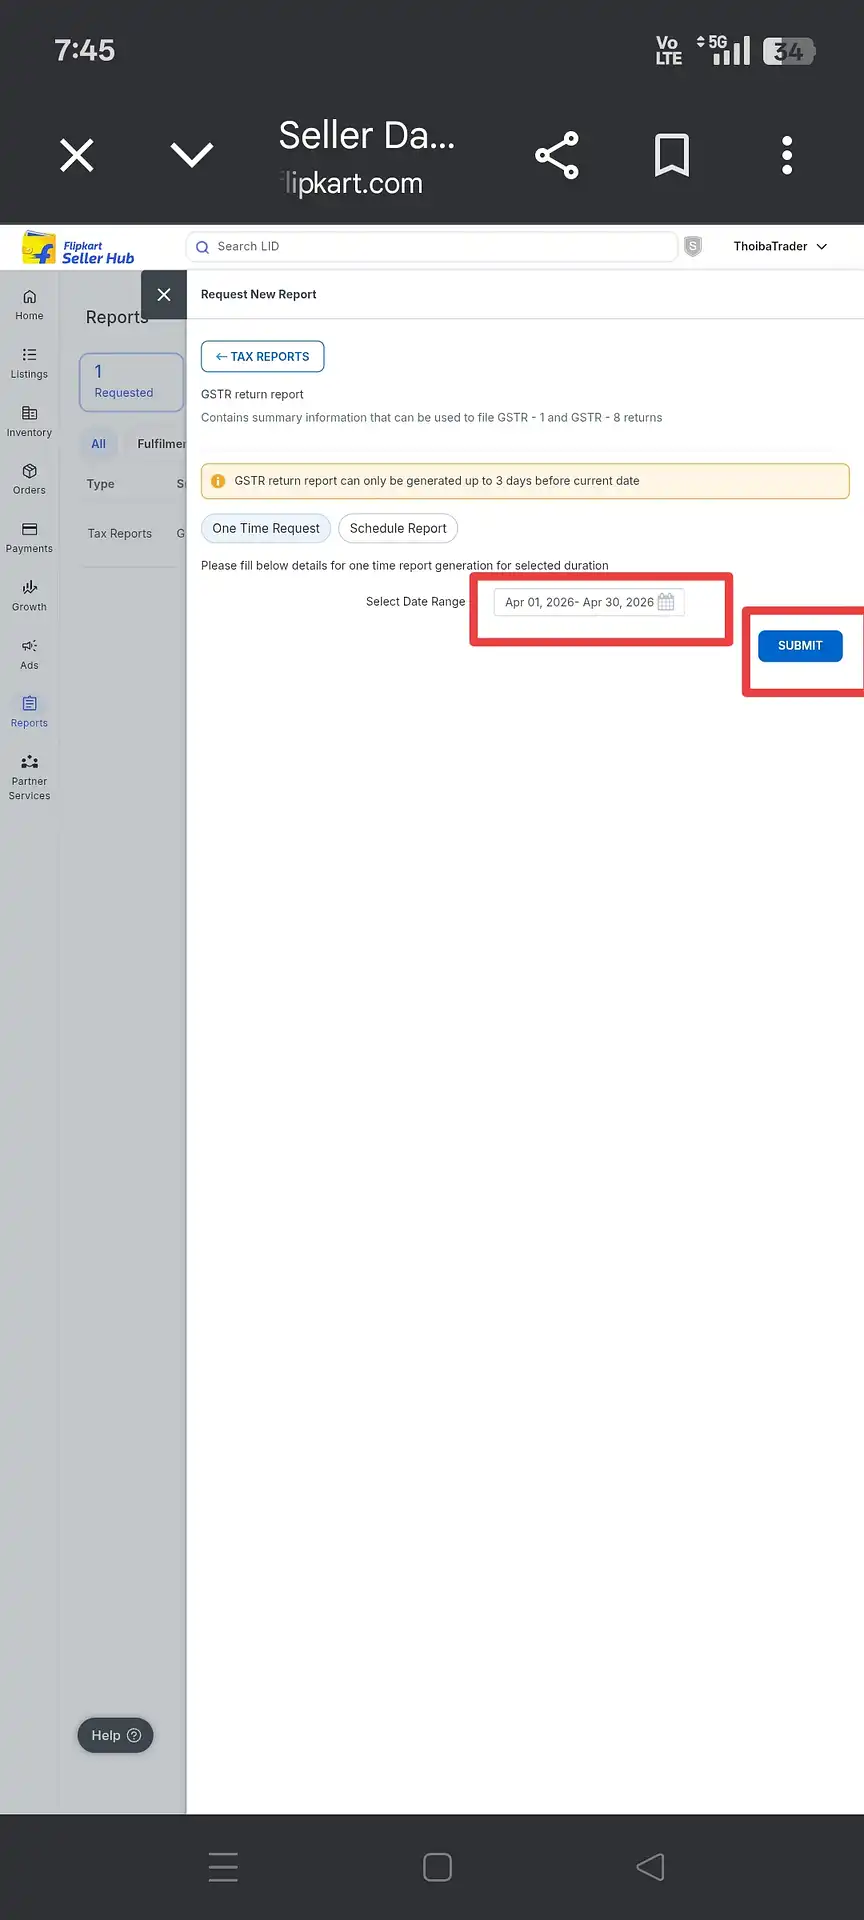
Step 6: Select "One Time Request", set your date range (full month), and click Submit
💡 After Submitting
Go back to the Reports page. You'll see your request listed under the "Requested" tab with status "Pending" or "In Progress". Once Flipkart generates the report, the status changes to Generated and a blue Download button appears. Click it to download your file.
4. The Waiting Period — Plan Ahead
Don't wait until the last minute to request your report.
After submitting your request, Flipkart typically takes a few hours to up to 1 full business day to generate the report. In my experience, most requests complete within 12 hours, but this can vary depending on server load.
If you submit the request in the evening, expect the report to be ready the next morning. The "Generated On" date shown in the Reports list (as seen in the screenshot showing "06 May 2026") gives you a reference for when it was completed.
⚠️ Don't Wait Until the Last Day
If your GSTR-1 filing deadline is the 11th, do not submit your Flipkart report request on the 10th. If generation takes a day, you'll be cutting it dangerously close — or missing it entirely. Request your report at least 2–3 days before the filing deadline.
5. Understanding the Sheets — Local vs Inter-State Sales
The most important structural detail in Flipkart's report that many sellers overlook.
When I first started using Flipkart's GSTR report, I noticed that the data wasn't all in one sheet — it was split across multiple tabs. The key distinction is between your home state sales and sales to other states. These are in separate sheets, and if you accidentally process only one of them, your total turnover will be wrong.
For us in Assam, for example, the sheet with Assam-to-Assam sales (intra-state, where CGST + SGST applies) is in one tab, and all the other states (inter-state, where IGST applies) are in another. You need both — every time.
🏠
Local / Intra-State Sales
Sales where the buyer is in the same state as your GST registration. CGST + SGST applies. These appear in a separate sheet.
Example: Seller in Assam → Buyer in Assam
✈️
Inter-State Sales
Sales where the buyer is in a different state from your GST registration. IGST applies. All other states in one combined sheet.
Example: Seller in Assam → Buyer in Maharashtra / Delhi / etc.
⚠️ Always Include Both Sheets
When computing your GSTR-1 summary, you must include data from both the local sales sheet and the inter-state sales sheet. Missing either one will result in an under-declaration of turnover. Our GSTR-1 Calculator handles this automatically when you upload the Flipkart report.
ℹ️ Review All Excel Sheet
Flipkart's GST report is an Excel file that often contains several tabs. Before you start processing, make sure to review every sheet in the file to ensure all transaction details and credit notes are accounted for.
6. Common Mistakes to Avoid
These are the errors that trip up Flipkart sellers during GSTR-1 time.
❌ Don't Make These Mistakes
- Trying to download from the Flipkart Seller App. The tax report option does not exist inside the app. Use a browser.
- Opening the browser while the Seller App is installed on your phone. It will redirect to the app. Either use a computer or temporarily uninstall the app.
- Waiting until the last filing day to request the report. Generation can take up to 24 hours. Request 2–3 days early.
- Processing only the local sales sheet and forgetting the inter-state sheet (or vice versa). You need both.
- Downloading the Sales Report instead of the GSTR return report. The Sales Report is a general sales overview — the GSTR return report is what you need for GSTR-1 filing.
- Setting the wrong date range. Always set the date range to the full calendar month (e.g., 1st to 30th/31st). Partial ranges will give you incomplete data.
7. What to Do After Downloading
The report is ready — now turn it into a filed return.
Once you have the Flipkart GSTR return report downloaded, you'll have an Excel file with multiple sheets covering your local sales, inter-state sales, HSN summary, and document series. The next step is to compile all of this — along with reports from Amazon and Meesho if you sell there too — into a single state-wise and HSN-wise GSTR-1 summary.
Doing this manually across three platform reports is where most sellers lose hours of time every month. The data formats are different, the sheet structures are different, and a single calculation error can lead to a mismatched return.
The Thoiba Trader GSTR-1 Calculator accepts Flipkart, Amazon, and Meesho reports together. Upload all three, and it outputs a single combined GSTR-1 summary — state-wise, HSN-wise, and ready for the portal — in under 4 minutes.
📚 Download Guides for Other Platforms