1. शुरू करने से पहले — Email का इंतज़ार करें
Report तैयार होने से पहले ढूंढने में अपना वक्त बर्बाद मत करें।
Amazon हर महीने का GST report calendar month की 5 तारीख को generate करता है। लेकिन मेरे personal experience से, आमतौर पर महीने की 2 तारीख के आसपास एक confirmation email आती है जो बताती है कि report तैयार है।
2. GST Report कहाँ मिलेगी
पहली बार menu path थोड़ा confusing लग सकता है — यहाँ exactly बताया है कहाँ जाना है।
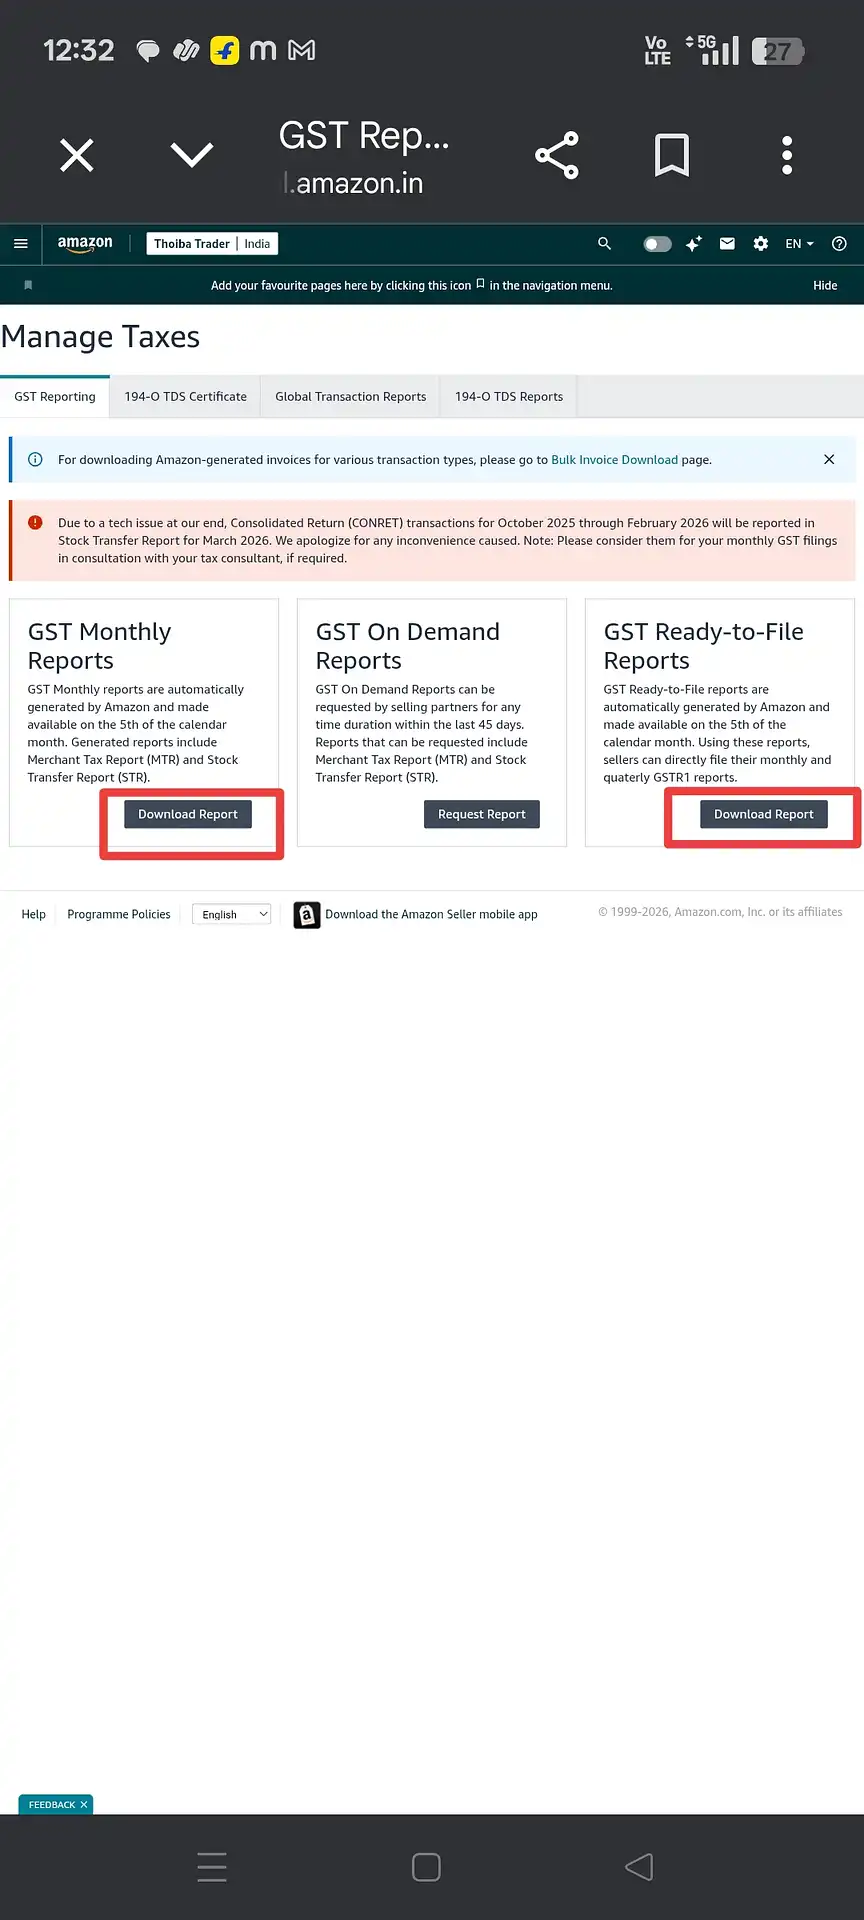
Laptop या desktop browser पर Amazon Seller Central (sellercentral.amazon.in) में login करें। Homepage पर आने के बाद यह navigation path follow करें:
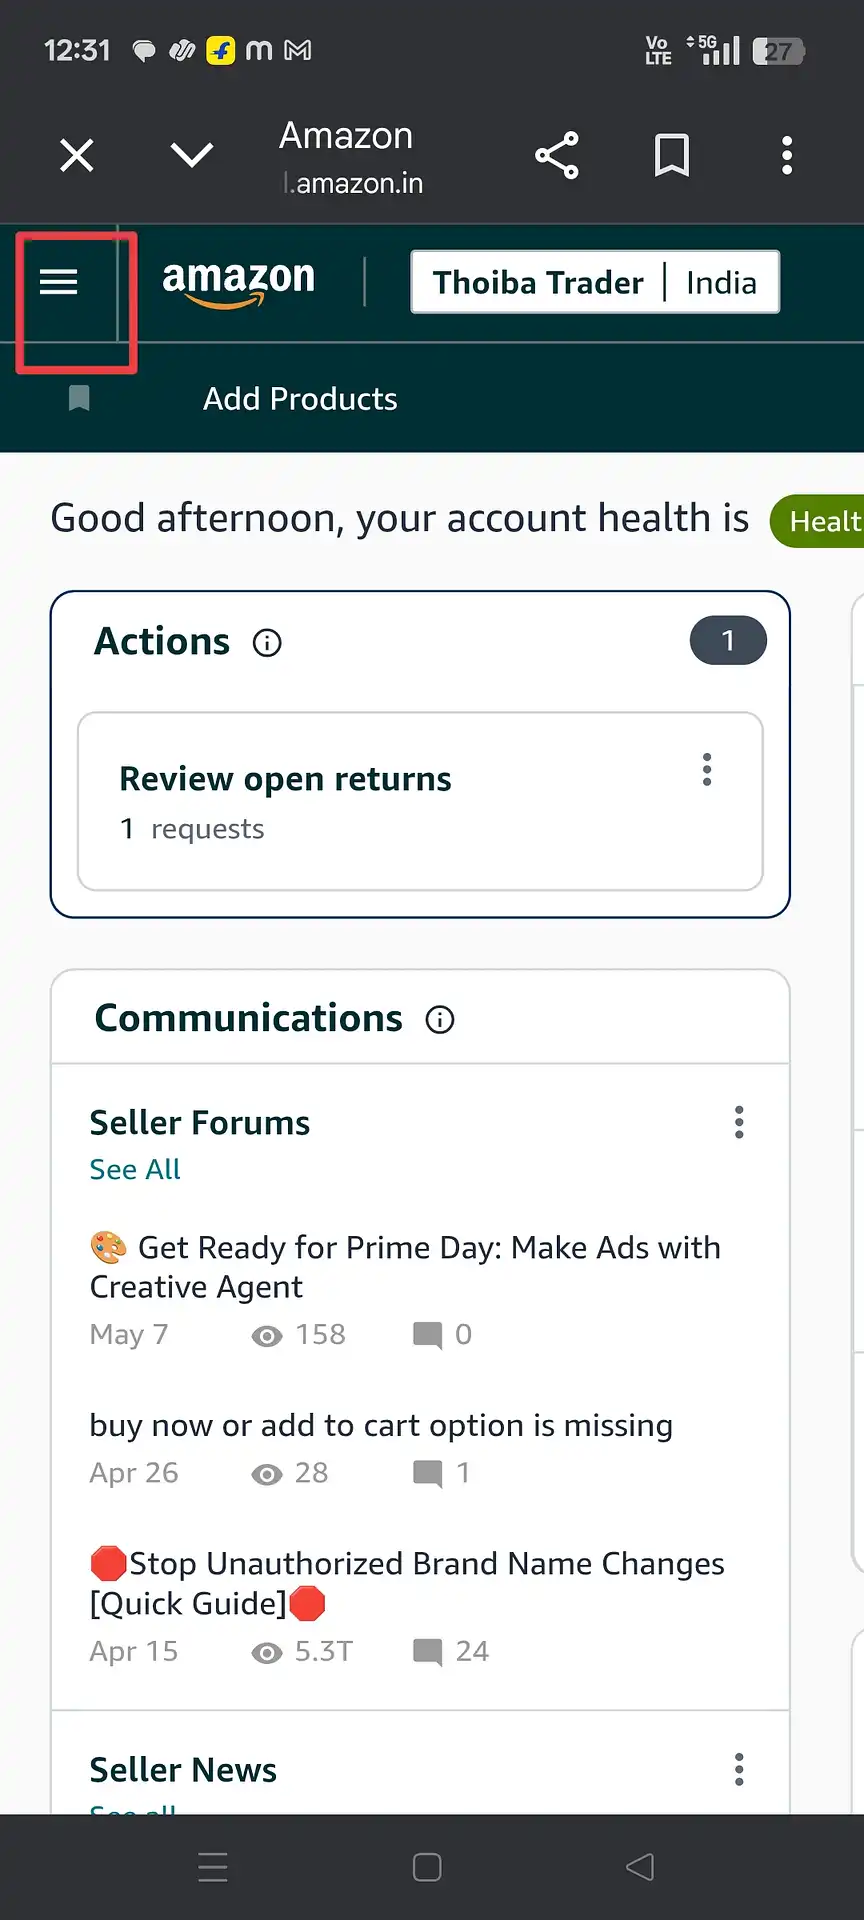
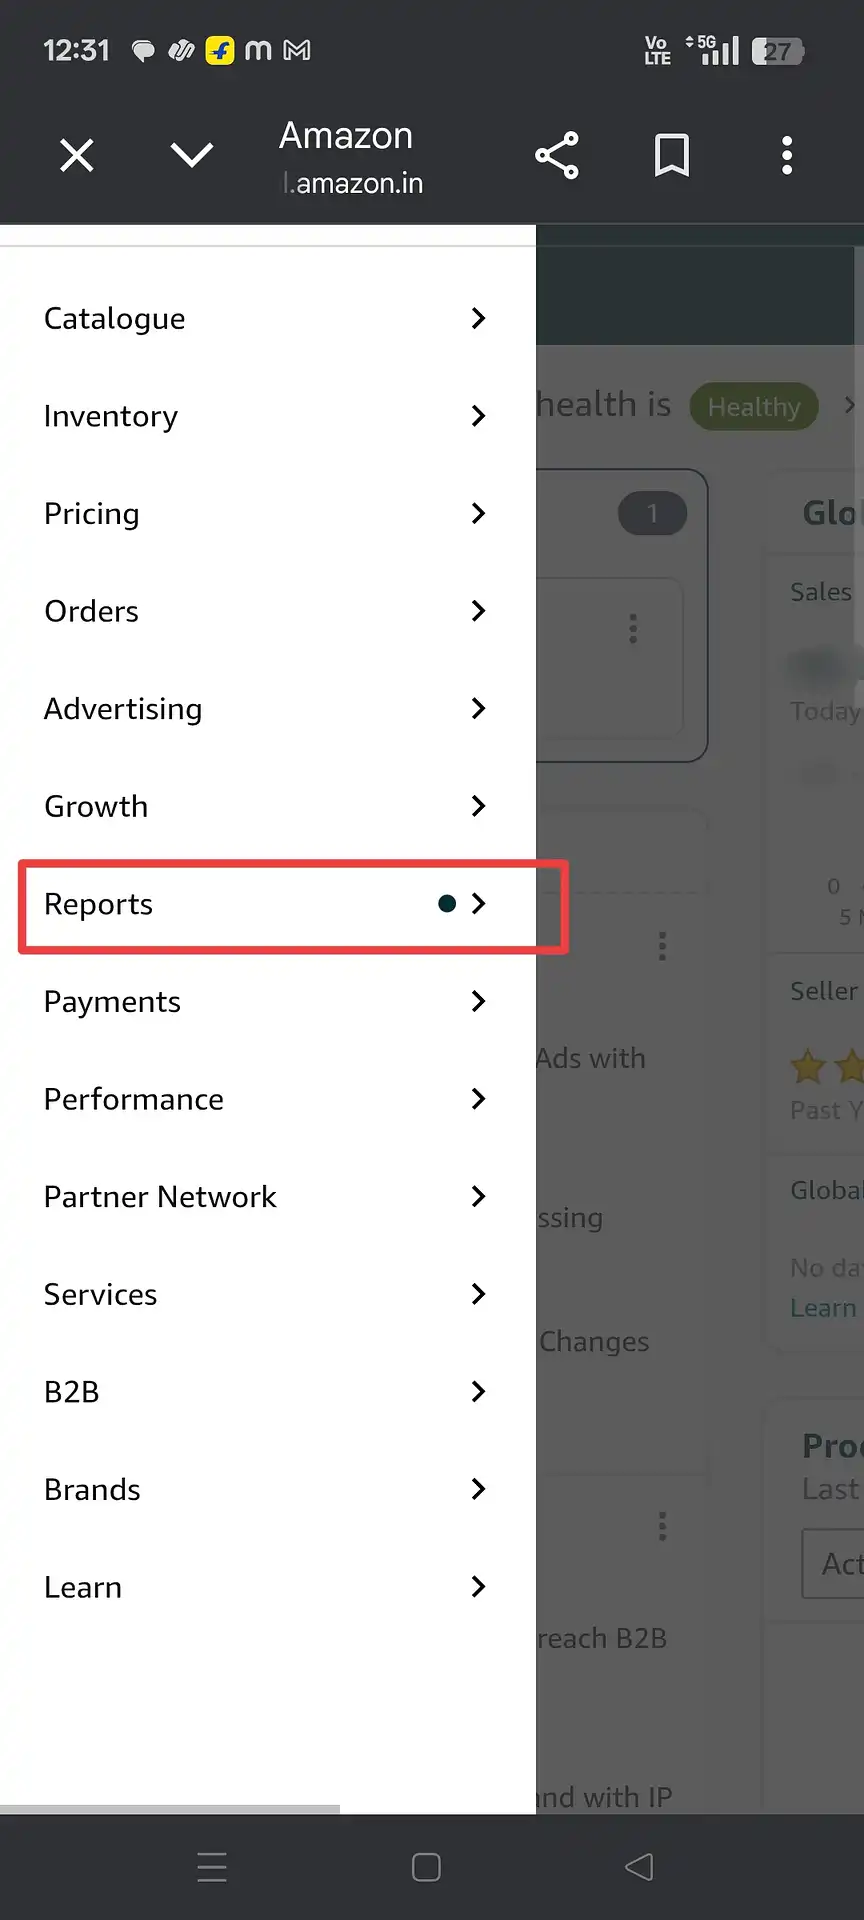
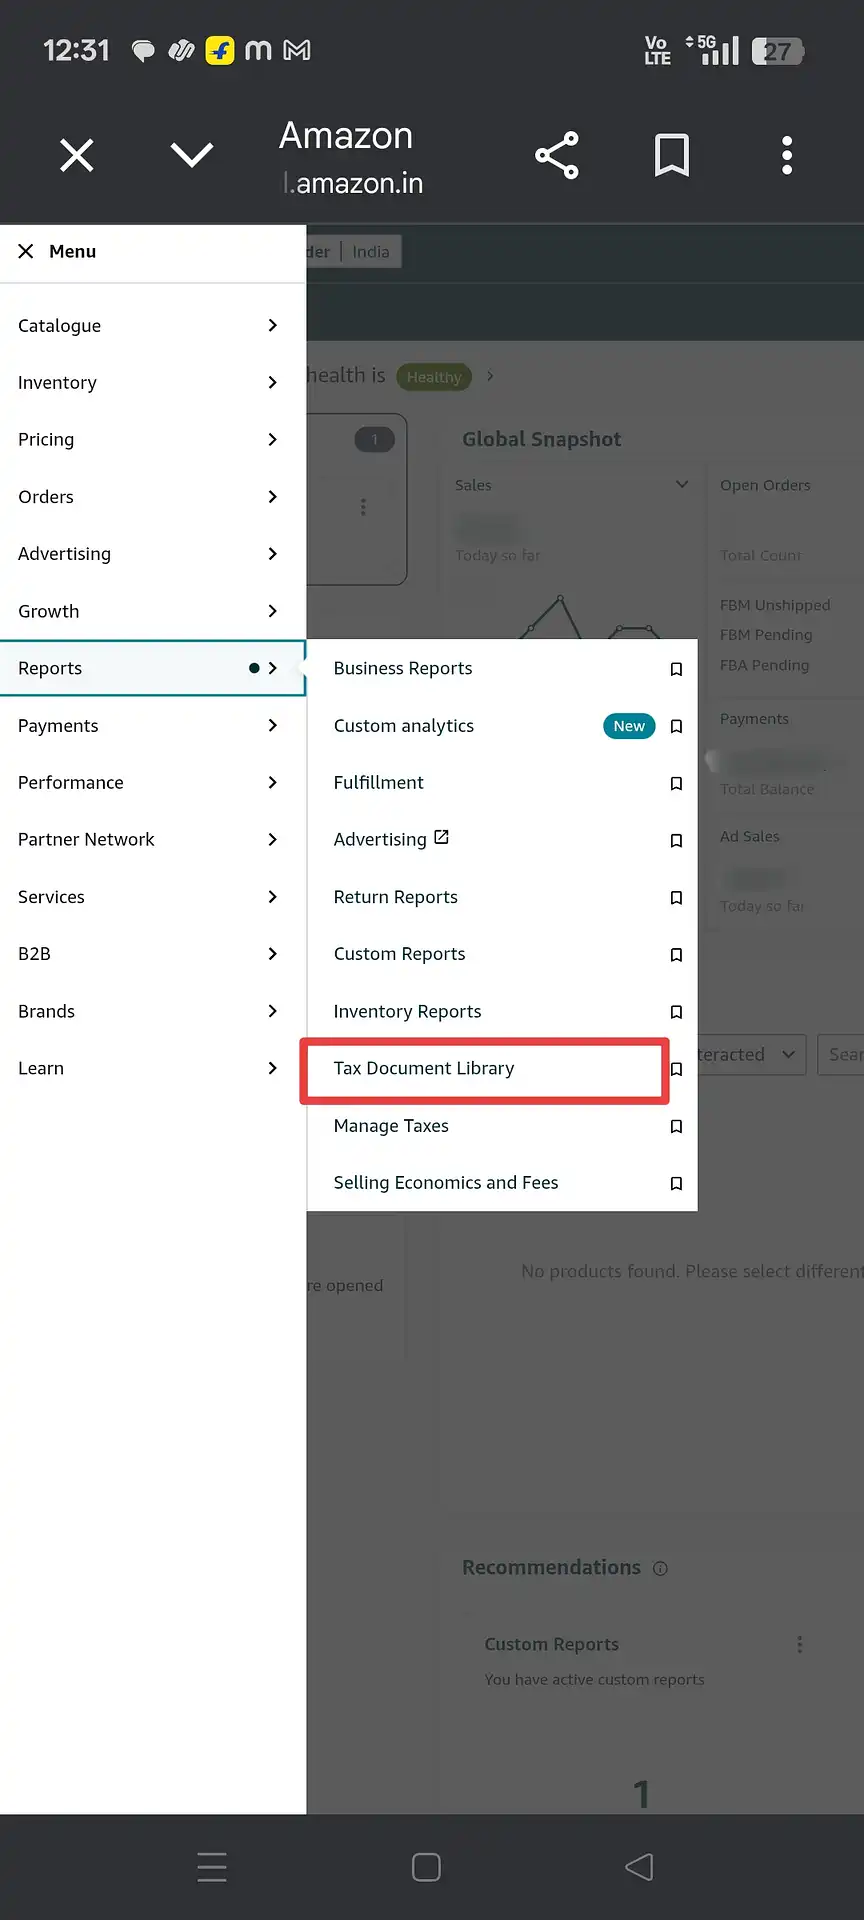
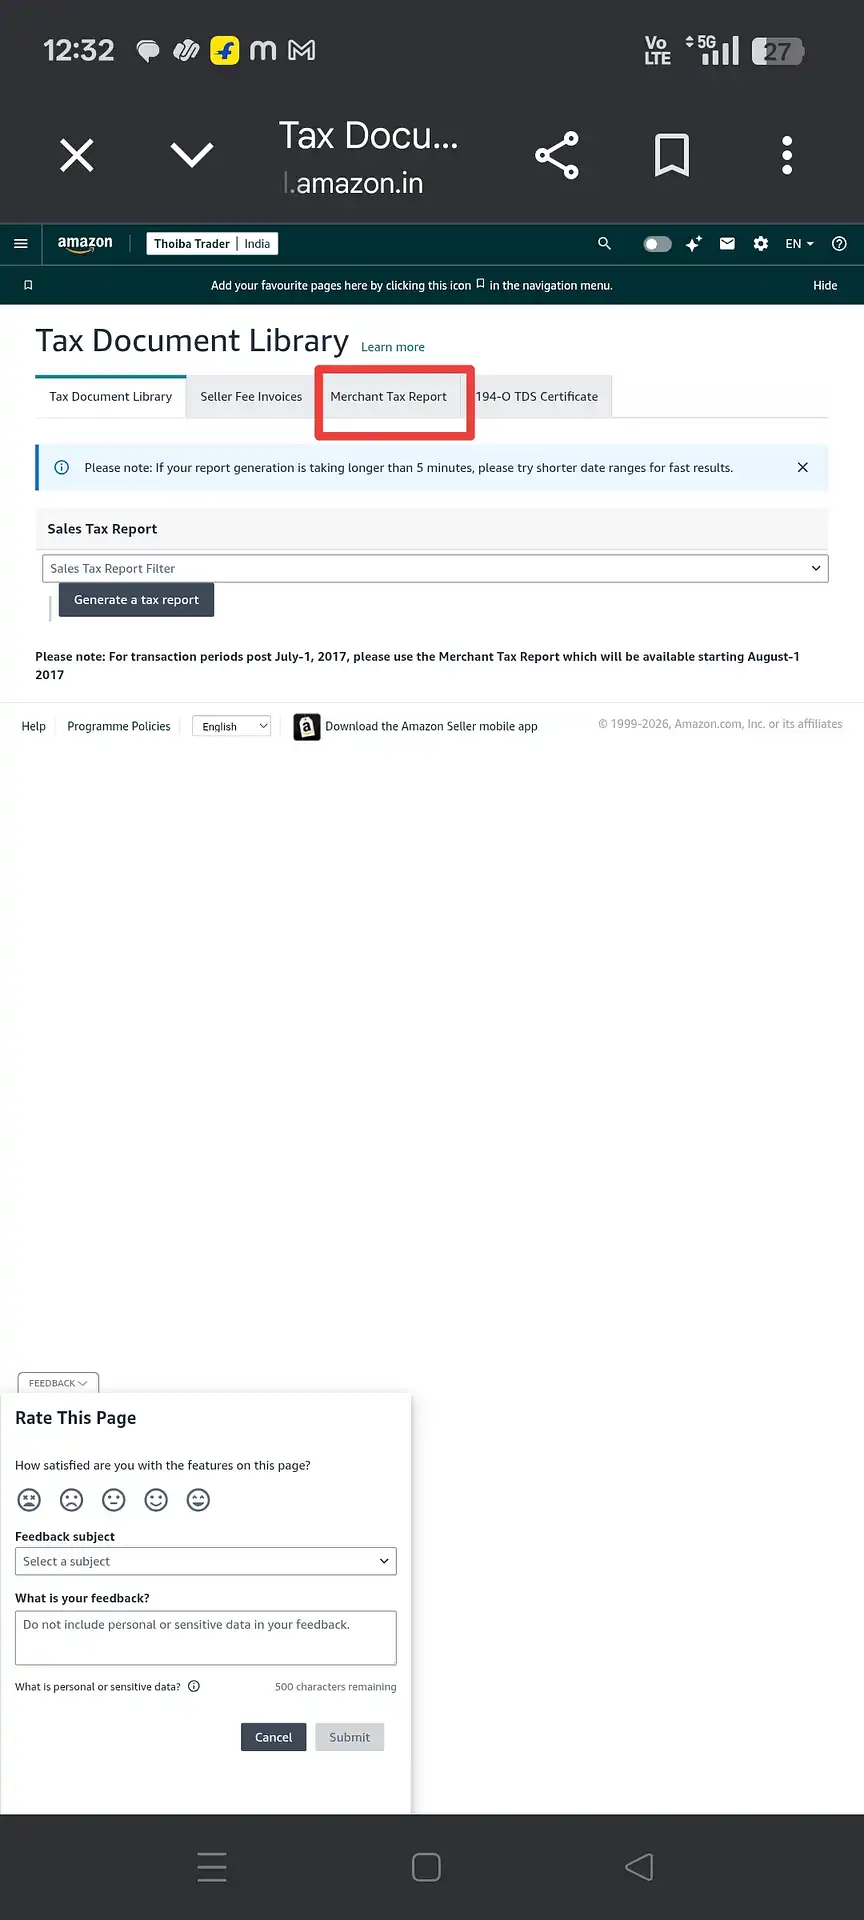
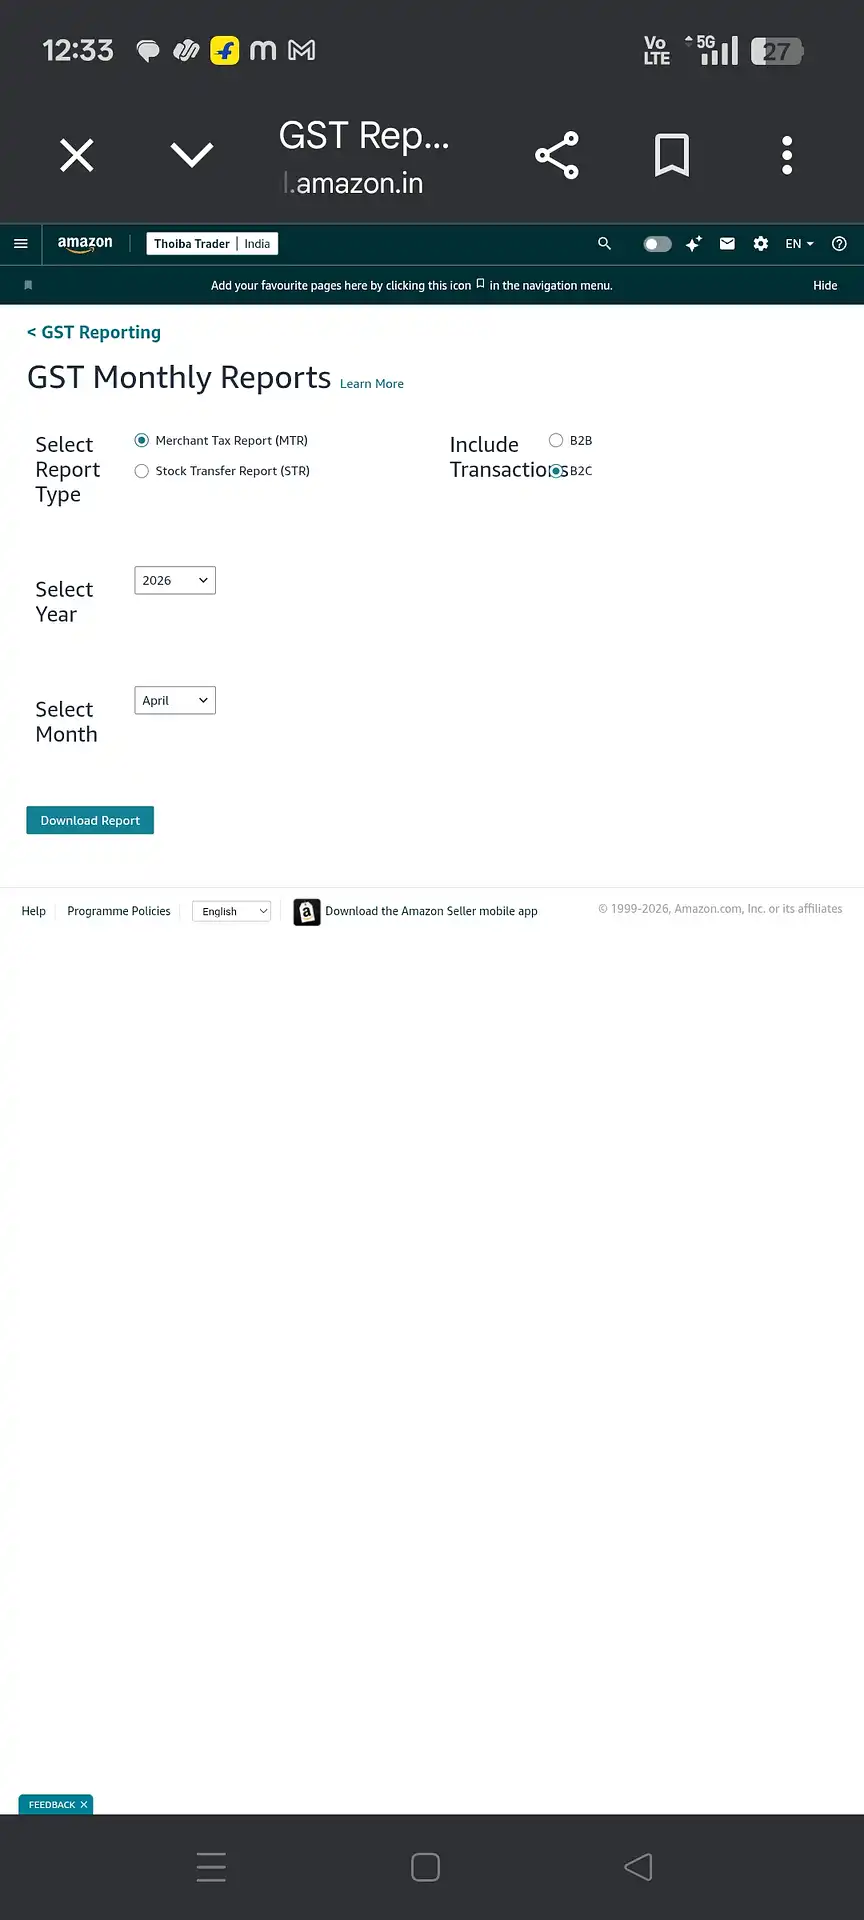
a) GST Monthly Reports — यह पूरा transaction-level Merchant Tax Report (MTR) देता है। पहले card के नीचे "Download Report" पर click करें।
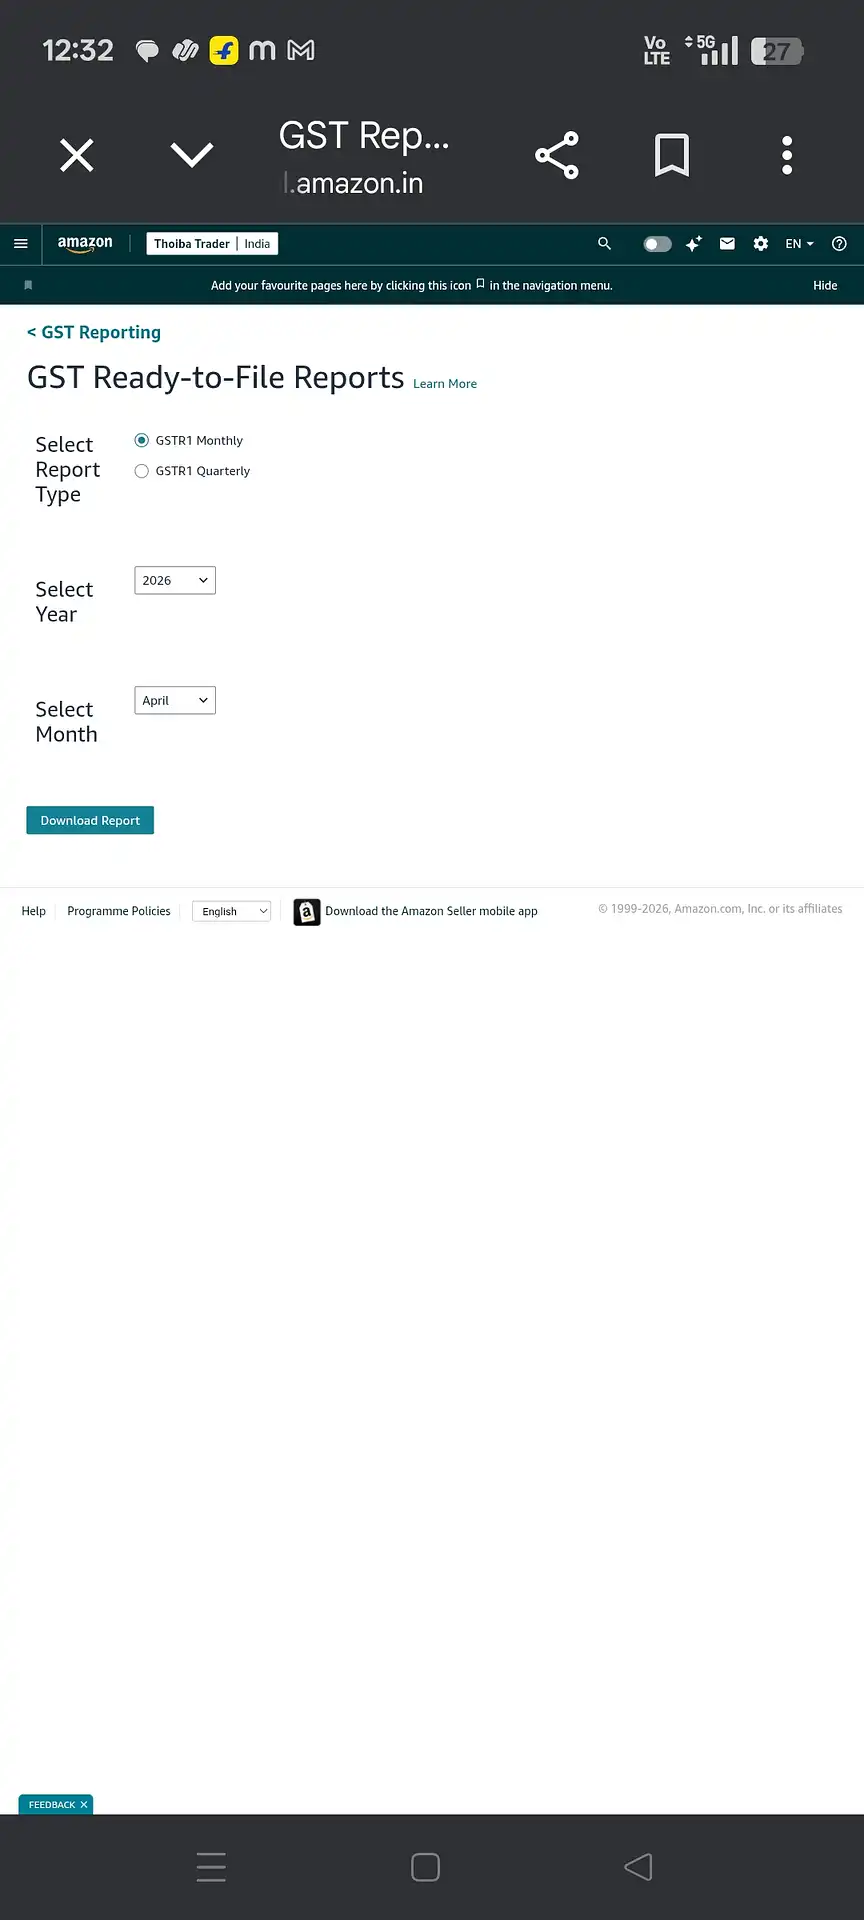
b) GST Ready-to-File Reports — यह pre-formatted GSTR-1 summary (Monthly या Quarterly) देता है। तीसरे card के नीचे "Download Report" पर click करें।
3. कौन सा Report Download करें — MTR vs Ready-to-File
Amazon आपको कई options देता है। यहाँ जानें हर एक का मतलब।
GST Reporting page पर आपको तीन report types दिखेंगे। GSTR-1 सही तरीके से file करने के लिए इनका फ़र्क समझना ज़रूरी है।
| Feature | GST Monthly Reports (MTR) | GST Ready-to-File Reports |
|---|---|---|
| पूरा नाम | Merchant Tax Report (MTR) | GSTR-1 Monthly / Quarterly |
| Data का प्रकार | Transaction-level (हर order) | Pre-summarised GSTR-1 format |
| B2B sales (GSTIN buyers) | ✓ शामिल | ✓ शामिल |
| Document Series (invoice range) | ✓ Available | ✗ Available नहीं |
| HSN-wise summary | Manual काम ज़रूरी | ✓ Pre-calculated |
| State-wise breakup | Manual काम ज़रूरी | ✓ Pre-calculated |
| File format | ZIP (CSV inside) | ZIP (Excel inside) |
| Best for | Cross-verification, document series | Quick filing reference |
4. Step-by-Step Download Guide
MTR (Monthly Tax Report) और Ready-to-File report download करने के exact steps।
Part A — GST Monthly Report (MTR) Download करें
Part B — GST Ready-to-File Report (GSTR-1 Summary) Download करें
5. मेरे अपने Experience की Personal Tips
वो बातें जो मैं Amazon पर selling शुरू करते वक्त जानना चाहता था।
1. Tax reports के लिए Amazon Seller App use न करें। मैंने try किया है — app order management के लिए बढ़िया है, लेकिन mobile पर tax files download और open करना बहुत झंझट है। Files या तो ठीक से download नहीं होतीं या incompatible viewer में खुलती हैं। इसके लिए हमेशा laptop या PC use करें।
2. अगर phone ज़रूर use करना हो, तो Desktop Mode use करें। Browser (Chrome best है) खोलें, sellercentral.amazon.in पर जाएं, three dots menu tap करें → "Desktop site" check करें। यह पूरा interface देता है। Perfect नहीं है लेकिन download के लिए काम करता है।
3. Ready-to-File report में Document Series नहीं होता। यह एक बड़ी कमी है। GST portal invoice number range (Document Series) declare करने को कहता है — जैसे invoice #1 से invoice #312 तक। यह information सिर्फ MTR में होती है, Ready-to-File report में नहीं। तो MTR download skip मत करें।
4. हमेशा B2B totals cross-check करें। मैं दोनों reports download करके verify करता हूं कि MTR और Ready-to-File summary में B2B sale totals match करते हैं या नहीं। अगर नहीं करते, तो filing से पहले investigate करें।
5. Email का इंतज़ार करें — 1 तारीख को panic न करें। मैं पहले हर महीने की 1 तारीख को Seller Central check करता था और सोचता था report क्यों नहीं है। अब बस Amazon की notification email का इंतज़ार करता हूं। बहुत कम stress होता है।
6. Common Mistakes जो Avoid करें ❌
ये छोटी गलतियाँ filing के वक्त बड़ी परेशानी बन सकती हैं।
-
Downloaded file का नाम मत बदलें। Amazon जो file name देता है (जैसे
MTR-B2B-2026-04.csv) उसमें important metadata होता है। नाम बदलने से tools में processing errors आ सकती हैं या बाद में multiple months की files में confusion हो सकता है। -
CSV file Excel में open करके "Save As" मत करें। Amazon MTR CSV को Excel में open करके .xlsx में save करने से data format बदल जाता है। Excel dates, GST numbers, और numeric values automatically reformat कर देता है — इससे data corrupt हो जाता है। हमेशा original downloaded file directly अपने calculator या CA को दें।
-
CSV के अंदर का data manually edit मत करें। एक extra space, comma, या deleted row भी calculations तोड़ सकती है। अगर data में कोई error लगे, तो Amazon support से बात करें — raw file खुद edit मत करें।
-
Amazon Seller App से download मत करें। Mobile app file ठीक से download नहीं करता, और phone पर ZIP properly extract हुई या नहीं यह verify नहीं कर सकते। Tax report downloads के लिए हमेशा laptop या desktop use करें।
-
"On Demand Report" को Monthly Report का substitute मत समझें। On Demand Reports सिर्फ पिछले 45 दिनों को cover करते हैं और GSTR-1 filing के लिए ज़रूरी calendar month boundaries से exactly align नहीं हो सकते। Monthly filings के लिए हमेशा GST Monthly Report use करें।
7. Download के बाद क्या करें
Download सिर्फ पहला कदम है — यहाँ जानें इसे filed return में कैसे बदलें।
एक बार जब दोनों MTR (ZIP/CSV) और Ready-to-File (ZIP/Excel) reports download हो जाएं, अगला कदम है इन्हें GSTR-1 format में process करना जो आपका CA या GST portal expect करता है।
अगर आप multiple platforms (Amazon + Flipkart + Meesho) पर sell करते हैं, तो तीनों के reports को combine करके एक single state-wise और HSN-wise summary बनानी होगी। Excel में manually यह करना error-prone और time-consuming है।