🛒 Flipkart Guide
Flipkart Seller Hub से GSTR-1 Report कैसे Download करें (2026)
🗓️ 12 मई 2026
✍️ Sanathoiba Singha
⏱️ 5 मिनट में पढ़ें
Flipkart की GST report — जिसे "GSTR return report" कहते हैं — तीनों major platforms में सबसे detailed है, एक ही file में GSTR-1 के लिए लगभग सब कुछ मिल जाता है। लेकिन दो important quirks हैं: report manually request करनी होती है (और waiting रहती है), और अगर phone में Flipkart Seller App install है तो browser download page से बार-बार redirect हो जाता है। यह सब कैसे handle करें — यहाँ बताया है।
1. Flipkart की Report सबसे Detailed क्यों है
Amazon, Meesho, और Flipkart में — Flipkart सबसे complete data देता है।
🏆 Major Platforms में सबसे Detailed GST Report
अगर multiple ecommerce platforms पर sell करते हो, तो जल्दी notice होगा कि हर platform अपनी GST reports में अलग level का detail देता है। तीनों पर seller के तौर पर मेरे experience से, Flipkart की GSTR return report सबसे comprehensive है।
| Data Point |
Amazon |
Meesho |
Flipkart |
| Document Series (invoice range) |
✓ MTR only |
✗ Manual lookup |
✓ Included |
| HSN-wise summary |
✓ Included |
✓ Included |
✓ Included |
| State-wise breakup |
✓ Ready-to-File |
✓ Available |
✓ Included |
| GSTR-1 & GSTR-8 data in one file |
✗ |
✗ |
✓ Both covered |
| Report availability |
Auto-generate (5 तारीख) |
Auto (6–8 तारीख) |
Request पर (1–24 घंटे) |
| Download method |
Direct download |
Direct download |
Request → इंतज़ार → download |
Trade-off यह है: Amazon और Meesho के उलट जहाँ report automatically generate होकर download के लिए ready होती है, Flipkart में report manually request करनी होती है और generate होने का इंतज़ार करना होता है। नीचे details हैं।
2. App Redirect Problem — और इसे कैसे Fix करें
Phone में Flipkart Seller App install है तो browser आपसे लड़ेगा।
यह frustrating लेकिन easily solve होने वाली problem है। जब Flipkart Seller App install रहते Chrome या किसी mobile browser में seller.flipkart.com खोलने की कोशिश करते हो, browser automatically page को app में redirect कर देता है। App के अंदर tax reports download करने का option नहीं है — तो circles में घूमते रहते हो।
⚠️ App Redirect का जाल
- Seller App install रहते browser को web page पर "force" रहने की कोशिश मत करो — वो redirect करता रहेगा।
- Tax reports download के लिए Flipkart Seller App खुद मत use करो — app के अंदर यह option simply available नहीं है।
✅ Fix — Temporary Uninstall
सबसे clean solution है phone से Flipkart Seller App temporarily uninstall करना। App remove होने के बाद Chrome में seller.flipkart.com खोलो, three-dot menu (⋮) tap करो, और Desktop Site select करो। अब बिना किसी redirect के पूरा seller dashboard और Reports section access कर सकते हो। Report download करने के बाद app reinstall कर लो।
ℹ️ Best Option: Computer Use करो
Laptop या desktop access है तो यह हमेशा सबसे आसान और reliable रास्ता है। Computer browser में seller.flipkart.com पर login करो — कोई app conflict नहीं, Desktop Site toggle की ज़रूरत नहीं।
3. Step-by-Step: Report Request और Download कैसे करें
Desktop browser में seller.flipkart.com पर (या app uninstall करके mobile पर) यह steps follow करें।
1
Flipkart Seller Hub में Login करें
Browser में seller.flipkart.com खोलें और login करें। Main dashboard पर आएंगे जिसमें impressions, today's units, और today's sales दिखेगी। Left sidebar में: Home, Listings, Inventory, Orders, Payments, Growth, Ads, Reports, और Partner Services।
seller.flipkart.com
2
Left Sidebar में "Reports" Click करें
Left navigation sidebar में Reports ढूंढें (document/list icon है)। Click करें। Reports page खुलेगा जिसमें पहले से requested reports और top right में Request New Report button दिखेगा।
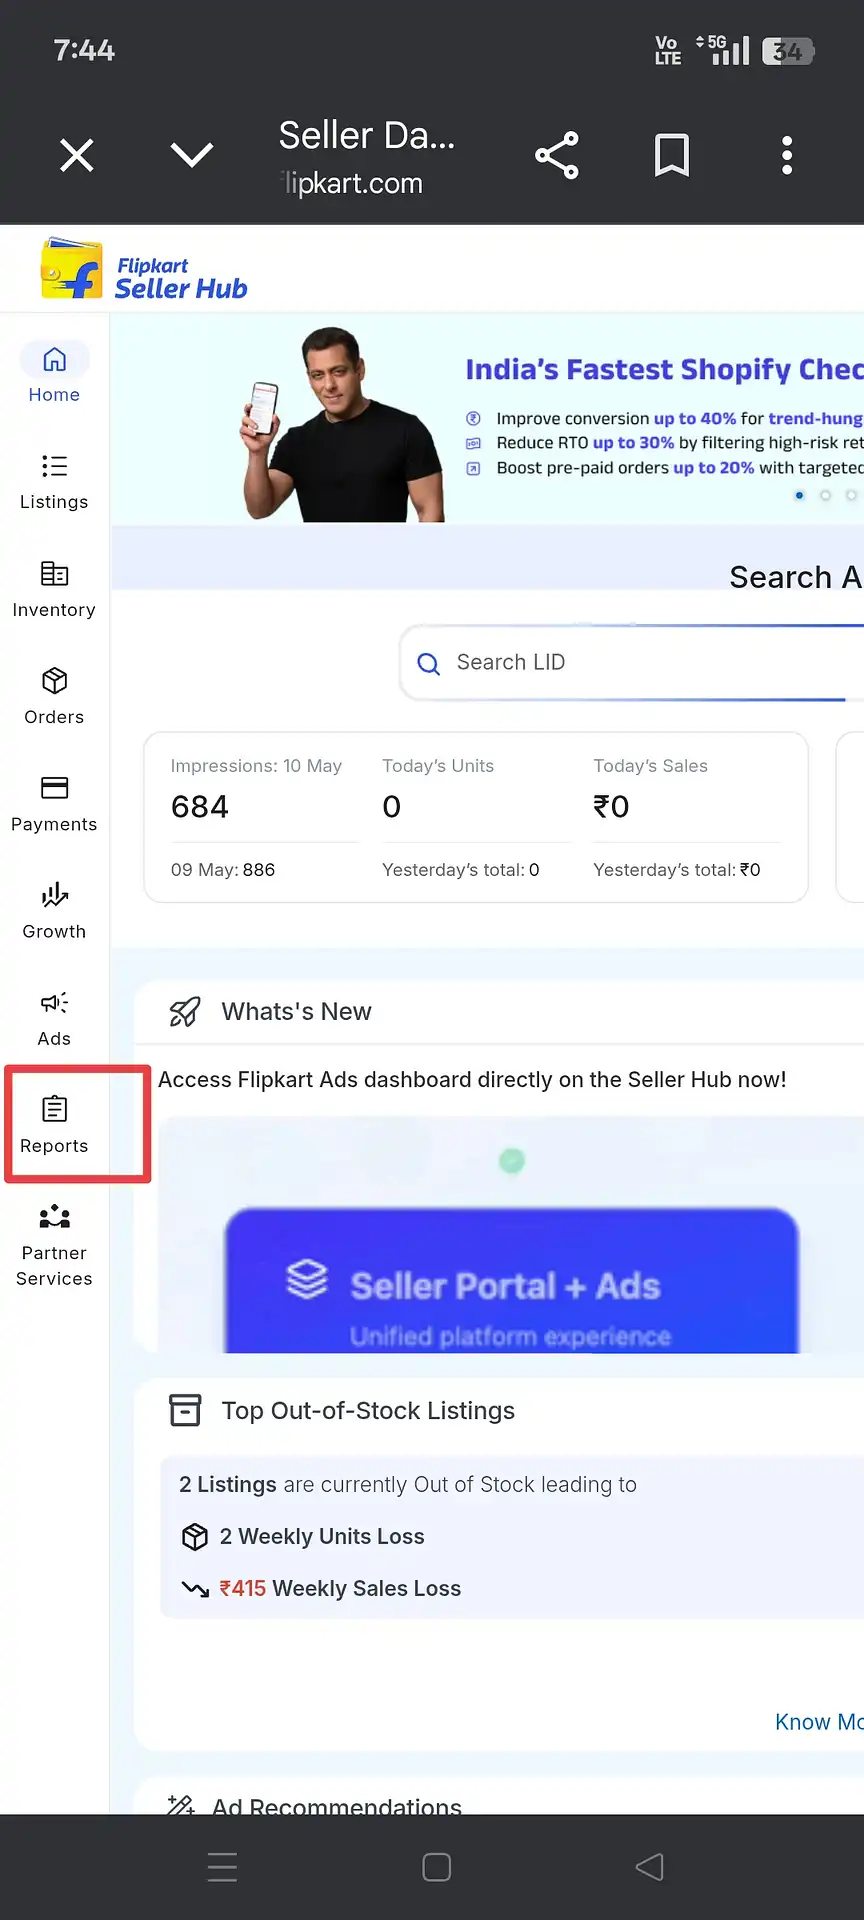
Step 2: Flipkart Seller Hub के left sidebar में "Reports" click करें
3
"Request New Report" Click करें
Reports page पर Requested और Scheduled reports के tabs और पहले download की गई reports की list दिखेगी। Report selection panel खोलने के लिए top right पर Request New Report button click करें।
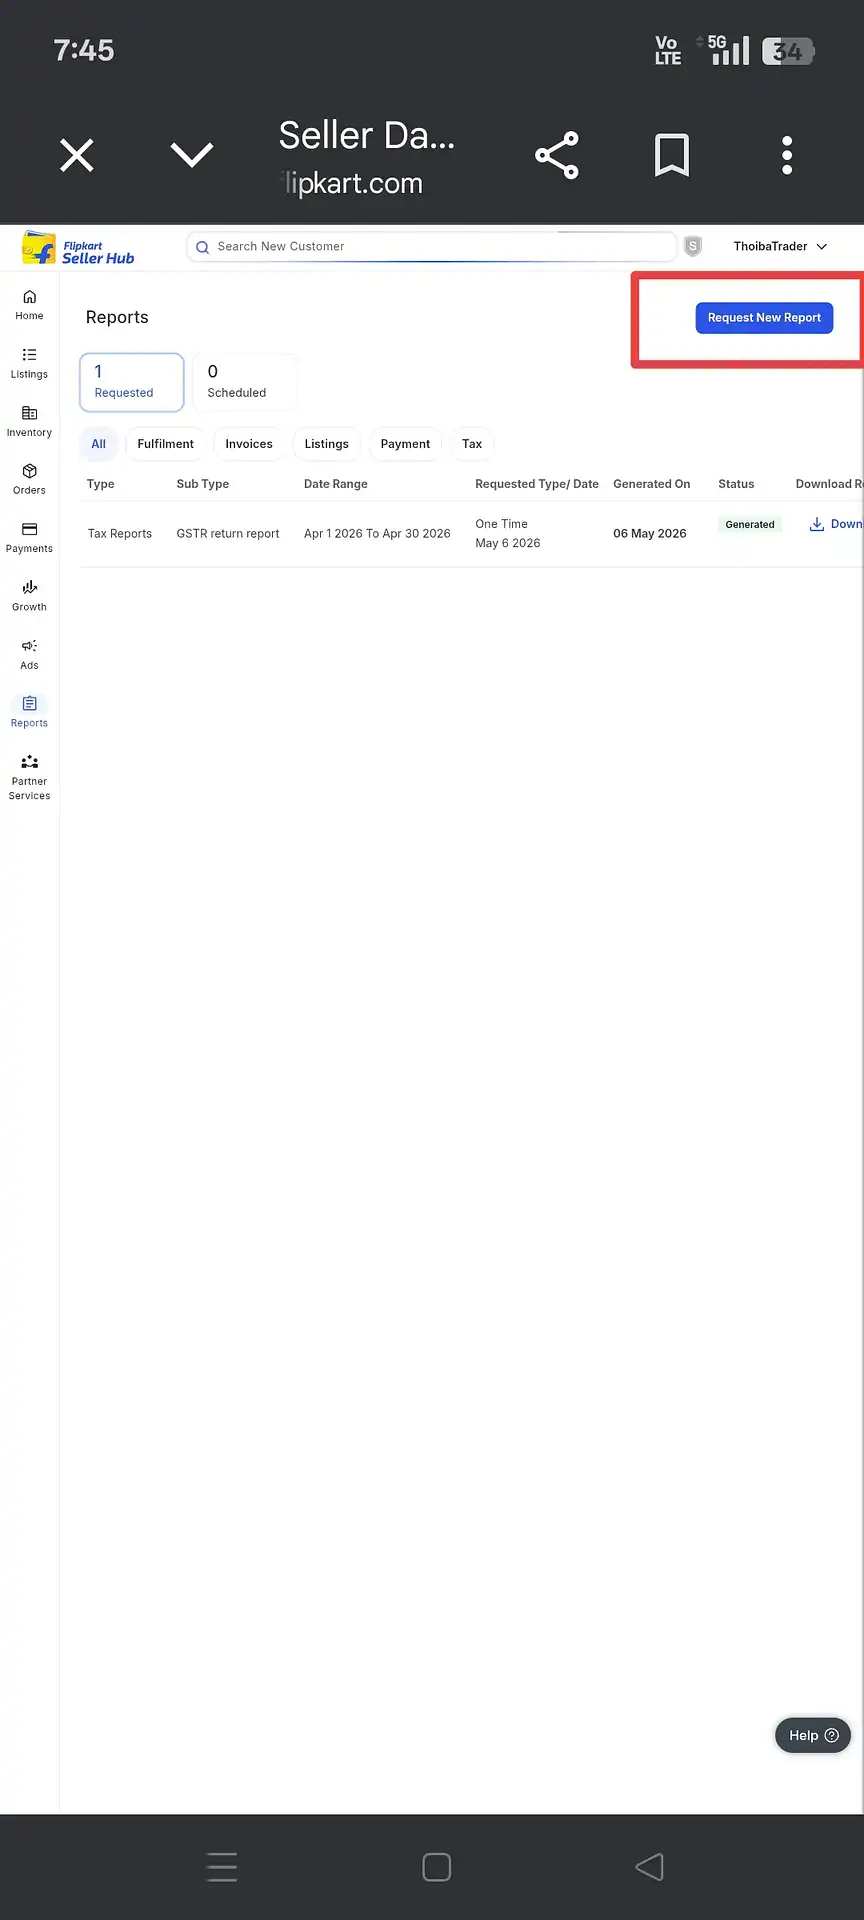
Step 3: Reports page — "Request New Report" (top right) click करें
4
"Tax Reports" Tab Select करें
एक panel खुलेगा जिसमें ऊपर report categories होंगी: Fulfilment Reports, Invoices, Listings Reports, Payment Reports, और Tax Reports। Tax Reports पर click करें।
Request New Report → Tax Reports
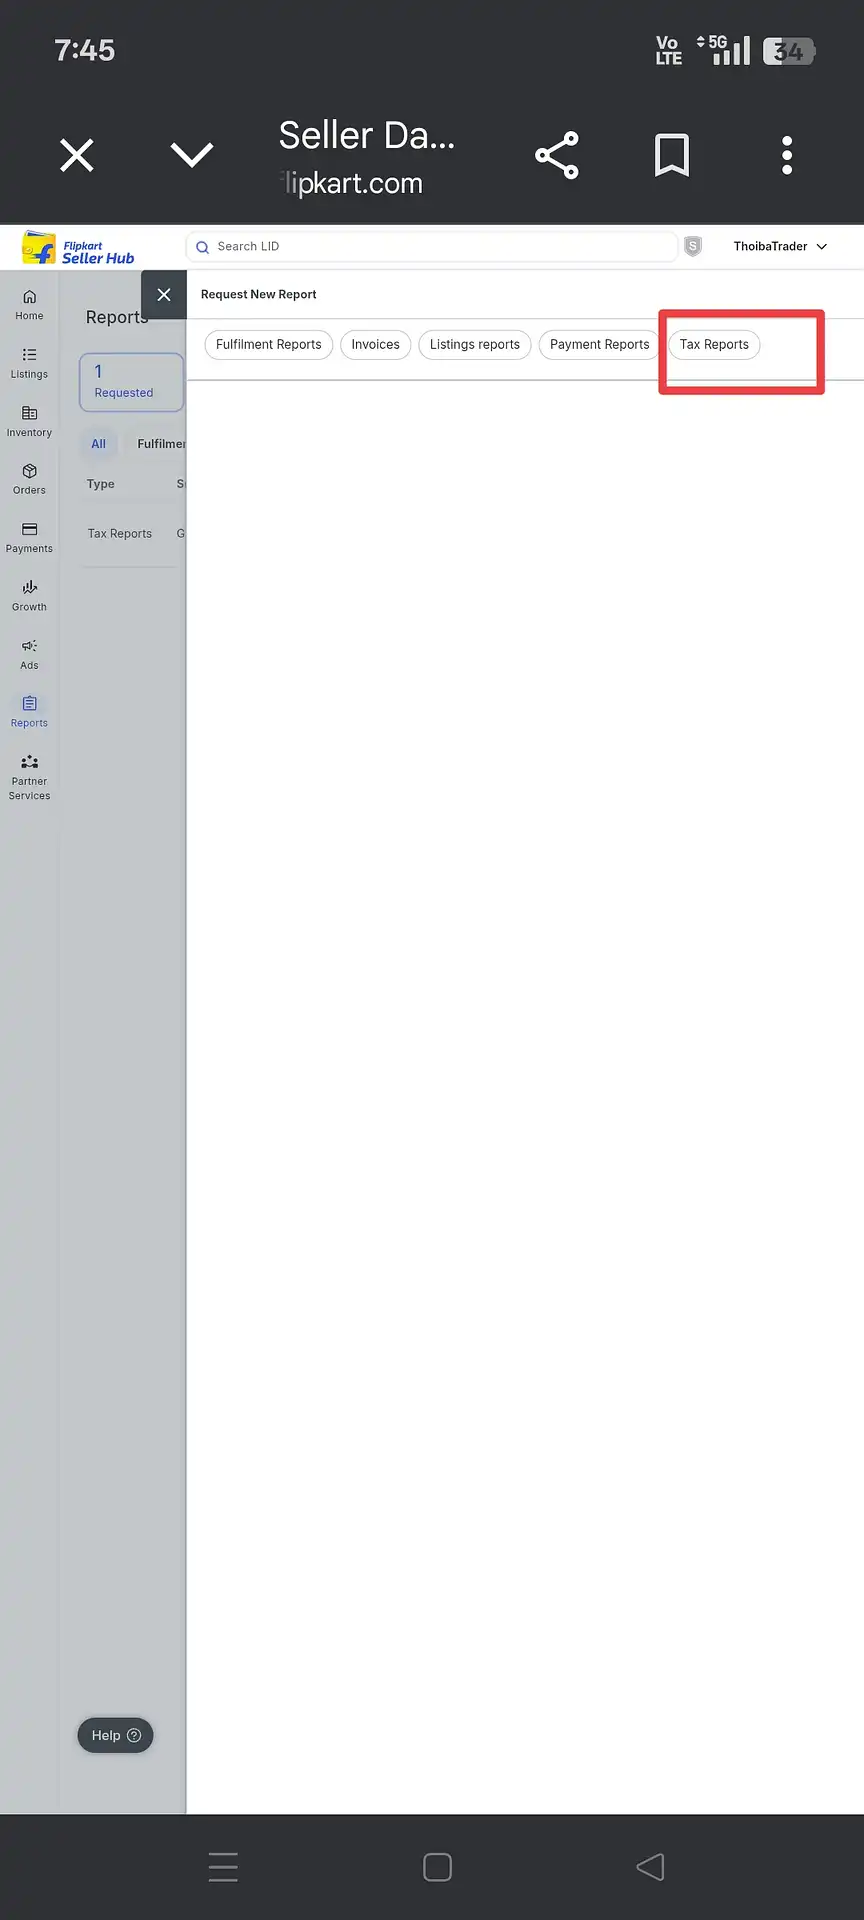
Step 4: Request New Report panel में "Tax Reports" tab select करें
5
"GSTR Return Report" के नीचे "Request Report" Click करें
Tax Reports में तीन options दिखेंगे: GSTR return report (GSTR-1 और GSTR-8 filing के लिए), Sales Report (sales tax के लिए), और TDS (TDS computation के लिए)। पहले option — GSTR return report — के नीचे Request Report click करें।
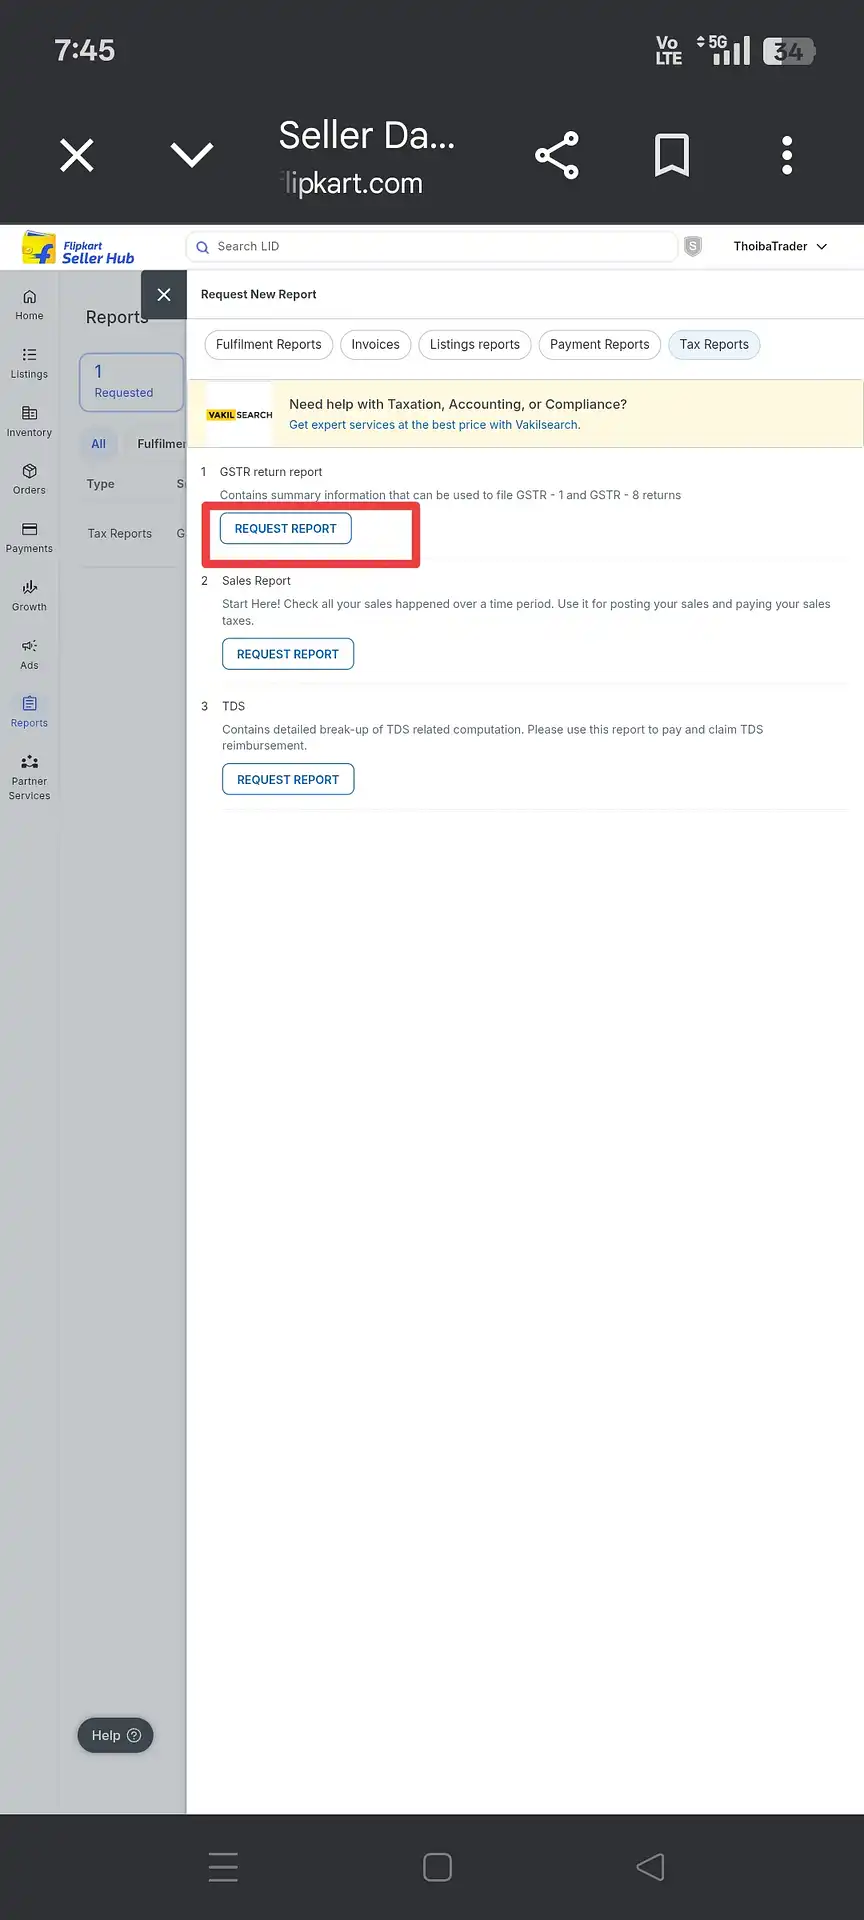
Step 5: Tax Reports में "GSTR return report" के बगल में "Request Report" click करें
6
Date Range Set करें और Submit करें
GSTR return report का form दिखेगा जिसमें दो options होंगे: One Time Request और Schedule Report। One Time Request choose करें। फिर Select Date Range set करें — जैसे April filing के लिए "Apr 01, 2026 – Apr 30, 2026"। Submit click करें। Note: report सिर्फ current date से 3 दिन पहले तक generate हो सकती है।
One Time Request → Select Date Range → Submit
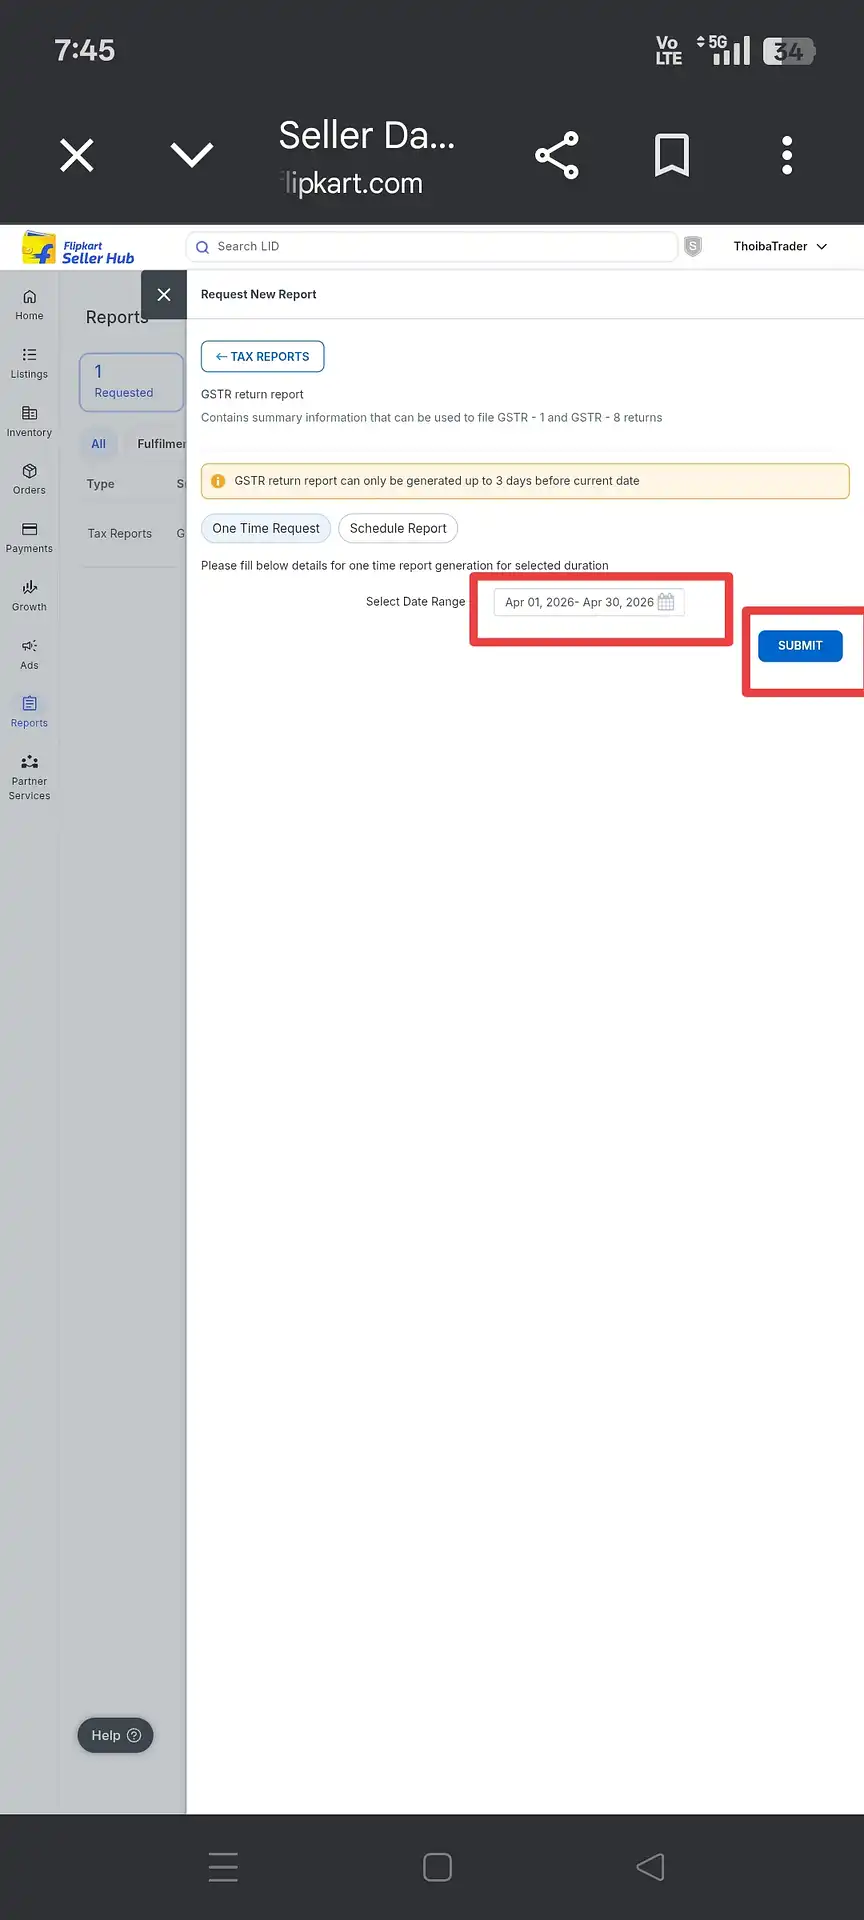
Step 6: "One Time Request" select करें, पूरे month का date range set करें, और Submit click करें
💡 Submit के बाद
Reports page पर वापस जाओ। "Requested" tab में तुम्हारी request status "Pending" या "In Progress" के साथ दिखेगी। Flipkart द्वारा report generate होने पर status Generated हो जाती है और एक blue Download button appear होता है। उसे click करो।
4. Waiting Period — पहले से Plan करें
Report request के लिए आखिरी minute तक मत रुको।
Request submit करने के बाद, Flipkart report generate करने में आमतौर पर कुछ घंटों से लेकर 1 पूरे business day तक लेता है। मेरे experience में, ज़्यादातर requests 12 घंटों के अंदर complete हो जाती हैं, लेकिन server load के हिसाब से vary कर सकता है।
शाम को request submit करें तो अगली सुबह report ready होने की expect करें। Reports list में दिखाई "Generated On" date (screenshot में "06 May 2026" जैसे) यह बताती है कि कब complete हुई।
⚠️ आखिरी दिन तक मत रुको
अगर GSTR-1 filing deadline 11 तारीख है, तो 10 तारीख को Flipkart report request submit मत करो। Generation में एक दिन लगे तो dangerously close हो जाएगा — या पूरी तरह miss हो जाएगा। Report filing deadline से कम से कम 2–3 दिन पहले request करो।
5. Sheets को समझें — Local vs Inter-State Sales
Flipkart की report की सबसे important structural detail जो बहुत से sellers miss कर देते हैं।
जब मैंने पहली बार Flipkart की GSTR report use करना शुरू किया, तो notice किया कि सारा data एक ही sheet में नहीं था — multiple tabs में split था। Key distinction है home state sales और दूसरे states में sales के बीच। ये अलग-अलग sheets में होती हैं, और गलती से सिर्फ एक process करें तो total turnover गलत हो जाएगा।
हमारे लिए Assam में, जैसे, Assam-to-Assam sales (intra-state, जहाँ CGST + SGST लगता है) एक tab में है, और बाकी सभी states (inter-state, जहाँ IGST लगता है) दूसरे में। दोनों चाहिए — हर बार।
🏠
Local / Intra-State Sales
वो sales जहाँ buyer आपके GST registration के same state में है। CGST + SGST लगता है। ये एक अलग sheet में होती हैं।
Example: Assam में Seller → Assam में Buyer
✈️
Inter-State Sales
वो sales जहाँ buyer आपके GST registration से अलग state में है। IGST लगता है। बाकी सभी states एक combined sheet में।
Example: Assam में Seller → Maharashtra / Delhi / आदि में Buyer
⚠️ हमेशा दोनों Sheets Include करो
GSTR-1 summary compute करते समय local sales sheet और inter-state sales sheet दोनों का data include करना ज़रूरी है। किसी एक को miss करने से turnover under-declare हो जाएगी। हमारा GSTR-1 Calculator Flipkart report upload करने पर यह automatically handle करता है।
ℹ️ सभी Excel Sheets Review करो
Flipkart की GST report एक Excel file है जिसमें अक्सर कई tabs होती हैं। Processing शुरू करने से पहले file की हर sheet review करो ताकि सभी transaction details और credit notes accounted हों।
6. ये गलतियाँ बिल्कुल मत करें
GSTR-1 time में Flipkart sellers यही errors करते हैं।
❌ ये गलतियाँ मत करो
- Flipkart Seller App से download करने की कोशिश। App के अंदर tax report option नहीं है। Browser use करो।
- Phone में Seller App install रहते browser खोलना। App में redirect हो जाएगा। Computer use करो या app temporarily uninstall करो।
- Report request के लिए आखिरी filing day तक इंतज़ार करना। Generation में 24 घंटे तक लग सकते हैं। 2–3 दिन पहले request करो।
- सिर्फ local sales sheet process करना और inter-state sheet भूल जाना (या उलटा)। दोनों चाहिए।
- GSTR return report की जगह Sales Report download करना। Sales Report एक general overview है — GSTR-1 filing के लिए GSTR return report चाहिए।
- गलत date range set करना। Date range हमेशा पूरा calendar month set करो (जैसे 1 से 30/31 तारीख)। Partial ranges incomplete data देते हैं।
7. Download के बाद क्या करें
Report ready है — अब इसे filed return में बदलो।
Flipkart GSTR return report download होने के बाद एक Excel file मिलेगी जिसमें multiple sheets होंगी — local sales, inter-state sales, HSN summary, और document series। अगला step है यह सब — साथ में Amazon और Meesho की reports भी अगर वहाँ sell करते हो — एक single state-wise और HSN-wise GSTR-1 summary में compile करना।
तीन platform reports में manually यह करना वो जगह है जहाँ ज़्यादातर sellers हर महीने घंटों time खोते हैं। Data formats अलग हैं, sheet structures अलग हैं, और एक calculation error mismatched return दे सकती है।
Thoiba Trader GSTR-1 Calculator Flipkart, Amazon, और Meesho की reports एक साथ accept करता है। तीनों upload करो, और 4 मिनट से कम में एक combined GSTR-1 summary output मिलती है — state-wise, HSN-wise, और portal के लिए तैयार।
📚 दूसरे Platforms के Download Guides